Re-syncing an Electronic Collection in Alma
Last edited October 29, 2025
Guidelines
If you have a widespread syncing issue for the whole e-collection, the ultimate resolution is to completely delete the IZ e-collection and add a fresh copy via the CZ. However, before you do a collection deletion, you need to check for the following:
- Acquisitions data
- Local data
- Inactive portfolios
- Local portfolios (display a house icon) – portfolios not linked to CZ
- Coverage statements in portfolios
- Override URLs in portfolio linking
- Internal and/or public display notes at the collection, service (authentication), and/or portfolio level(s)
extended export
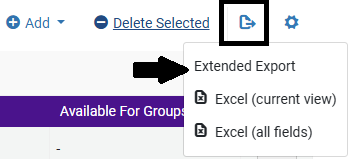
Even if your institution does not currently use Alma Acquisitions, it is still a good practice to download the “Extended Export” of the portfolios in the collection to check for Acquisitions and Local data. The spreadsheet also serves as record of your entitlements as they currently are in Alma. In Alma, do a search for the e-collection in the persistent search bar. When you find the collection in the results, click on the three ellipses/row actions menu to the right of the electronic collection name. Select “Edit Full Text Portfolios” from the drop-down. You are now in the Electronic Service Editor level and on the Portfolios tab. Within this tab, find the export icon which looks like a dog-eared page with an arrow coming out from the center and pointing right. If you roll over the icon with your cursor, it will say “Export list (up to 100,000 lines).” Click on this and select “Extended Export.” This menu is displayed in the image to the right of this text.
Depending on the size of the collection/the number of portfolios in the collection, this download could take some time (there are 99 columns of data!). When finished, open the download, which appears as a notification that pops out from the right when logged into Alma and is also emailed to you when the download is complete. The naming convention for this file is the name of the e-collection name with plus signs separating each word, followed by an underscore and the word, “portfolios” (with no quotations), example: JSTOR Open Access would look like this as a file name, JSTOR+Open+Access_portfolios. Open the download and check each column listed (the columns come with filters applied except the last column entitled, “Notes”) in the table below to the corresponding column in the spreadsheet. If they have data, you will need to save this document for when you have deleted the e-collection and are ready to activate a fresh copy of the collection from the CZ.
Here are the columns to pay attention to in the spreadsheet:
- LOCALIZED - Any rows listed as "N."
- LOCAL DATE COLUMNS - FROM_YEAR, TO_YEAR, FROM_MONTH, TO_MONTH, FROM_DAY, TO_DAY, FROM_VOLUME, TO_VOLUME, FROM_ISSUE, TO_ISSUE, EXPECTED_ACTIVATION_DATE, COVERAGE_STATEMENT (if any say “local”)
- AVAILABILITY - Any rows listed as "INACTIVE."
- NOTES COLUMNS - AUTHENTICATION_NOTES, PUBLIC_NOTES, INTERNAL_DESCRIPTION, NOTES
- ACQUISITIONS COLUMNS - LICENSE, LICENSE_NAME, COLLECTION_LICENSE, COLLECTION_LICENSE_NAME, PDA, EBA, PO_LINE
- URL - If a URL is listed here, it is an override URL/local URL.
Once you have completed your review and decided to save or not save the Extended Export, here are next steps:
When the Extended Export contains zero Acquisitions and Local Data (everything is Global Data/Default)
If it is clear from the Extended Export file that no local data are present, you may delete and then reactivate the collection, selecting all portfolios.
- Delete the e-collection and bib records. The link will direct you to CARLI documentation on deleting e-collections and their bib records. Note: It is recommended to do this deletion at slow times like early morning or end of day.
- When the deletion job is complete, you will receive an email notification from the system and if you are logged into Alma, you will see a box pop out from the upper right side of the screen notifying you the job is complete. After you receive the notification, then go to the Community Zone and activate the e-collection. The link will direct you to CARLI documentation on activating e-collections.
- When you are in the third step of the Activation Wizard where you select Activation Type for portfolios, you can select the top radio button “Activate all – Activation of the complete electronic collection with no selection of portfolios.”
- When the job completes, you will receive an email notification and if still logged into Alma, a pop out notification there. You can then update proxy service and/or linking parser parameters, if applicable. The link will direct you to CARLI documentation about linking parser parameters.
- Last step is to test access to portfolios to ensure they link out from Primo VE and resolve correctly.
- You can do this from Alma by searching for the e-collection and clicking on the three ellipses/row actions menu to the right of the e-collection name in the results.
- From this menu, select “Edit Full Text Portfolios.”
- From the Portfolios tab in the Electronic Service Editor, you will see the listing of portfolios in the e-collection. Select a random portfolio and click the three ellipses/row actions menu to the right of the portfolio name. In this menu, select “Test Access.”
- You can click on the hyperlinked text that says, “Display in a new window” or the e-collection name, which is also hyperlinked.
- From this it should link resolve correctly.
- If not, review the service settings in the collection, service, and portfolio levels (all Community icons/Institution icons should be blue).
- If service is active in all three levels, check that proxy service is active at the service level only. If these check out, check the linking parser parameters in the service level, if applicable to ensure there are no typos. Double-check this against the portfolio linking by clicking on the row actions menu next to a portfolio and selecting “Edit Portfolio.” Then, click on the “Linking Tab.” Review the URL Syntax.
- If there are still errors after taking these review steps, submit a ticket to CARLI Support.
When the Extended Export contains ACQUISITIONS AND LOCAL DATA
These next sections highlight what to do with data in the Extended Export before deleting the e-collection, activating a fresh copy of the e-collection from the CZ, and using Portfolio Loader to manually load portfolios with the Extended Export file.
It is best practices to make a copy of the original download and save it as a “working version,” so that when needed you can compare your work to what is in the original download.
Note: Do not modify the structure and design of the spreadsheet. Leave column headers exactly as they are and in the order that they are. Any changes to these will cause errors when using the Portfolio Loader.
when there are pol(s) in the extended export
- Verify that the correct POL is attached to the correct portfolio.
- If not, modify the data in this cell to the correct POL or delete the data if there is no POL that contains the portfolio.
- If you find information in the POL in the Alma that should be in the spreadsheet, but is not add that information to the correct column, ex: the portfolio has a simultaneous user limit. This data may be added to a public display note, so users would know a maximum number of users can access the resource at the same time.
- Save your changes.
when the local data in the extended export contains inactive portfolios
- Delete the rows in the spreadsheet that contain the inactive portfolios. This will prevent them from being added to the e-collection and activated.
- If you discover you no longer have access to this portfolio, you can delete the entire row out of the spreadsheet.
- Save your changes.
when the e-collection contains localized portfolios
- These will be the rows in the LOCALIZED column with an “N.” These are portfolios that are not linked to the CZ.
- Review these rows and decide if they need to remain localized or if they can be linked to the CZ. If you decide they should be linked to the CZ, then change the “N” to “Y.” It is recommended to link all portfolios to the CZ, so they can be updated when there are changes to the portfolios as seen in the weekly Community Zone Updates Task List (CZUTL ka-zoo-till).
- If you discover you no longer have access to this portfolio, you can delete the entire row out of the spreadsheet.
- Save your changes.
when there are local coverage statements
- Review the rows that contain local coverage dates.
- Confirm the dates are correct by using the Test Access option in Alma. The steps for using this option are detailed in Step 5 of the “When the Extended Export contains zero Acquisitions and Local Data (everything is Global Data/Default)” section above.
- If you find dates need to be modified, edit these in the spreadsheet.
- If you discover you no longer have access to this portfolio, you can delete the entire row out of the spreadsheet.
- Save your changes.
when there are override url(S)
- Review the rows of the spreadsheet that contain URLs in the URL column. This is where override URLs are listed, regardless of their syntax: parser parameters or static URL.
- Test access to these to ensure they still link resolve properly. Directions for using the Alma “Test Access” feature are detailed in Step 5 of the “When the Extended Export contains zero Acquisitions and Local Data (everything is Global Data/Default)” section above.
- Modify linking information in the URL column, if applicable.
- If the global linking data resolves correctly, you can remove the URL from the URL column and it will defer to the global setting when you load the file.
- If you discover you no longer have access to this portfolio, you can delete the entire row out of the spreadsheet.
- Save your changes.
when there are internal or public display notes
- Review the notes and confirm if they are still applicable. If adjustments need to be made, edit these cells in the spreadsheet.
- If the note no longer applies, you can delete the data in the cell.
- Save your changes.
Collection Deletion, Re-activation, and Manual Load of Portfolios
Once you have reviewed the Extended Export file and made any modifications, you may delete the existing collection, then reactivate the collection, selecting manual activation. Reloading the extended export file will complete the activation of your portfolios.
- After you have reviewed the columns of the Extended Export and saved your changes log into Alma and delete the e-collection and the bib records. Note: It is recommended to do this deletion at slow times like early morning or end of day.
- When the deletion job has finished, you will receive an email notification and if logged into Alma a notification will pop out from the upper right part of the screen.
- Next, you will activate a fresh copy of the e-collection.
- When you are in the third step of the Activation Wizard where you select Activation Type for portfolios, you will select the third radio button that says, “Manual activation – activate electronic collection and manually select portfolios.” Selecting this will activate the shell of the e-collection and the full text service, but zero portfolios. The activation job should be quick, since no portfolios are being loaded via the Activation Wizard.
- When the activation job completes, you will receive an email notification and see a pop-out notification in Alma in the upper right of the screen. From here, click on the row actions menu to the right of the e-collection name and select “Edit Service.”
- From the Electronic Service Editor, click on the “Portfolios” tab.
- Click on “Load Portfolios.”
- This will take you to the Activation Wizard: File Upload screen. Select the following radio buttons: Institution, Portfolio Loader Format (Excel), Complete, and Validate Online. Check the box for Update portfolios. Then, in the File field upload the Extended Export and click the “Next” button in the upper right. Note: the file upload is last because if you do this before selecting your settings you will have to do re-select them.
- On the next screen will be a summary of your activation. If everything in the summary looks correct, click “Load” in the upper right. If the summary looks incorrect, click the back arrow/less than symbol (<) to the left of “Activation Wizard: Activation Summary,” and adjust the settings on this screen. Then click “Load.”
- When the portfolio activation job completes, you will receive an email notification and if still logged into Alma, there will be a pop-out notification in the upper right of the screen.
- Last step is to test access to portfolios to ensure they link out from Primo VE and resolve correctly.
- You can do this from Alma by searching for the e-collection and clicking on the three ellipses/row actions menu to the right of the e-collection name in the results.
- From this menu, select “Edit Full Text Portfolios.”
- From the Portfolios tab in the Electronic Service Editor, you will see the listing of portfolios in the e-collection. Select a random portfolio and click the three ellipses/row actions menu to the right of the portfolio name. In this menu, select “Test Access.”
- You can click on the hyperlinked text that says, “Display in a new window” or the e-collection name, which is also hyperlinked.
- From this it should link resolve correctly.
- If not, review the service settings in the collection, service, and portfolio levels (all Community icons/Institution icons should be blue).
- If service is active in all three levels, check that proxy service is active at the service level only.
- If these check out, check the linking parser parameters in the service level, if applicable to ensure there are no typos. Double-check this against the portfolio linking by clicking on the row actions menu next to a portfolio and selecting “Edit Portfolio.” Then, click on the “Linking Tab.” Review the URL Syntax.
- If there are still errors after taking these review steps, submit a ticket to CARLI Support.