Linking Records to the Network Zone
Introduction
CARLI consortial cataloging guidelines recommend that all permanent collections be shared with the Network Zone (NZ). An Institution Zone (IZ) record that is linked to the NZ is shared across the consortium, and updates made to that record by one institution immediately benefit all of the libraries sharing the record via that link. This saves time spent on record maintenance and provides a ready pool of records for copy cataloging.
Due to the size of the consortium, when we migrated from Voyager, our network zone catalog was constructed differently than usual. CARLI was tasked with migrating the Voyager union catalog over as the new NZ, while institution catalogs were migrated as is and then linked to the NZ after migration. The original NZ included a large number of duplicate records, frequently caused by the presence of distinct versions of records in catalogs that reflected different merge history.
As a result, not all of the records in an institution zone will have been linked to the network. As part of regular maintenance, CARLI encourages libraries to link their bibliographic records to the NZ to take advantage of the shared catalog. Library catalogers should also take care to not create duplicate records in the NZ, as only one NZ record per manifestation (i.e., OCLC control number, or OCN, as found in the MARC 035 $a) should be present. (This excludes Community Zone bibliographic records.)
Page Contents
- Scope for These Procedures
- Network Zone Linking Fundamentals
- Finding Unlinked Records
- Linking Records to the NZ in Batches
- Identifying and Resolving Multimatches
- Linking to the NZ in the Metadata Editor
Scope for These Procedures
These procedures are primarily targeted for records in an Institution Zone (IZ) for physical inventory and for any electronic inventory that does not use the Community Zone (CZ). These records may have been migrated from your previous catalog, imported in batches to your IZ, or copy cataloged from the NZ or from WorldCat.
Bibliographic records that are related through bound-withs, or "host bibliographic records," should not be shared with the network. The host bib and the component bibs should all be retained in the IZ only. See documentation on Bound-with Practices for more details.
CZ records are excluded from this process. The Network Zone automatically inherits a copy of any records that are linked between an IZ and the CZ.
Records may be linked to the NZ, one-by-one in the metadata editor, or in batch using a job. Records may also be unlinked from the NZ using similar procedures.
Network Zone Linking Fundamentals
Linking on OCLC Control Number
In general, linking between an IZ and the NZ is based on matching of the OCLC Control Number, as found in MARC field 035 subfields a and/or z. The network zone uses the Unique OCLC Identifier Match Method as the default configuration for both serial and non-serial records. This method will be used automatically when working in the metadata editor to find matches at any time.
Alma recognizes different forms of the OCLC number in these fields and indexes them to the same identifier. For example, the following varations for the same identifier are recognized as equivalent.
- (OCoLC)12345
- (OCoLC)00012345
- (OCoLC)ocm00012345
- ocm00012345
At least one of these prefixes--(OCoLC), ocm, ocn, on--are required to establish the identifier as and OCLC control number. Other variations will not match. The following examples do not match as an OCLC number, as only the first sample has a valid prefix.
- (OCoLC)1102213456
- 1102213456
- (OCLC)1102213456
- #1102213456
- OCLC#1102213456
Alma will check both 035 $$a and 035 $$z for a matching control number. This supports the ability to match records that had been merged in WorldCat.
Record Precedence; Linking versus Merging
The network zone is a shared catalog repository. Once a record is added to the NZ, updates to that record must also be made at the NZ level. For instance, a record may be updated in the metadata editor, updated by a merge from a WorldCat export (e.g., via Connexion or Record Manager), updated by a merge or overlay from an import profile, or merged and combined with duplicate bibliographic records.
The linking process attempts to contribute, or share an IZ record with the NZ. Linking may have three outcomes:
- If no matching records are found, the IZ record will be copied to the NZ as is, except for any local extension fields. Additionally, the IZ record will be linked to the new NZ record.
- If one matching record is found, the IZ record may be linked to the existing NZ record. Once linked, the metadata in the NZ record will take precedence over that of the IZ record, except that local extension fields will still be visible to the IZ. Alma does not attempt to merge or overlay the NZ record. The NZ record will remain as is.
- If more than one matching record is found, Alma will not attempt to link the NZ. Multimatches may be resolved through duplicate merge processes, or you may manually select a record to link in the metadata editor.
It is important to note that the linking process does not perform an overlay of or a merge between the NZ bib by the IZ bib. Other workflows should be followed to update the existing NZ bibliographic record.
Finding Unlinked Records
Perform a search on records with inventory. Use Physical Titles for records with holdings and items. Use Electronic Titles for records with electronic collections and portfolios.
Use the advanced search options to include specific attributes of records
- Is Linked equals No – Identifies whether the record is linked to the NZ. (Is linked also works with links to the CZ, but CZ linked bibs should also be linked to the NZ.)
- OCLC Control Number (035a) Is Not Empty – Record has an OCLC number in field 035a, in the format (OCoLC)############ or (OCoLC)ocm/ocn/on#########
- Library (Holdings) equals *your main library* and/or *your permanent collection locations*; for physical titles, this is important because you don’t want to include records from your Resource Sharing Library; you may be more selective than the library, for instance, excluding reserves locations.
The image below shows a sample advanced search for unlinked bibs with OCLC numbers and physical inventory in a library's Circulating Stacks (main).
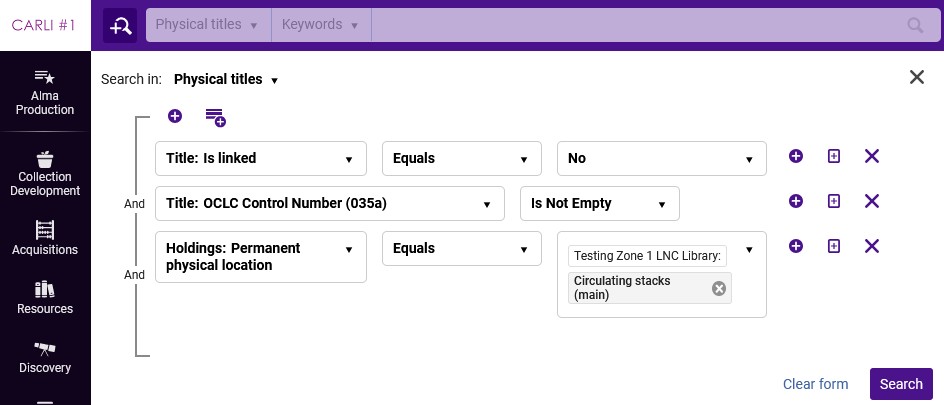
Click Search to perform the search.
You may choose to link individual records from the results by clicking Edit Record or Push to MDE.
You may also choose to create a set to work with these records over time or prepare to link batches using a job.
Creating a Set of Unlinked Records
- Create an advanced search as described above, and click Search.
- You may choose to refine the search further with facets or new terms.
- Click Create and Filter Set.
- Provide a set name and other details.
- Set Name is required; e.g., Unlinked titles for circulating stacks.
- Description and note are optional ways to share more about what the set contains or what steps you are taking.
- Set Content Type should be Physical Titles or Electronic Titles, depending on your search.
- Uncheck Private to make set visible to other staff that might need to review titles or that may run the job on the set.
- Click Save.
- The set will be found on the My Sets page (Admin > Manage Jobs and Sets > Manage Sets).
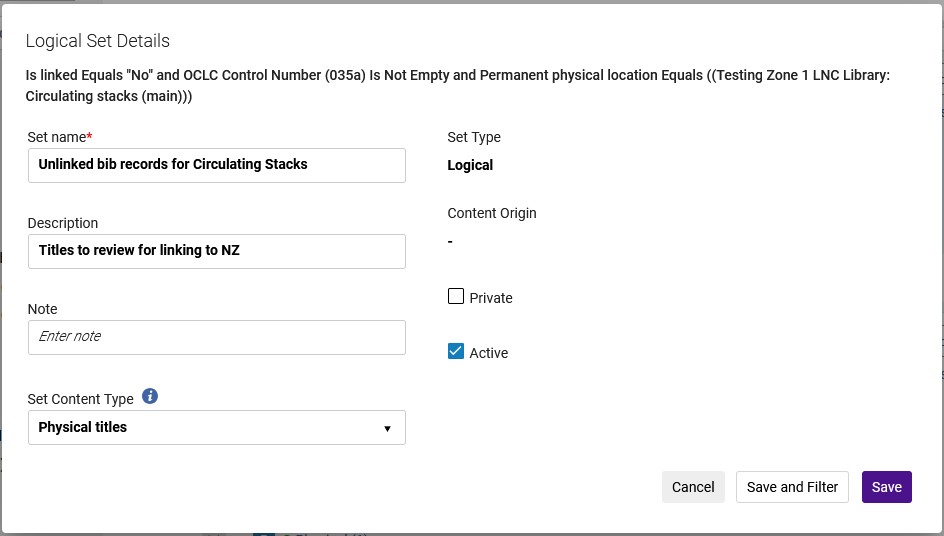
Note that this is a logical set, which is based on records matching the search parameters. You may use this set to keep the records organized as you work on them, but when you link records to the network, the records will no longer be part of the set. Create an itemized set if you wish to keep a static list.
Linking Records to the NZ in Batches
Alma provides a job named "Link a set of records to the Network Zone" that processes a set of titles with a match method to look for existing NZ records for linking. The linking job allows the choice of different match methods for linking, however, most users should use the standard Unique OCLC Identifier Match Method. Consult CARLI staff before using any other match method for linking to the NZ.
Begin with an itemized set of records. Itemized sets are static and will retain the member records after metadata are modified. Itemized sets may be created from logical sets, such as those made above, or from files, from Analytics, or through other set and search operations. These procedures continue with the set made above. Check documentation or contact CARLI support for other set creation options.
Itemizing the Logical Set of Unlinked Records
- Select the Admin menu > Manage Jobs and Sets > Manage Sets.
- Find the set that you created above (e.g., Unlinked titles for circulating stacks).
- Select the ... menu button for the set, then select Itemize.
- Alma will automatically populate the fields using the existing set information; you may modify them further as needed.
- Click Submit.
- Alma will present a pop-up that a job was started to add items to the new set.
- Alma will notify you when the job completes via a pop-up in the user interface, via the Real-Time Notifications menu (bell icon on menu bar), and via email.
To view the new set, refresh the sets page. Click the Content button to view the members of the set. Records may be removed from the set manually or filtered out with an indication rule.
Running the Link a Set of Records to the Network Zone Job
In order to run the Link a Set of Records to the Network Zone, a user must have either the Catalog Manager or Catalog Administrator role.
- Select the Admin menu > Manage Jobs and Sets > Run a Job.
- Find and select the Link a set of records to the Network Zone job; use the filter box to find the job faster. Click Next.
- Find and select the itemized set that you created above. Click Next.
- Enter Task Parameters for the job:
- Serial Match Method: Unique OCLC Identifier Match Method
- Non-Serial Match Method: Unique OCLC Identifier Match Method
- Ignore resource type during matching: leave this box unchecked
- Upon no match, Contribute IZ records: check this box.
- Click Next.
- Review and confirm the job details. Alma will automatically populate the Job Name, which will appear in the jobs list. You may modify this if desired. CARLI recommends making a screen capture of this screen, since later job reports may not present all of the parameters selected.
- Click Submit when ready to run the job. Alma will prompt for confirmation to run a job on the number of records in the set. Click Confirm when ready.
- Alma will notify you when the job completes via a pop-up in the user interface, via the Real-Time Notifications menu (bell icon on menu bar), and via email.
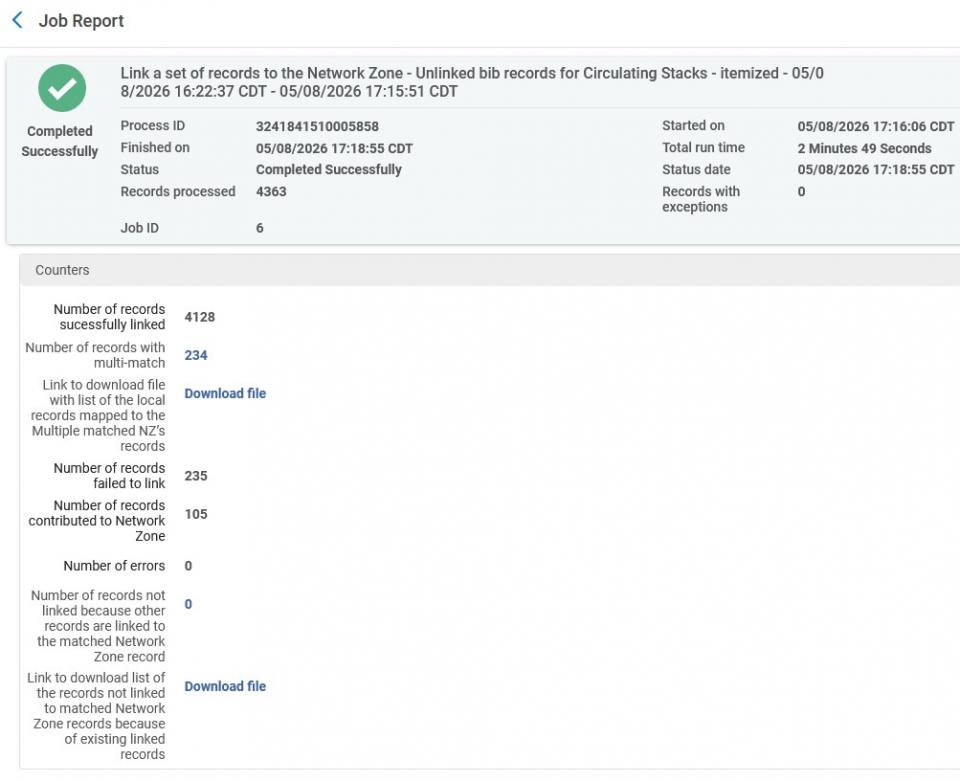
- The email report provides a summary of the job actions and totals, while the report available from the jobs history may include additional details, such as a multimatch file report.
- To view the job report and retrieve the multimatch report, select the Admin menu > Manage Jobs and Sets > Monitor Jobs. Click the History tab. Since jobs run throughout the day, your job may not be the top item on the list.
- Locate the job in the history list. Click the ... menu button to the right, then select Report.
- The linked value for Number of records with multi-match connects to a new set in your IZ containing the records that resulted in multi-matches.
- The Download File link provides a text document that identifies the matching records in the NZ for each IZ record. Click the link to download and open or save the file (according to your browser preferences). Larger files may take longer to prompt that it is okay to save or open the file.
Identifying and Resolving Multimatches
The multimatch file provides a list of your IZ records that matched to two or more NZ records according to the match method used by the job. Multimatches represent probable duplicate records in the network zone. These duplicates often cause problems for catalogers and for patrons reading Primo VE displays. Staff should investigate these multiple matches before attempting to link the records again, though individual records may be linked manually to a specific NZ bib using the metadata editor.
To promote a clean shared catalog, multiple matching NZ records must be merged or deleted, so that there is only one matching record. See Merging Network Zone Records for specific instructions to complete this in your IZ. CARLI staff and staff from the Cataloging Maintenance Center also periodically merge duplicates.
The Multimatch Report File
The report contains only MMS IDs rather than the actual matching values, so you may need to investigate each multimatch further. To begin, open the file in a text editor, such as Notepad or Notepad++. The file may be opened in Excel but the file is not tab-delimited or comma-delimited. You may find that processing the file in OpenRefine makes it easier to process in other programs.
The format of each file includes a row of data for each IZ record, and no headings. The left-most column of data is the IZ MMS ID. This is followed on the right by the NZ MMS IDs for matching records. These are listed in order, separated by semi-colons.
99228028205858 991033311969705816; 991106442869705816;
99218218205858 991023104609705816; 991033247869705816;
99112588205858 991046631509705816; 991157376684605816; 991157903529805816;
Tips for Preparing the Multimatch file
In Notepad or Notepad++: Perform a find & replace operation (typically Ctrl+H) on the data. Find your 4-digit institution code and a space (e.g., "5858 " for the image above), then replace with the 4-digit code and a semi-colon (e.g., "5858,"). Then save the file with a .txt extension. You may then open the file in Excel, and when prompted, select that the file is delimited, and choose comma as the delimiter. Be sure to select Text as the data type for each column, or MMS IDs may be truncated to scientific notation.
In Excel: Import the text file using the option for delimited files. Select space as the delimiter. Be sure to select Text as the data type for each column, or MMS IDs may be truncated to scientific notation.
In OpenRefine: Minimally, you will want to have the list of your IZ MMS IDs to match to OCLC numbers in analytics.
- Start OpenRefine.
- Choose Files, select the multimatch file, select Next.
- Select to Parse data as Line-based text files.
- Create project.
- Transform Column 1 using grel:value.replace(/5858 /,'5858,') --i.e., replace 5858space with 5858comma.
- Transform Column 1, split into several columns using , (comma) as a separator.
- Rename column 1 1 to IZ MMS ID.
- Rename column 1 2 to NZ MMS IDs.
- Trim whitespace from IZ MMS ID.
- Trim whitespace from NZ MMS IDs.
At this point, the file now has a single column of IZ MMS IDs that can be used in Analytics to pull a report of bibliographic details such as OCLC Control Number (035a) and OCLC Control Number (035a+z).
Additional steps could be used to create a single row for each IZ MMS ID and matching NZ MMS ID. However, you would need to request a report of matching values from CARLI support.
- Transform column NZ MMS IDs: grel:value.replace(/; /,';') --i.e., replace semicolon space with semicolon.
- Transform column NZ MMS IDs: grel:value.replace(/;$/,'') --i.e., replace trailing semicolon with nothing.
- Edit cells for NZ MMS IDs column > Split multi-valued cells on ; (semicolon).
- Select Show as Records.
- Edit cells for IZ MMS ID column > Fill down.
Linking to the NZ in the Metadata Editor
In the metadata editor, a cataloger may link, or share, an IZ record to the NZ. Linking is not automatic, however. As noted above, linking to the NZ may result in multiple outcomes.
- If the IZ record does not match on OCLC number to any NZ record, the record will be contributed to the NZ.
- If the IZ record matches one or more records in the NZ, then the cataloger must review and select the NZ record to link.
- If the IZ record matches one or more records in the NZ, but the cataloger does not select a record to link, then the record will be added to the NZ as a duplicate.
The last scenario is a common cause of duplicate records appearing in the NZ. Catalogers should avoid this by searching the NZ prior to linking, so that any possible matches may be found in advance and reviewed, and duplicates may be merged.
- Open a record for editing in the metadata editor.
- If the record contains any local data that should be retained, make sure to create local extension fields in the record and save the record before proceeding.
- If the record is ready to link, select Record Actions > Share with network.
- If one or more matching records are found, the editor will present a confirmation pop-up message. "Matched record/s exist in the catalog, do you want to view them before saving?"
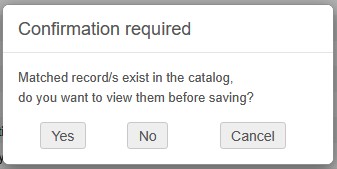
- Select Yes to view a list of matching records.
- Selecting No will add the record to the NZ without further attempt to link the record. Note that this may create a duplicate record in the NZ.
- Selecting Cancel will stop the linking process, allowing the cataloger to review and edit the IZ record further or search the NZ before continuing.
- The Editor will open a list of matching records. The record list does not indicate whether other libraries have holdings on any bibs. Records on the list have options for View, Link, and Edit.
- Select View to review the contents of the matching record without making changes. The record view screen includes an action box at the bottom to select either Edit or Link with an Execute button.
- Select Edit to open the record for editing. This does not link the IZ bib to the NZ, and it cancels the linking operation. There is no option to link the records while editing, and there is no option to merge or overlay records.
- Select Link to connect the IZ bib to the NZ bib.
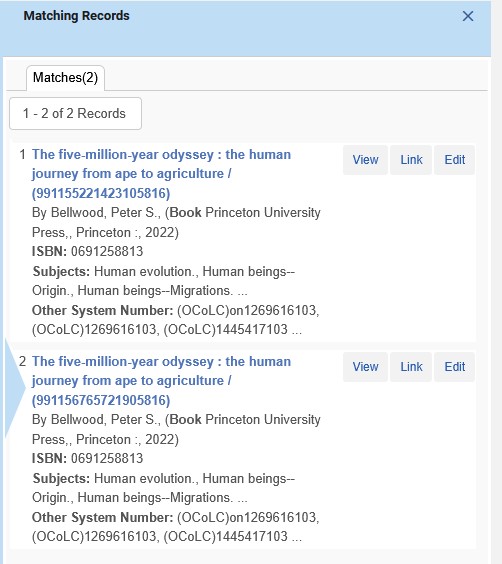
- After identifying the appropriate record to link, select Link (or Link then Execute from the record view). The metadata editor will refresh, and the record will show that it now uses the MMS ID for the network zone record. It may be necessary to refresh the record list. The editor workspace will now show the NZ record along with any local extensions from the IZ record.
- Release the record from the metadata editor.