Getting Started with SIS Synchronization in Alma
Student Information System (SIS) Synchronization (more commonly know as patron loads) is the most common way for a library to manage their users in Alma. In order for users (both students and staff) to use the library's services, Alma needs to know their information. That user information (such as name, address, user group, expiration date, etc.) is exported from a library's external Student Information System (e.g. Banner, and loaded into Alma on a regular basis to make sure it's kept up to date. Synchronization is different than a full load (record dump) in that Alma will compare the existing user records (if any) with the incoming records from the input file and only load/update those records (and fields within those records) that have changed. If a user record in Alma has data in a field and that data is not present in the incoming user record, the existing data will be overwritten (removed).
The following is a general outline for setting up a new SIS synchronization process in Alma. If your institution is new to CARLI/I-Share, but has an existing workflow from your current/previous SIS, that should make the transition to Alma easier. In most cases, you will need to work with your school's IT department to complete these steps:
1. Create the XML Data File
Resources
Your institution most likely has a department that manages their users' information locally via SIS software and is probably already exporting that data for use in various other systems. Exporting the data in the right format (XML, UTF-8) and sequence can vary depending on which SIS software you use. CARLI has developed a list of Patron Extract Resources that you can share with the department to hopefully make the Alma-specific export process easier. In addition to data maps and example patron extract scripts, the resources page also contains a link to Ex Libris' Rest User API documentation should you or your IT department be interested in using that method to update/maintain user records.
Internal vs. External Users
There are 2 different types of users in Alma: internal and external. Internal users are managed (created, updated) manually in Alma by library (and CARLI) staff. External users are stored and managed outside of Alma, usually in a Student Information System. These users’ information are loaded into Alma and are synchronized on a regular basis. It is possible to update an external user’s information manually in Alma, but these updates are overridden by the next synchronization. Certain fields such as identifiers (net ID, barcode, etc.) within a user record may be manually added and marked as internal so they are protected against any future synchronizations.
Managing Different User Groups
Most schools have both student and employee/staff users. For users that fall into both categories, you have to be intentional about order when creating the XML file and/or loading them in Alma:
- If loading student and employee/staff records in the same file, you need to place the user with priority (i.e. whether you want them to show up as a student or employee/staff) first in the file as Alma will reject the 2nd occurrence with the same primary ID.
- If loading separate files for students and employees, you need to choose which loads 2nd because that will be the one that has priority.
Mandatory Fields
User data are shared between institutions as a part of Alma's automated fulfillment network (AFN) architecture. In order to facilitate the sharing of resources, CARLI has established a set of I-Share Mandatory Fields for User Records in Alma, which includes information on the Importance of Preferred Addresses. Please be sure all mandatory fields are included in each XML data file you submit for synchronization.
SIS validation tool
During the XML data file creation process, you can choose to proactively run your newly created SIS file through CARLI's SIS Validator Tool. This tool can help you catch any XML schema errors and/or formatting issues before moving on to the next steps. More detailed information about the tool, including example output and how to intrepret it, can be found in How to Use the CARLI SIS Validator Tool.
2. Create an S/FTP Definition in Alma
This step is necessary to establish the secure connection that you or your IT department will be using to upload the XML data file created in Step 1 to an S/FTP server so that Alma knows where/how to access it. A full set of instructions on how to set up this connection is available at How to Create an S/FTP Definition in Alma.
3. Create a SIS Integration Profile in Alma
This step determines how Alma retrieves the XML file that was created in Step 1 and that will be uploaded in Step 4, as well as how it will process that data. It's also how you will run the actual synchronization process that loads the files, either manually or via the scheduling option.
- Log into your Alma instance.
- Select Configuration from the lower left corner of the Alma welcome screen to enter Alma Configuration.
- On the Configuration screen, select the General tab on the left side of the screen.
- Under External Systems, locate and select Integration Profiles.
Screenshot 1

- On the Integration Profile List screen, select +Add Integration Profile.
Screenshot 2

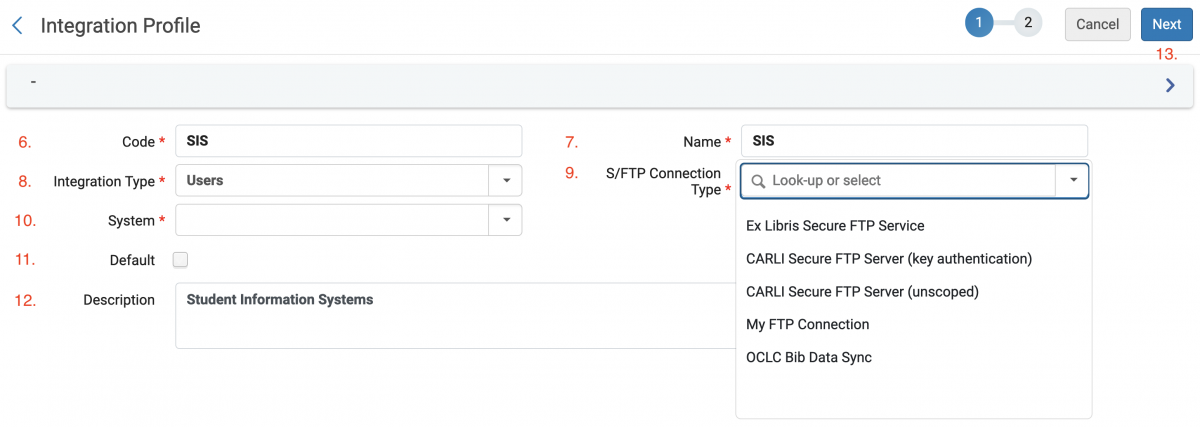
For steps 6-13, please refer to screenshot 3 below
- Enter a Code (i.e. SIS) which will be a unique identifier for the integration profile. Ex Libris and CARLI staff may use this code later in troubleshooting integrations.
- Enter the Name (this can be a copy of the Code from the previous step) for this integration; the name will appear on the Integration Profile List, in the Monitor Jobs list, and in emailed reports.
- As Integration Type, select Users from the drop down.
- After the Integration Profile screen refreshes, select your S/FTP Connection Type, as created in Step 2, from the drop down list. This connection determines how Alma will connect to and retrieve the XML data file you created in Step 1. For example, if you’re using CARLI’s secure ftp server, you would select CARLI Secure FTP Server (unscoped) or CARLI Secure FTP Server (key authentication).
- In the System field, select the student information system for this particular integration from the drop down lost; select Other if your system is not listed.
- Decide if you want to leave the Default box unchecked.
- Write a description for this profile if you wish.
- Select the Next button in the upper right of the Integration Profile screen.
Screenshot 3
- On the second Integration Profile screen, you will enter the details for the specific type of SIS integration you are creating. You will use only one type per integration. Mark the choice you will use in this integration as Active; other types should remain inactive. This documentation will focus on the Synchronization settings.
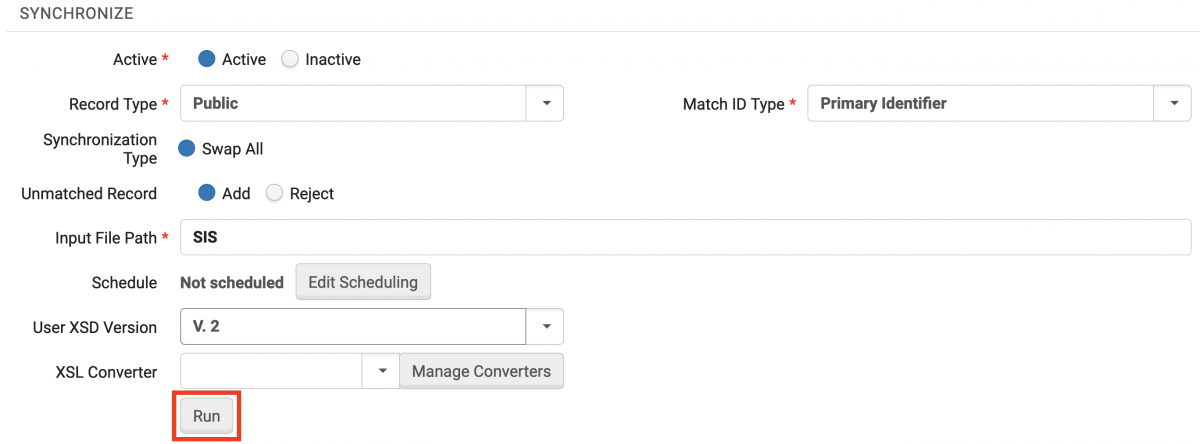
For step 15, refer to screenshot 4, below.
- The SYNCHRONIZE option will add new users to Alma and will update users already added previously to Alma with current information from the SIS (provided data are included in the XML user files).
- Set Record Type as Public.
- Set Match ID Type as Primary Identifier.
- Keep the Synchronization Type setting of Swap All.
- Keep the Unmatched Record setting of Add.
- Input File Path - enter the sub-directory on your FTP server where user import files will be placed. If using CARLI’s S/FTP server, enter SIS.
- For your initial testing period, keep the Schedule setting of Not Scheduled. To change this value at a later time, see Step 6: Production SIS Synchronization.
- Keep the User XSD Version setting of V. 2.
- XSL Converter (optional) - Select an XSL (eXtensible Stylesheet Language) converter to process the Integration Profile XML files with XSL before placing them in the output location. Select Manage Converters to view and edit the converter. For details, see Integration XSL Converters.
- Click the Save button in the upper right of the Integration Profile screen.
- Repeat the above steps for each separate SIS that you are integrating, or for different methods of adding users.
Screenshot 4

- Other Integration Profile (User) Types. For more information, please see the User Integration Profile Fields table here.
- IMPORT only adds users to Alma. Generally, this option is used for the initial import of users. A record is not imported if a matching record is found. Manually run this once, or once per year. Afterwards, use the Synchronize option. For more detailed information, see Ex Libris' documentation. Note: Once the integration profile has been saved, a Create Sample File option will appear. This option will create a new user XML file from an existing user. This enables you to preview the way in which a user XML file should be structured.
- EXPORT USER BY CONDITIONS is generally used to export users that are blocked and/or have unpaid fines. Configure any desired settings for the export, such as User Groups or the output file path. The file path setting will use the ftp connection chosen in step 9 above. If using CARLI's S/FTP server, enter ALMA or something besides SIS to avoid any potential interference with SIS synchronizations.
- EXPORT USERS is used to export old, inactive, or deleted users, or recently updated/created users (not for an ongoing full export of users).
- ONLINE IMPORT gets user information from a SIS using an external REST API, typically for one user at a time. If using this approach, enter the URL and credentials provided by your IT group.
4. Upload the XML Data File
- In order for Alma to retrieve and load the XML data file, it must first be zipped (using file compression software such as WinZIP) and then uploaded to an FTP server using your FTP client of choice (CARLI recommends WinSCP). The method (username/password or key authentication) and location (server) you upload the file to depends on how you set up the S/FTP Definition in Step 2 above.
- If using the CARLI FTP server (files.carli.illinos.edu):
- The standard directory is ~/upload/ALMA/SIS/.
- Authentication Method - when establishing the connection to the CARLI FTP server, you and your IT department will need to determine what method of authentication to use.
- username/password - whether your institution is new to CARLI/I-Share or is an existing member, you should have an xxxftp (where "xxx" is your institution's 3-letter code) account on the CARLI FTP server. The login information is typically sent to your institution's I-Share Liaison, but can be shared with any necessary staff. For more information on using your xxxftp account, please see CARLI's Secure FTP server documentation.
- key authentication - this method involves the creation of a key pair, which your IT department will most likely have to set up.
- One advantage of using key authentication is that it eliminates a potential point of failure. Key authentication uses a separate process that won't be affected should the xxxftp account password be reset. Otherwise, any automated scripts for uploading the XML file would fail if they aren't updated with the new login information.
- If using your institution's or a third party S/FTP server (if available):
- Your IT department should have any information necessary to connect and upload files to this server.
- Note: If using the CARLI S/FTP Server, CARLI's policy is to keep uploaded files for a maximum of 60 days before they are deleted. This should not be a factor as most libraries choose to set up a regular schedule for their loads, but it may it may limit CARLI staff's ability to troubleshoot issues with previous loads if they occurred longer than 60 days ago.
- If using the CARLI FTP server (files.carli.illinos.edu):
5. Test Load of SIS Synchronization XML File in Alma
Once the XML file you created in Step 1 has passed the SIS validation test (see SIS Validation Tool) and you've created the S/FTP Definition (Step 2) and SIS Integration Profile (Step 3) in Alma, you're ready to load a test file into Alma.
- Create a subset of the full XML file to use as a test file containing no more than 10 user records. If possible, include users from different user groups (undergrad, staff, etc.) to test if each type is loaded correctly. Once you are ready to move to Production SIS Synchronization in Step 6, you may choose to load multiple files (1 for each user group) simultaneously if that fits your IT workflow better. In either case, remember to keep loading order in mind, as outlined in the Managing Different User Groups section above.
- Upload the test file using the instructions from Step 4 above.
- Log into your Alma instance to access your newly created SIS Integration Profile. Unlike other jobs that can be run from the Admin > Run a Job menu, a SIS Synchronization job must be submitted from within the SIS Integration Profile.
- Select Configuration from the lower left corner of the Alma welcome screen to enter Alma Configuration.
- On the Configuration screen, select the General tab on the left side of the screen.
- Under External Systems, locate and select Integration Profiles.
- Click on Student Information System (or whatever name you chose) and select the Actions tab near the top of the page.
- Scroll down to the SYNCHRONIZE section, confirm the previously-entered information is correct and click on the Run (see screenshot 5 below) button to submit the job.
Screenshot 5
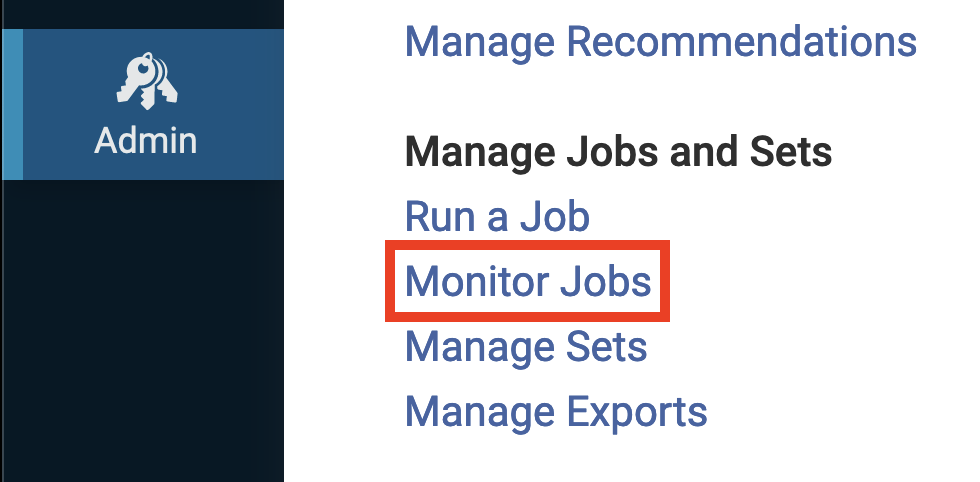
- After hitting Run, you should get a small notification in the upper right corner of the screen confirming that the Synchronize job was submitted. The notification includes a job number that you can click on (act quickly; the notification will disappear after several seconds) to take you to the Monitor Jobs section of the Admin menu. If you miss clicking on the job number in the notification before it goes away, you can also access the Monitor Job page by clicking the Back button in the lower left corner, then selecting Admin > Monitor Jobs from the side menu.
Screenshot 6
- Accessing the Synchronization Job Results - You can access the job results in 2 ways:
- Via the Monitor Jobs Page (see screenshot 7 below):
- The Monitor Jobs screen has 3 tabs at the top: Scheduled, Running (default), and History. Depending on the size of the file you're loading, the Synchronization job may already have finished running and will therefore not be listed in the Running tab. If the file is larger (i.e. a full production file) the job may still be listed in the Running tab. You can keep track of the status by periodically clicking on Refresh at the top right of the list.
- When the job has finished running, click on the History tab. The Synchronization job should be at or near the top of the list with the name "Users SYNCHRONIZE using profile Student Information System" (or whatever you named the profile). If not, you can sort the list by:
- Job Category - choose Users for SIS Synchronization jobs
- Status - the default is All, but you can filter to help narrow the list (e.g. All Successful, All Unsuccessful (which includes Failed, Skipped, Completed with Errors), etc.
- Date Submitted - the default range is the last 2 days; TIP: click the "X" in the Submit Date Range box to view results for the last 365 days.
- To view the Job Summary click the more actions button (...) at the far right of the "Users SYNCHRONIZE using profile Student Information System" entry and select Report from the drop-down list.
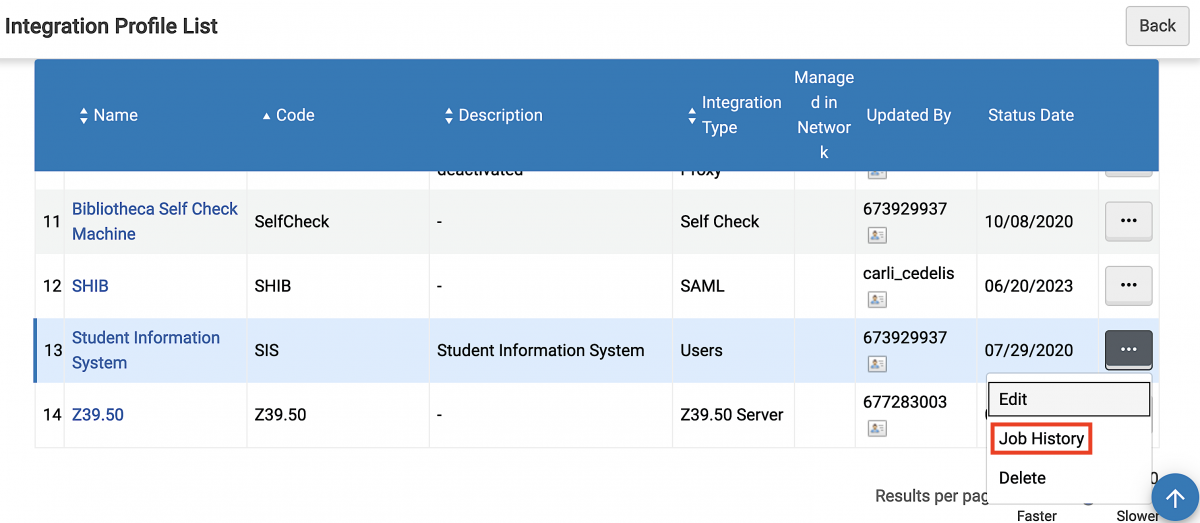
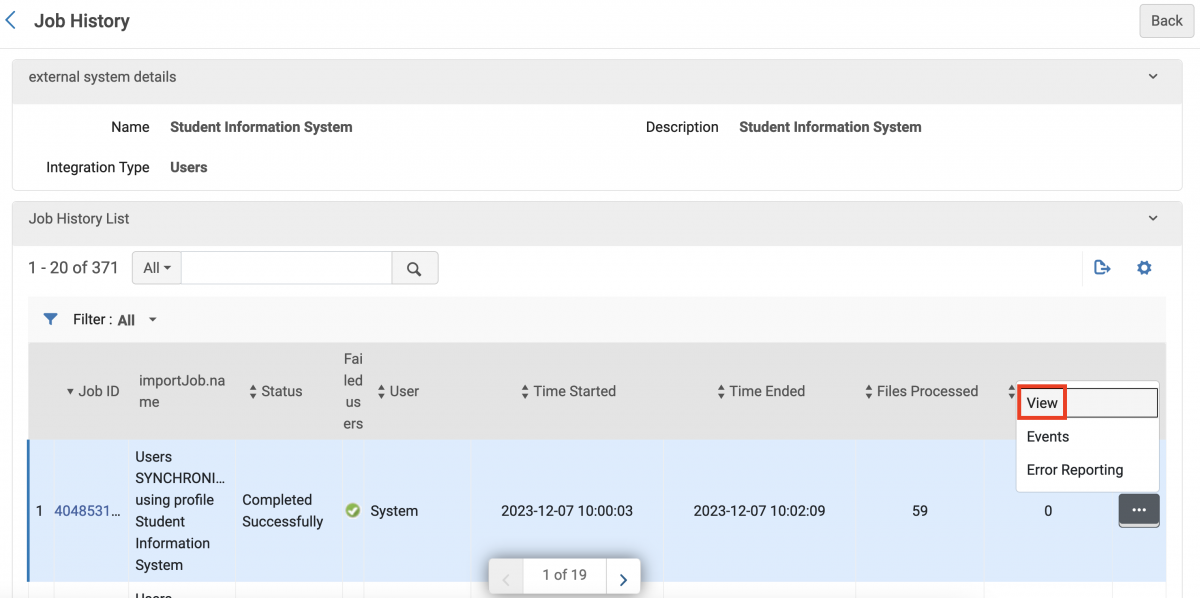
- Via the Integration Profile's Job History Page (see screenshots 8 & 9 below):
- If you miss clicking on the job number in the notification before it goes away, click on the back arrow (<) at the top left of the current Integration Profile screen. This will take you back to the Integration Profile list where you can click the more actions button (...) next to the SIS integration profile and select Job History from the drop-down list. Depending on the size of the file you're loading, the Synchronization job may take several minutes to show up in the list. If it's not listed at the top, you may need to click on either the Back button at the upper right or the back arrow (<) at the top left to exit the Job History page and repeat the steps above to try accessing the history again as there is no refresh option like there is with the Monitor Jobs page.
- Via the Monitor Jobs Page (see screenshot 7 below):
Screenshot 7

Screenshot 8
Screenshot 9
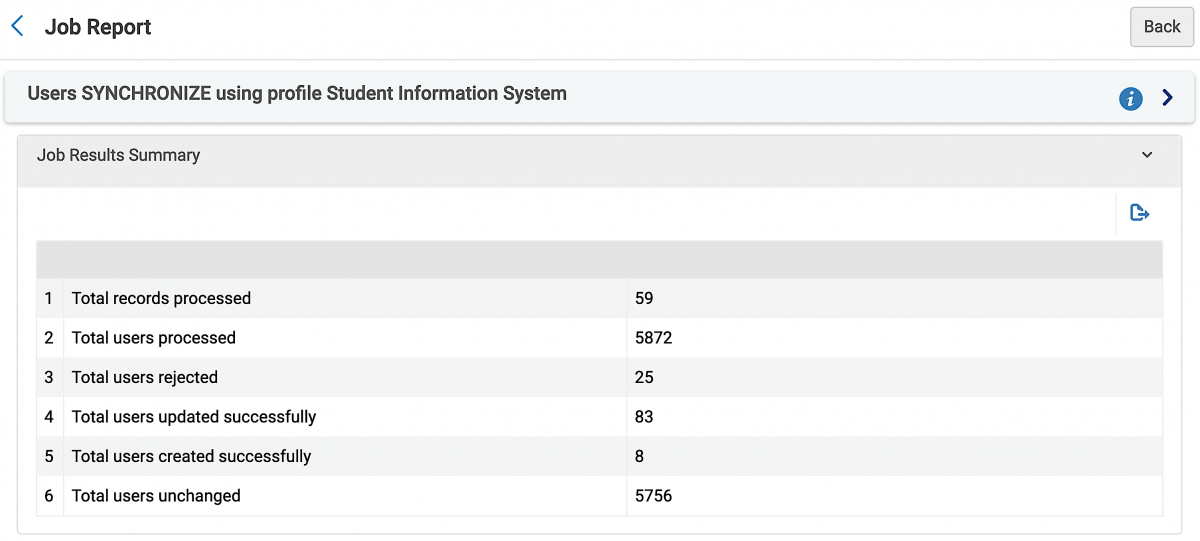
- Interpreting the Synchronization Job Summary Report
- The top of the Report screen shows a Job Results Summary (see screenshot 10 below) with counts for the following:
- Total records processed (this is an internal development label; this count is not relevant for customers but does have relevance for the Ex Libris Development team)
- Total users processed
- Total users rejected
- Total users updated successfully
- Total users created successfully
- Total users unchanged
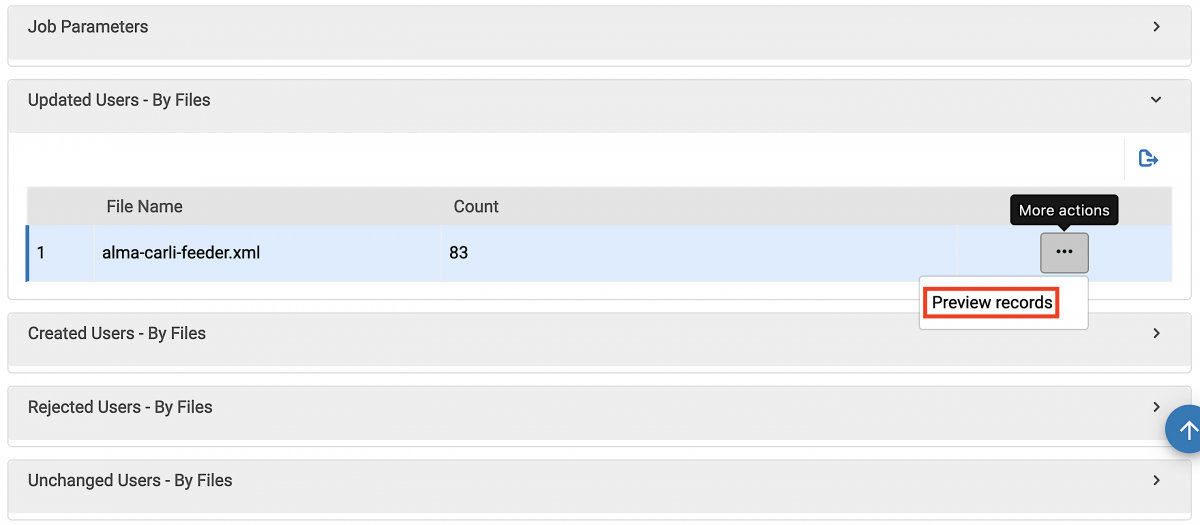
- Below the Job Results Summary, are some expandable categories (see screenshot 11 below). Each category has a count as well as the name of the XML file that was loaded.
- To view the specific user records from each respective category listed below, click the more actions button (...) at the right of the entry and select Preview Records
- Job Parameters - mostly information taken from the SIS Integration Profile settings (schedule frequency, input file path, record type, etc.)
- Updated Users - By Files - count of existing Alma users that were updated with new information from the XML data file(s)
- Created Users - By Files - count of users that were created with user information from the XML data file(s)
- Rejected Users - By Files - count of users that were rejected (and the associated reasons) from the XML data file(s)
- Unchanged Users - By Files - count of existing Alma users that weren't updated because no new information was included in the XML data file(s)
- The Rejected Users category contains the Identifier ID in addition to the error message that explains why the record was rejected. For help interpreting the reason(s) for rejection, please see CARLI's documentation on SIS Troubleshooting. If necessary, make refinements to the XML data file and run another test load.
- To view the specific user records from each respective category listed below, click the more actions button (...) at the right of the entry and select Preview Records
- The top of the Report screen shows a Job Results Summary (see screenshot 10 below) with counts for the following:
Screenshot 10
Screenshot 11
6. Production SIS Synchronization
Once you have successfully loaded a test XML file and are satisfied with the results, you should then determine whether you want the full production loads to be scheduled in Alma or manually run as needed.
- To set a schedule, access the SIS Integration Profile you set up in Step 3.
- Either click on the profile name or click the more actions button (...) and select Edit from the drop-down list.
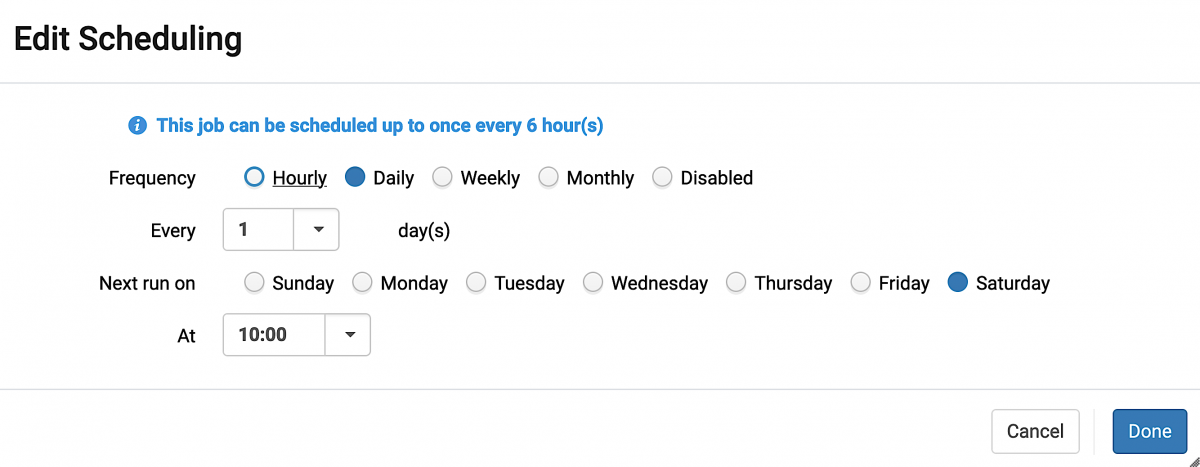
- Click on the Actions tab near the top, then scroll down to the SYNCHRONIZE section to find the "Edit Scheduling" button (see Screenshot 12 below).
- Frequency - Hourly, Daily, Weekly, Monthly (or Disabled to remove an existing schedule).
- Next run on - this setting determines when the first run of the new schedule will start.
- At - choose the time of day (24-hour clock).
- Click Done to save the schedule.
- TIP: Setting the schedule to "daily" offers the most flexibility. Alma will check for a new XML file each day and if one is not present, it will simply not process anything. That way, you can control the schedule entirely from your institution's side based on when you choose to export and upload a new XML file.
Screenshot 12
- Email notifications - If you'd like to have Alma send you (and perhaps other staff) an email of the post-load summary report, you can sign up that at the main Alma login screen by navigating to:
- Admin > Monitor Jobs > Scheduled tab
- At the top of the Scheduled tab, sort Job Category by Users
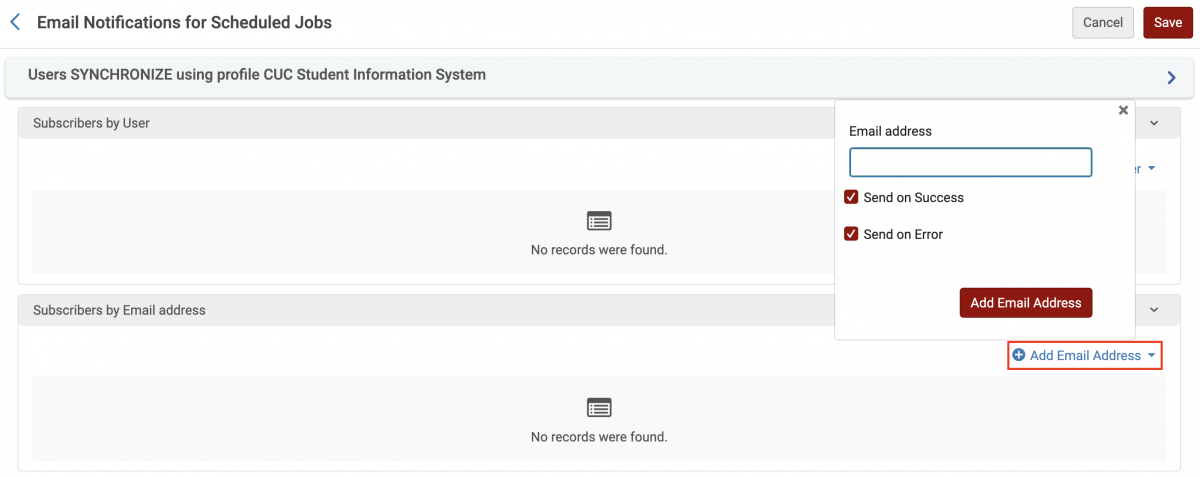
- Click the more actions button (...) at the right of the "Users SYNCHRONIZE using profile CUC Student Information System" entry and select "Email Notifications" from the drop-down list (see Screenshot 13 below).
- You can add yourself to the list by Alma user or by email address.
- You can also choose to be notified only when the job is successful, only when the job has errors, or both.
- Note: Alma also considers a SIS load successful if it runs at the scheduled time whether there's a file to be processed or not, so it's a good idea to pay attention to the record counts in the summary to see if records were actually loaded or not.
- Admin > Monitor Jobs > Scheduled tab
Screenshot 13
Other SIS-related Documentation
- How to Create an S/FTP Definition in Alma
- SIS Synchronization Troubleshooting
- CARLI's SIS Validator Tool
- I-Share Mandatory Fields for User Records in Alma
- Patron Extract Resources and Alternative Methods
- Importance of Preferred Addresses
- Ex Libris' Rest User API documentation