Products & Services
How To Create an S/FTP Definition in Alma
These instructions are part of CARLI's documentation on Student Information Systems (SIS) Synchronization, but can be used for the general purpose of setting up S/FTP definitions in Alma. For more information relating to SIS, please see Getting Started with SIS Synchronization in Alma.
These tasks should be performed by a staff member with Alma’s General System Administrator role
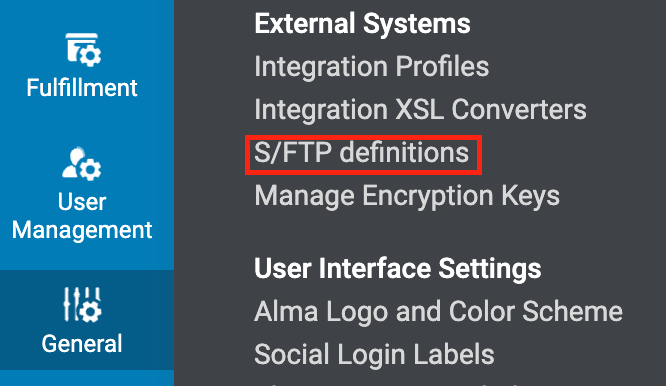
- On the Alma Configuration screen, select the General tab on the left side of the screen.
- Under External Systems, locate and select S/FTP definitions.
Screenshot 1
- Determine if you will be using CARLI's S/FTP Server, your institution's S/FTP server or a third party S/FTP server.
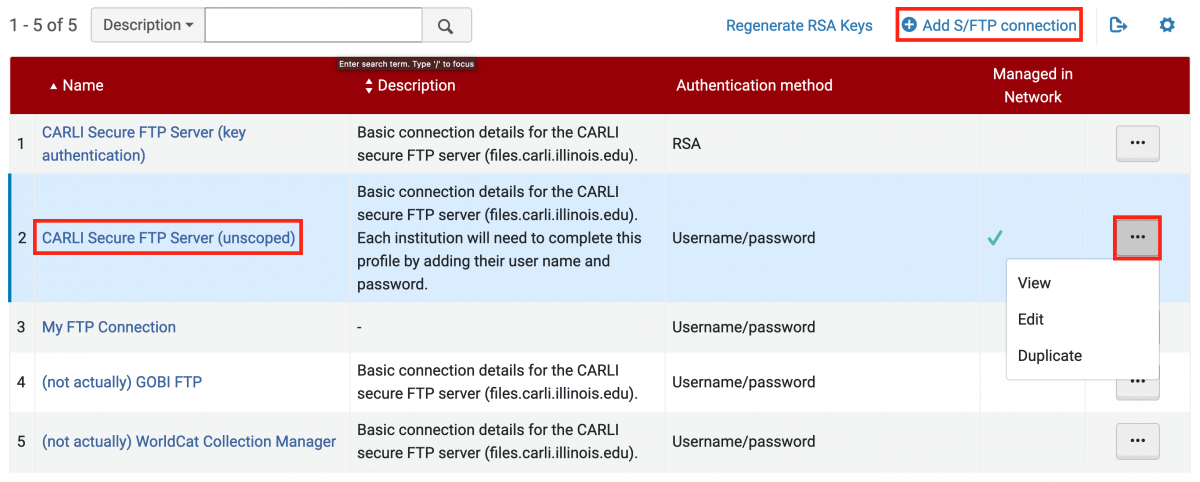
- On the List of S/FTP Connections screen (screenshot 2, below):
- If you will be using CARLI's S/FTP Server, there might already be an entry called CARLI Secure FTP Server (unscoped). It may have already been set up by someone else at your institution or by CARLI staff, but if you need to edit it (to add the username and password, etc.), select the row actions menu (the ... button) on the row for CARLI Secure FTP Server (unscoped) and select Edit to modify the current profile. Or you may select Duplicate to make an additional entry for a different use (i.e. setting up key authentication). If one does not exist, click on +Add S/FTP connection near the top-right of the list of connections.
- Continue below, with steps 5-20 which list CARLI's recommended values. Otherwise-
- If you will be using your institution's or a third party S/FTP server, click +Add S/FTP connection and consult with your IT group for the values to use for steps 5-20, below.
- If you will be using CARLI's S/FTP Server, there might already be an entry called CARLI Secure FTP Server (unscoped). It may have already been set up by someone else at your institution or by CARLI staff, but if you need to edit it (to add the username and password, etc.), select the row actions menu (the ... button) on the row for CARLI Secure FTP Server (unscoped) and select Edit to modify the current profile. Or you may select Duplicate to make an additional entry for a different use (i.e. setting up key authentication). If one does not exist, click on +Add S/FTP connection near the top-right of the list of connections.
Screenshot 2
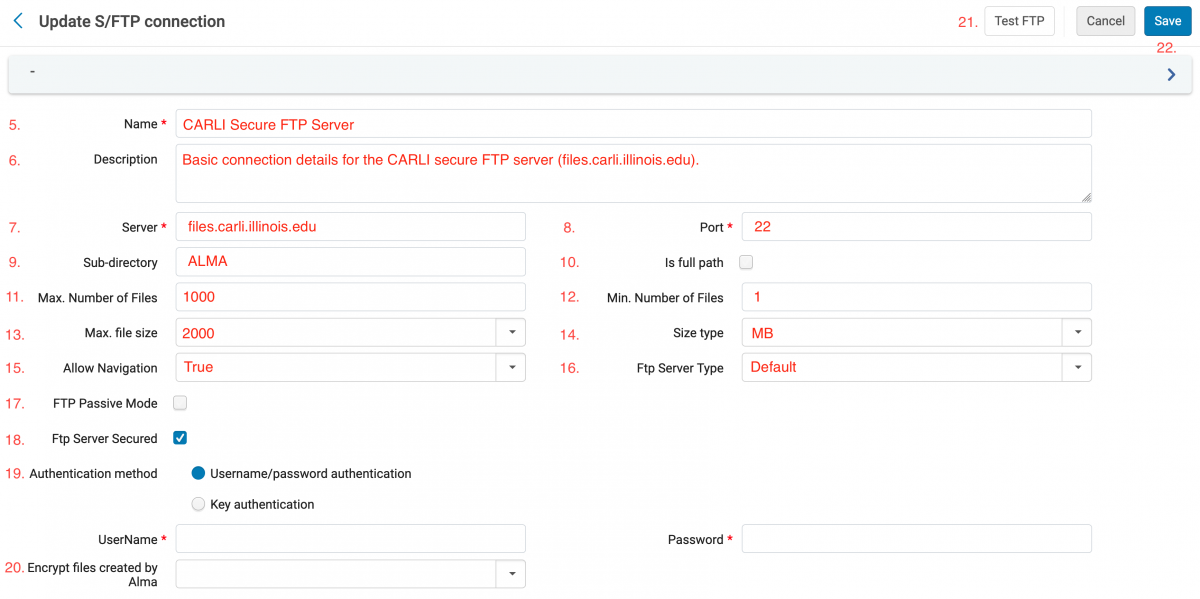
Steps 5-20 use CARLI's recommended values when using the CARLI S/FTP Server. Refer to screenshot 3 at the bottom of this page.
- Enter the Name of your ftp server connection. This name will appear in other Alma screens, so it should describe the connection unambiguously. Enter CARLI Secure FTP Server. You may wish to add further detail at the end of the name, such as (key authentication), if setting up the connection using that method to differentiate it from the other connections.
- Provide a Description of the server that will be helpful to others who view the configuration screen (e.g., server address, IT contacts, etc.)
- In the Server field, put the fully qualified server name of files.carli.illinois.edu.
- In the Port field, put in 22.
- In the Sub-directory field, specify the directory that the s/ftp connection should open, if different from the home directory allowed for the account. CARLI's recommendation is to use a value of ALMA (case-sensitivity is important so it matches exactly to the name of the /home/xxxftp/upload/ALMA directory on the CARLI Files server).
- Leave the Is Full path box unchecked.
- Increase the Max. Number of Files to 1000.
- Leave the Min Number of Files set at 1.
- Increase the Max. file size to 2000.
- Make sure that Size type is set as MB.
- Set Allow Navigation to True.
- Set FTP Server Type to Default.
- Set the FTP Passive Mode according to your IT group’s instructions
- Set FTP Server Secured as checked.
- Select whether the connection will use Username/password authentication or Key authentication. You and your IT department should determine which connection type is best for your setup.
- Username/password authentication - enter your UserName (xxxftp - where xxx is your institution's three letter code) and Password for the connection. Whether your institution is new to CARLI/I-Share or is an existing member, you should have an xxxftp account on the CARLI S/FTP server. The login information is typically sent to your institution's I-Share Liaison, but can be shared with any necessary staff. If no one at your institution has that information, you will need to contact CARLI by filing a support ticket via email to support@carli.illinois.edu. For more information on using your xxxftp account, please see CARLI's Secure FTP server documentation.
- Key authentication - this method involves the creation of a key pair. The private key remains stored in Alma and the public key that is generated during setup of this type of connection method needs to be added to a specific file in your xxxftp directory (contact CARLI for help with this). One advantage of using key authentication is that it eliminates a potential point of failure. Key authentication uses a separate process that won't be affected should the xxxftp account password be reset. Otherwise, if you're using a username/password-based s/ftp definition and forget to update the password there, Alma will not be able to connect to the CARLI Files server and retrieve files (such as for SIS synchronization).
- If you choose key authentication, the username field should be your xxxftp account (where xxx is your library's 3-letter code) and the key type should be RSA.
- The public key that is generated is what needs to be added to a specific file in your ftp directory on the CARLI Files server.
- Leave Encrypt files created by Alma blank.
- Select Test FTP in the upper right of the Update S/FTP Connection screen. If you have the correct permissions and sub-directory for your selected FTP server, the test should succeed. If the test fails, check your information and adjust the profile settings.
- Select the Save button in the upper right of the Update S/FTP Connection screen.
Screenshot 3