Alma Configuration: Digitization for Patron Requests
Digitization is the process by which a library can allow their users to request scanned copies of physical items from the library's collection. Directions for how to set up digitization at your institution are included on this page.
For directions on the day-to-day workflows for placing and processing patron digitization requests: How to: Processing Patron Digitization Requests in Alma.
Thank you to Ashtin Trimble from Black Hawk College for providing the ground work for this how-to page.
(created 6/9/2021)
Documentation on Configuring Alma Digitization for patron requests:
- CARLI Resource Sharing Committee Webinar: Digitization Dos and Don'ts- recording and companion documentation; presented November 20, 2020.
- Ex Libris Documentation: Configuring Digital Fulfillment
Implementing Digitization- Overview
The steps involved in implementing digitization for patron requests are:
- Planning how digitization should work at your institution.
- Specify/configure the location where digitization will occur.
- Modify the applicable Terms of Use.
- Modify the applicable Fulfillment Unit rules.
- Specify/modify patron digitization limits.
- Specify/modify document delivery rules.
- Configure digitization and copyright rules.
- Configure Primo VE digitization form.
- Modify/configure applicable display logic rules.
- Configure and enable patron-facing digitization letters.
- Assign roles for library staff.
Step 1: Planning how digitization should work at your institution.
Before you begin configuring digitization for patron requests in Alma, you will need to know the answers to several questions:
- Do you want digitization to be processed at the circulation desk or at a separate department?
- Will digitization requests require library staff approval before digitization work can begin? Or will requests be automatically approved?
- Will digitization requests require library staff to approve copyright clearance before digitization work can begin? Or will requests be automatically approved?
- Which local user groups should be able to request digitization?
- For which materials can patrons request digitization? From which locations and with which item types?
- Do you want to limit the number of digitization requests a patron can place simultaneously?
- Which staff with work with patron digitization requests? Which parts of the workflow will each staff member perform?
After you know the answers to these questions for your institution, you are ready to begin configuration.
Step 2: Specify/configure the location where digitization will occur.
Staff can perform the work of digitizing library physical materials for patron requests either in a digitization department, or at a circulation desk.
The options for configuration include:
- An institutional level digitization department.
- If your institution has multiple libraries; multiple libraries can share the institutional level digitization department.
- A library level digitization department.
- If your institution has multiple libraries, each library that fulfills patron digitization requests can have its own digitization department.
- A library's existing circulation desk.
The set up steps vary based on where your institution would like the digitization work to occur; directions for configuring each option are included below.
Select the option to use based on your answers to the questions in Step 1.
- Considerations:
- If your institution only has one library, common choices include using the institutional level digitization department, or using an existing circulation desk to process patron digitization requests.
- To configure digitization departments, you must have one of the following roles: General System Administrator or Fulfillment Administrator
Configuring the default institutional level Digitization department
Ex Libris includes an institutional level digitization department by default in each institution's Alma configuration; this department has the code of DIGI_DEPT_INST and name: Digitization Department For Institution. This default digitization department can be modified by your institution, if desired.
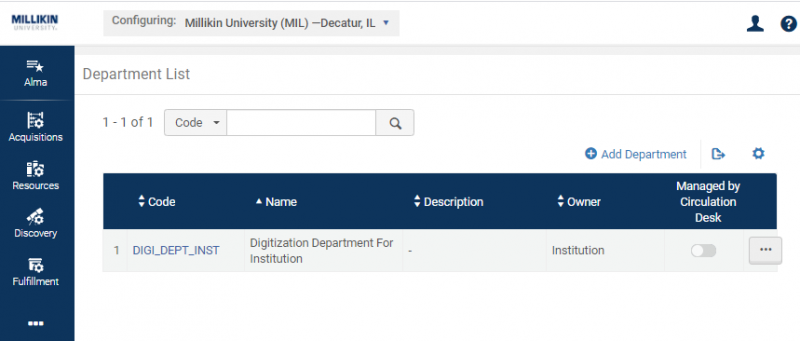
To edit the settings in the default DIGI_DEPT_INST digitization department:
- Open Alma Configuration at the Institutional Level.
- Select Fulfillment> Digital Fulfillment> Digitization Departments.
- Locate the DIGI_DEPT_INST in the list of digitization departments.
- Select the row action ellipsis button for the department, and choose the option to Edit.
- Optional changes that you can make to this department include:
- General Details tab:
- Name: Update the name of the department to better fit your institution's needs.
- Description: Add a description to help differentiate the department from other departments at your institution.
- Work Time(days): Enter the number of days after which an unfilled digitization request is expired.
- Map: Enter a URL to a map to assist users in finding the location of the digitization department.
- Default Printer: The printer that is associated with the digitization department can be selected from the Printer list. The digitization department prints all non-automated print jobs on this printer.
- Served Libraries tab:
- If your institution has not yet made edits to this tab, the value in the table should be your Institution's Name.
- If you want this digitization department to serve your whole institution and all of your libraries, no edits are needed.
- If you want this digitization department to only serve select libraries at your institution, you can use the row action ellipsis to remove your institution. Then, use the "Attach Library" option above the table to add only the libraries that you want to use the digitization department for.
- If your institution has not yet made edits to this tab, the value in the table should be your Institution's Name.
- Contact Information tab:
- If your institution has not yet made edits to this tab, the settings for addresses, phone numbers, and email addresses will be blank.
- You may add appropriate contact information, but, it appears optional.
- If your institution has not yet made edits to this tab, the settings for addresses, phone numbers, and email addresses will be blank.
- Operators tab:
- Use the "Add Operator" option above the table to search for library staff who should have the "Work Order Operator" role added to their staff roles, automatically scoped to this digitization department.
The role will allow the staff to process patron digitization requests for the Digitization Department.
- Use the "Add Operator" option above the table to search for library staff who should have the "Work Order Operator" role added to their staff roles, automatically scoped to this digitization department.
- General Details tab:
- After making your edits for the department, select Save to retain your changes.
Adding an additional institutional level Digitization department
If your institution would benefit from having multiple institutional-level digitization departments, you can add additional to serve your needs.
For example, if your library has multiple branches, and each branch has multiple libraries, you may wish to have an institutional digitization department for each branch, so that it can be shared by the libraries at that branch.
To add an additional digitization department for your institution:
- Open Alma Configuration at the Institutional Level.
- Select Fulfillment> Digital Fulfillment> Digitization Departments.
- Locate the "Add Department" option above the table listing the departments.
- The Department Details wizard will open to guide you through four configuration tabs:
- General Details tab:
- Code: Enter a meaningful code to represent this digitization department.
- Name: Enter the name of the department to fit your institution's needs.
- Description: Add a description to help differentiate the department from other departments at your institution.
- Work Time(days): Enter the number of days after which an unfilled digitization request is expired.
- Map: Enter a URL to a map to assist users in finding the location of the digitization department.
- Default Printer: The printer that is associated with the digitization department can be selected from the Printer list. The digitization department prints all non-automated print jobs on this printer.
- Select the Next button.
- Served Libraries tab:
- The default value in the table will be your Institution's Name.
- If you want this digitization department to serve your whole institution and all of your libraries, no edits are needed.
- If you want this digitization department to only serve select libraries at your institution, you can use the row action ellipsis to remove your institution. Then, use the "Attach Library" option above the table to add only the libraries that you want to use the digitization department for.
- Select the Next button.
- The default value in the table will be your Institution's Name.
- Contact Information tab:
- Optional: You may add addresses, phone numbers, and email addresses for departmental contact information. These details are optional. Select the Next button.
- Operators tab:
- Use the "Add Operator" option above the table to search for library staff who should have the "Work Order Operator" role added to their staff roles, automatically scoped to this digitization department. The role will allow the staff to process patron digitization requests for the Digitization Department.
- General Details tab:
- After completing the wizard for the department, select Save. Your new department is now added.
Adding a library level Digitization department
If your institution has multiple libraries, and each (or a subset of each) should have their own digitization department, you can set up a digitization department for a specific library.
To add an additional digitization department to serve a specific library:
- Open Alma Configuration to the Library where you want to add the department.
- Select Fulfillment> Digital Fulfillment> Digitization Departments.
- When the Department list opens, any institutional-level digitization departments that are configured to serve this library will display.
- Locate the "Add Department" option above the table listing the departments.
- The Department Details wizard will open to guide you through four configuration tabs:
- General Details tab:
- Code: Enter a meaningful code to represent this digitization department.
- Name: Enter the name of the department to fit your institution's needs.
- Description: Add a description to help differentiate the department from other departments at your institution.
- Work Time(days): Enter the number of days after which an unfilled digitization request is expired.
- Map: Enter a URL to a map to assist users in finding the location of the digitization department.
- Default Printer: The printer that is associated with the digitization department can be selected from the Printer list. The digitization department prints all non-automated print jobs on this printer.
- Select the Next button.
- Served Libraries tab:
- The default value in the table will be the name of the library where you are configuring; this is expected. Select the Next button.
- Contact Information tab:
- Optional: You may add addresses, phone numbers, and email addresses for departmental contact information. These details are optional. Select the Next button.
- Operators tab:
- Use the "Add Operator" option above the table to search for library staff who should have the "Work Order Operator" role added to their staff roles, automatically scoped to this digitization department. The role will allow the staff to process patron digitization requests for the Digitization Department.
- General Details tab:
- After completing the wizard for the department, select Save. Your new department is now added.
Configuring a library's existing circulation desk for Digitization work
For some institutions/libraries, it may be a better fit with staff workflows to perform digitization tasks while staff are logged into the circulation desk location, as opposed to needing to switch over to a separate digitization department in Alma to perform digitization work.
To configure an existing circulation desk to allow staff to process patron digitization requests:
- Open Alma Configuration to the Library where the circulation desk is situated.
- Under Fulfillment> Library Management> select Circulation Desks
- The Circulation Desks List will open.
- For the circulation desk where you want to enable digitization support, select the ellipsis, and choose the Edit option.
- On the General Details tab, locate the "Digitization Department" section.
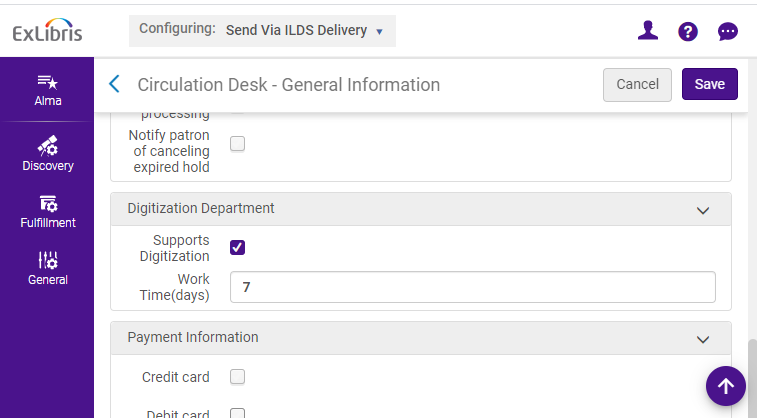
- Check/select the "Supports Digitization" check box. This will display an additional configuration field.
- In the "Work Time(days)" field, specify the amount of time after which a digitization request is canceled if staff are unable to process it.
- Save your changes to the circulation desk.
Step 3: Modify the applicable Request Terms of Use.
Modifying the Terms of Use to permit user digitization requests is simultaneously simple and complicated.
If you would like to schedule a consultation with CARLI Office Staff review and streamline your library's Request Terms of Use as part of enabling digitization, please email CARLI Support.
Instructions for the fundamentals of these edits, forthcoming.
Step 4: Modify the applicable Fulfillment Unit request rules.
Modifying the Fulfillment Unit request rules to permit user digitization requests is simultaneously simple and complicated.
If you would like to schedule a consultation with CARLI Office Staff review and streamline your library's Request Rules as part of enabling digitization, please email CARLI Support.
Instructions for the fundamentals of these edits, forthcoming.
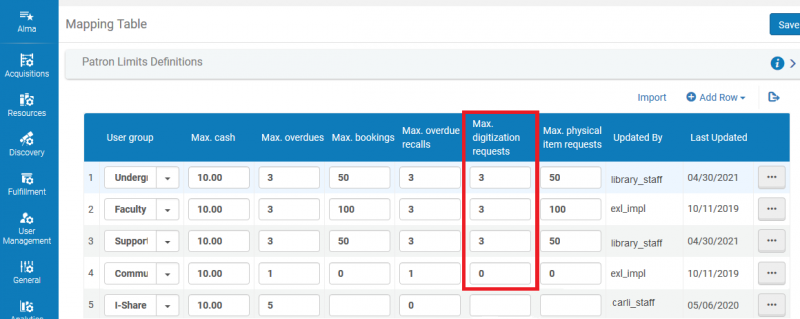
Step 5: Specify/Modify patron digitization limits.
In the Patron Limits table, you can set a limit on the number of digitization requests that a patron in a specific user group can request simultaneously.
To configure patron limits, you must have one of the following roles:
- General System Administrator
- Fulfillment Administrator
- Open Alma Configuration at the Institutional Level.
- Select Fulfillment> Patron Configuration> Patron Limits.
- Modify the values in the Max Digitization Requests column to meet your library's policies for each local user group. Do not edit the values for the I-Share user group.
- If you specify 0 for a user group, that group will not be able to place digitization requests.
- An empty column means no limits.
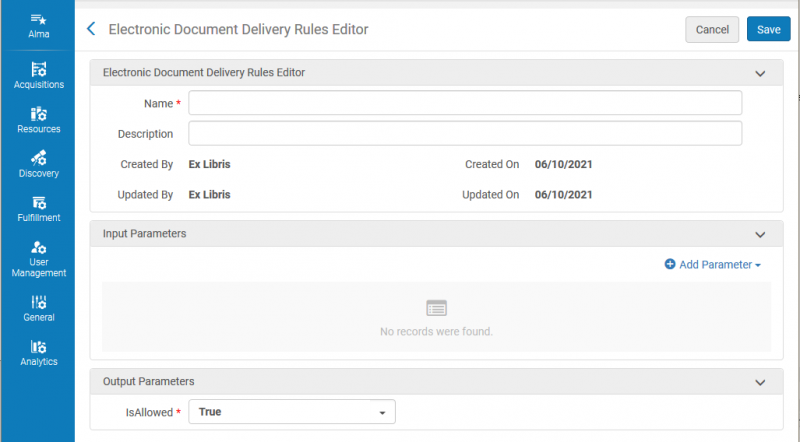
Step 6: Specify/Modify document delivery rules.
Document delivery rules give Alma permission to provide the digitized files to the user groups for which you've scanned the material.
The rules are set at the institutional level, and apply to all libraries at your institution.
To configure electronic document delivery rules, you must have one of the following roles:
- General System Administrator
- Fulfillment Administrator
Ex Libris Documentation: Adding Electronic Document Delivery Rules
- Open Alma Configuration at the Institutional Level.
- Select Fulfillment> Digital Fulfillment> Electronic Document Delivery Rules.
- At the top of the Electronic Document Delivery Rules List, select the option to "Add Rule."
- The Electronic Document Delivery Rules Editor will open.
- Your institution will want to add at least one rule to permit digitization-eligible user groups to receive document delivery. Here is an example for how you might choose to fill out the fields:
- Name: Enter a name
- Description:
- Input Parameters: Select the "Add Parameter" option.
- Name: Select "User Group"
- Operator: Select "In List"
- Value: Select all of the user groups at your institution who should be eligible for electronic document delivery.
- Output Parameters: Set to True.
- Save your new rule.
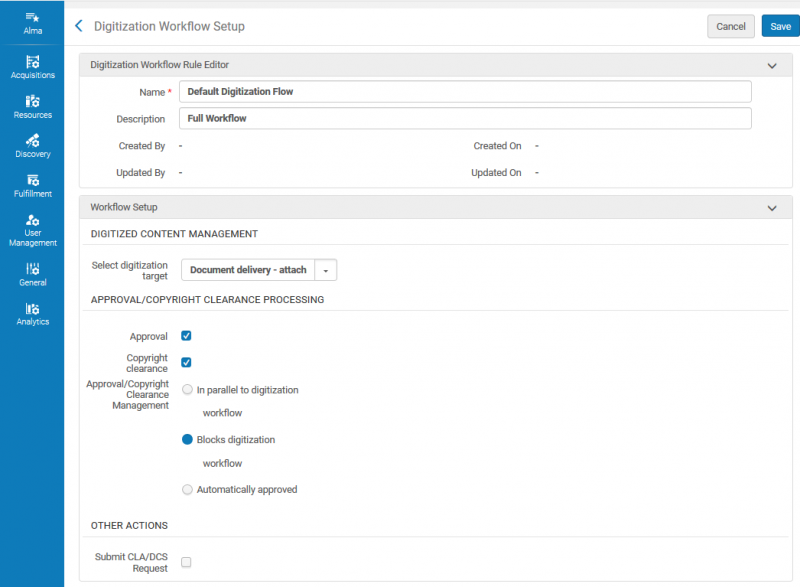
Step 7: Configure digitization and copyright rules.
With digitized files, library staff need to consider copyright provisions, whether or not staff need to approve a request before digitization work begins, and the methods used to deliver digital files to patrons.
Alma includes the ability to schedule both request approvals and copyright approvals into different parts of the digitization workflow. I-Share libraries using Alma have the choice between two file delivery methods for patrons. How those approvals are required or handled is set in the Digitization and Copyright Rules.
- Open Alma Configuration at the Institutional Level.
- Select Fulfillment> Copyright Management> Digitization and Copyright Rules.
- At the bottom of the table, locate the Default Digitization Rule and select the ellipsis from the row action, and choose Edit.
- Please note that the 12 rules included by default in the "Institution Rules List" portion of the Digitization Workflow Rules List are all disabled by default; this is as expected.
- If your institution would like to test more advanced rules for copyright and request approval than the default rule's settings described below, please email the CARLI Office; we'd be interested in piloting this workflow with you.
- The rule editor will open.
- Edits to make, based on institutional decisions, are noted below.
- Choosing how the user is sent the file:
- Under the Digitized Content Management section, locate the "Select digitization target" drop down menu.
- I-Share libraries can choose between two options in this list:
- Document delivery- attachment; sends the digitized file to the user as an email attachment.
- Document delivery- link; sends the user an email with a link to view/download the file. If this option is selected, you may enter the maximum number of times the user can access the document via the link, before the link expires.
- Do NOT select Digital Inventory (representation); I-Share libraries should not use this option.
- I-Share libraries can choose between two options in this list:
- Under the Digitized Content Management section, locate the "Select digitization target" drop down menu.
- Choosing whether or not staff need to approve a user's digitization request:
- Under the Approval/Copyright Clearance Processing section, locate the "Approval" checkbox.
- If checked, the library staff workflow will include a step for staff to review/approve the request.
- Under the Approval/Copyright Clearance Processing section, locate the "Approval" checkbox.
- Choosing whether or not staff need to approve the Copyright clearance of a user's digitization request:
- Under the Approval/Copyright Clearance Processing section, locate the "Copyright clearance" checkbox.
- If checked, the library staff workflow will include a step for staff to review/approve the request's copyright compliance.
- Under the Approval/Copyright Clearance Processing section, locate the "Copyright clearance" checkbox.
- If approval is required for the request or for copyright clearance, determine when that approval needs to be completed:
- If either the Approval or the Copyright clearance checkbox is checked, under the Approval/Copyright Clearance Processing section, locate the "Approval/Copyright Clearance Management" section. In this section, you will select when in the digitization workflow staff need to approve the request/copyright compliance.
- In parallel to digitization workflow: This option allows staff to begin digitizing a resource before approval is given. While the digitization workflow can begin without waiting for the approval task to be approved, the file will not be sent to the user until the approval task is approved.
- While the request is being processed, the representation (digital file) is marked as inactive.
- If the request is approved, the representation (digital file) is marked as active.
- If the request is rejected, the representation (digital file) is deleted.
- Blocks digitization workflow: The request workflow is activated only after the approval is completed.
- Automatically approved: A new approval task is created as Approved, and the request workflow continues.
- If Automatically approved is selected, you will see an additional menu for "Approval reason." Select the appropriate chose from the list of options.
- In parallel to digitization workflow: This option allows staff to begin digitizing a resource before approval is given. While the digitization workflow can begin without waiting for the approval task to be approved, the file will not be sent to the user until the approval task is approved.
- If either the Approval or the Copyright clearance checkbox is checked, under the Approval/Copyright Clearance Processing section, locate the "Approval/Copyright Clearance Management" section. In this section, you will select when in the digitization workflow staff need to approve the request/copyright compliance.
- Choosing how the user is sent the file:
- After your edits are complete, Save the rule.
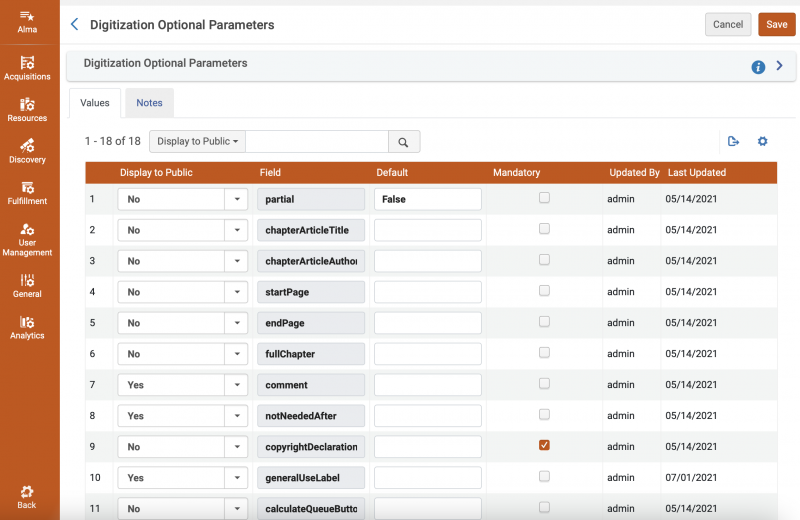
Step 8: Configure Primo VE digitization form.
While staff with appropriate roles may place digitization requests through Alma on behalf of users, more often, libraries offering digitization services to users will allow the user to request digitization through records found in Primo VE.
Your institution can configure which fields display in the Primo VE digitization form.
- Open Alma Configuration at the Institutional Level.
- Select Discovery> GetIt Configuration> Digitization Request.
- The Digitization Optional Parameters table will open.
- Review each field to determine whether it should display in Primo VE for your patrons requesting digitization.
- Display to Public: Select Yes if the field should be included in the digitization request form.
- Field: Shows the Alma code for the field that will be shown in the form if "Display to Public" is set to True. Knowing this Code, you can customize the field's display label. For more information on how to do this, see Customizing Primo VE Labels.
- Default column: In this column, you can specify a default value for the field. An empty field indicates there is no default value.
- Mandatory: Determines if a field in the Digitization form is mandatory.
- After making your edits, select the Customize button to save.
- After initial customizations have been made, the Customize button will be replaced with a Save button.
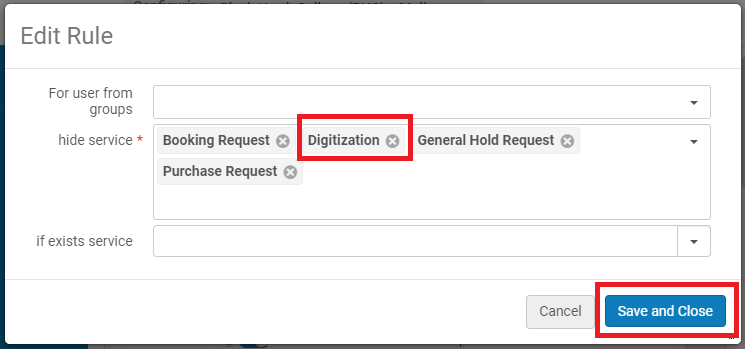
Step 9: Modify/configure applicable display logic rules.
Display Logic Rules determine when certain services and fulfillment options are offered to users in Primo VE.
In order to offer digitization as a service to your users, first double-check whether there is a Display Logic Rule that is currently hiding the Digitization service that needs to be removed. All I-Share institutions were set with a rule at migration to hide Digitization and General Digitization by default.
- Open Alma Configuration at the Institutional Level.
- Select Fulfillment> Discovery Interface Display Logic> Display Logic Rules.
Please Note: Before making any edits, some Display Logic Rules are consortially-required. Please do NOT modify any of the CARLI-Required Display Logic Rules for I-Share Institutions.
- Display Logic rules vary at each I-Share institution, so your list will look different than the list at another I-Share institution.
- In reviewing your institution's list of Display Logic Rules, you are looking for whether there is an Active status Rule Description that says "Hide service Digitization."
- In some institutions, there may be multiple services hidden using the same rule. For example, "Hide service Booking Request, General Hold Request, Digitization."
- If you locate a Rule that is set to "Hide service Digitization":
- If the rule only includes Digitization (and not also additional services, such as Booking Request, Purchase Request, etc.), either 1) Set the rule to inactive; or 2) use the row action ellipsis to delete the rule.
- If the rule includes additional services, use the row action ellipsis to Edit the Rule. Remove Digitization from the list of services to hide, and the "Save and Close."
- If you do not locate any Rules that are set to affect Digitization, no changes need to be made.
Next, consider if you would like to create any new Display Logic Rules to hide the Digitization service(s) under certain circumstances. For example, you could choose to hide the Digitization service when the item is requestable, or when the item is available in full text already. Please contact CARLI Support with any questions.
Digitization vs. General Digitization
The "Digitization" service displays in the request options in Primo VE at the title level when all Items lack text in the Description field, or when there are no holdings.
The "General Digitization Request" service displays in the request options in Primo VE when there are no items on the holdings record(s).
Your institution may choose to allow "Digitization" requests but use a Display Logic Rule to prevent "General Digitization" requests.
Step 10: Configure/enable patron-facing digitization letters.
Alma uses two letters to notify patrons that their scanned document is available.
The letter used depends on the delivery method selected in Step 7, number 5, "Choosing how the user is sent the file."
- Document Delivery- attachment; Alma sends the user the Ful Digitization Notification Item Letter if you upload a document.
- Document Delivery- link; Alma sends the user the Document Delivery Notification Letter if you specify a link to the scanned document.
To configure letters, you must have one of the following roles:
- General System Administrator
- Letter Administrator
- Open Alma Configuration at the Institutional Level.
- Select General> Letters> Letter Configuration.
- In the letter list, locate either the Ful Digitization Notification Item Letter and/or the Document Delivery Notification Letter, depending on which will be in use at your institution.
- It would be okay to go ahead and customize both, in case your institution decides to switch file delivery methods at some point.
- For the letter, select the row action ellipsis, and choose to Edit the letter.
- Modify the letter formatting and wording according to the needs at your institution. Please contact CARLI Support for assistance in working with Alma Letters.
- Save your changes to the letter.
- After completing your edits, toggle the "Enable" button to allow Alma to send the letter to the user.
- Save the letters list using the Save button at the top of the screen. (If you do not select to Save at the top of the letter list, your changes, including enabling the letter, may not be retained).
Step 11: Assign roles for library staff.
Depending on the workflow steps that staff may be completing as part of the digitization process, you may need to add addtitional roles to their user accounts.
- To manage the digitization of an item, staff need the role: Work Order Operator.
- To approve a digitization request, staff need the role: Fulfillment Services Manager.
- To create a digitization request in Alma on behalf of a patron, staff need the role: Fulfillment Services Operator.
- To log into a digitization department to perform tasks (aka, switch work location in Alma), staff need the role: Work Order Operator scoped to that department; this role can be applied automatically by adding the library staff member to the "Operator" tab in the department. See above, "Step 2: Specify/configure the location where digitization will occur," for more details.
- To work with the pick from shelf list to identify patron digitization requests for retrieval, staff need the role: Requests Operator, scoped to the library.