Cleaning up P2E (Physical to Electronic) Records in Alma for I-Share Institutions
Last edit 4/23/26.
There are several different scenarios that your institution may or may not have present in Alma as a result of the P2E process that was run during migration. Each of these will be described below with directions for cleaning up records, if needed.
Page Contents
Duplicate Active Portfolios
Relink Purchase Order Line (POL) associated with a P2E resource
Group ILS-migrated P2E portfolios into local collections to make them easier to manage
Link ILS-migrated P2E portfolios to CZ but retain ILS-migrated bib records
P2E Clean-Up Webinars
Duplicate Active Portfolios
Scenario: Duplicate active portfolios are created as a result of the Link Resolver and P2E Migration.
Cause: The P2E file from your former ILS contained your electronic resources that were cataloged in your former ILS, and these resources may have also been represented in your link resolver file (SFX, 360, etc.).
You have this problem if: Post-migration you see duplicates of active portfolios that represent the same title in Alma or duplicate entries in Primo VE—one that was created in P2E and another from the link resolver data.
Solution: The best solution is to remove the migrated former ILS bib record (and its portfolio) from Alma and retain the Community Zone (CZ)-linked portfolio migrated from your link resolver.
Steps to Remove the former ILS migrated P2E portfolio(s)
1. Identify a set of portfolios that represent an e-collection in Alma. Using your P2E file is a good way to find e-collections. Sort the P2E file by Column O or the 856 Field from your former ILS.

Another way you may find sets of portfolios is by simply running across duplicate entries in Primo VE, using the title found there you can refer to the P2E file and find the correct collection. Your P2E file used in the production migration is still available in your Institution’s Box Folder > Production Migration Folder.
NOTE: If your P2E portfolios have PO numbers in the P2E file and you want to link the PO Lines to portfolios in Alma, stop at this point, as these directions are for records with no POs. Instructions are provided for records with POs attached in the next section of this document, Relink Purchase Order Line (POL) associated with a P2E resource.
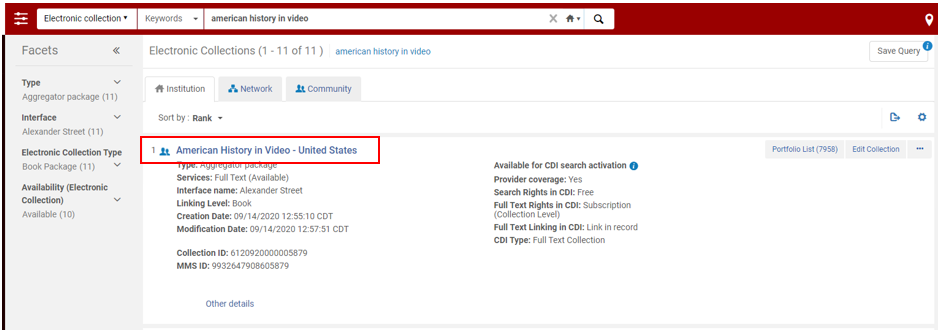
2. Verify that the e-collection and portfolios are activated (either through your link resolver migration or manually post-migration). In the example below, duplicated records from Alexander Street Press American History in Video are being cleaned up in Alma. The e-collection and portfolios are active in the Community Zone (CZ). We know this because the CZ icon - the two person icon - is blue indicating it is active. The screenshot shows the CZ icon and e-collection name outlined in a red rectangle.
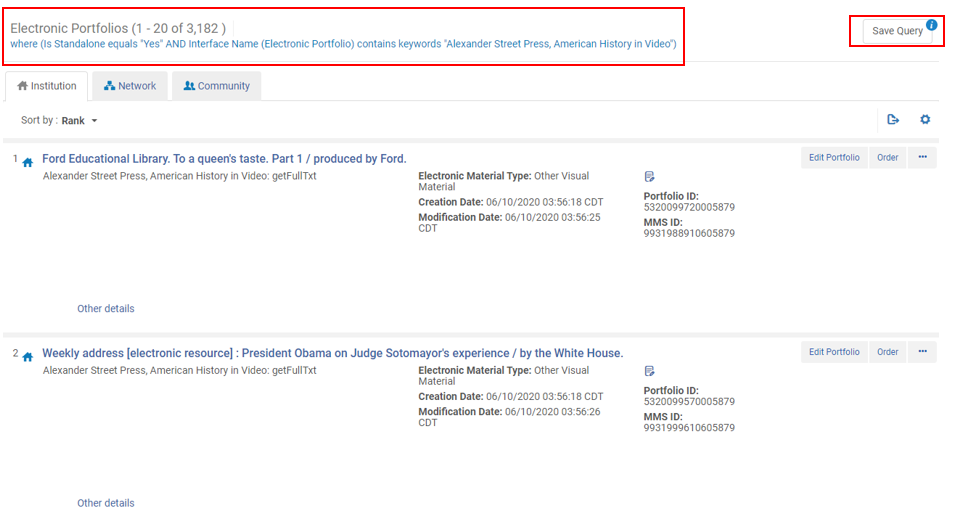
3. In Alma, using this same e-collection, create a set of standalone portfolios that are duplicate activations from your link resolver. Do this by performing an advanced search with: Electronic portfolios > Is Standalone > equals > Yes AND Electronic portfolio > Interface name > contains keywords> Alexander Street Press, American History in Video. Shown in the image below, a total of 3,182 standalone portfolios for Alexander Street Press, American History in Video were found. Click the Save Query button in the top right (shown outlined in a red rectangle below) to save your set.
Tip: another way to search for standalone portfolios is using the URL search parameter and using the base URL to identify standalone portfolios from the same e-collection.
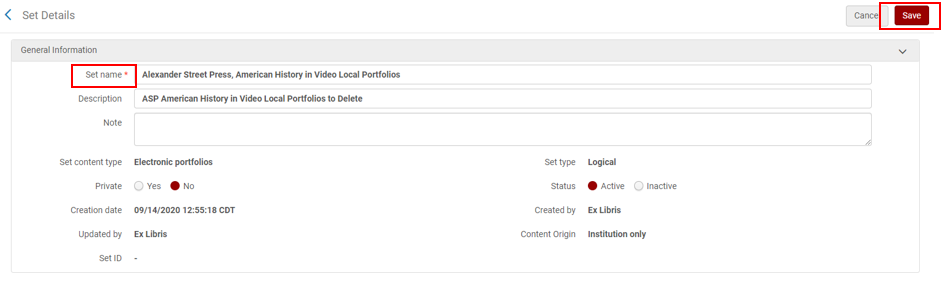
4. When you click the Save Query button, you will be taken to a "Set Details" screen as imaged below. Select a "Set name." You have the option of adding a Description. Click Save. Set name and Save are outlined in red rectangles in the screenshot that follows.
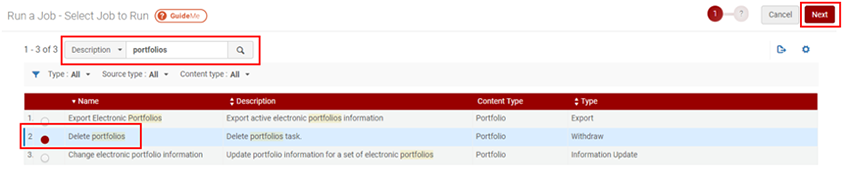
5. Next, you will want to run the Delete Portfolios job on the set you just saved. In Alma, go to: Select Admin > Run a Job. Once there, you can type the word "portfolios" in the Description field (make sure that Description is selected from the drop-down menu) and this will return all results for jobs with portfolios in the job description. The Delete Portfolios job should be in the list of results. Click on the radio button to the left of the job name and then click on the Next button in the top right of the screen. In the screenshot that follows, the Description field, Next button, and Delete portfolios job are all outlined in red rectangles.
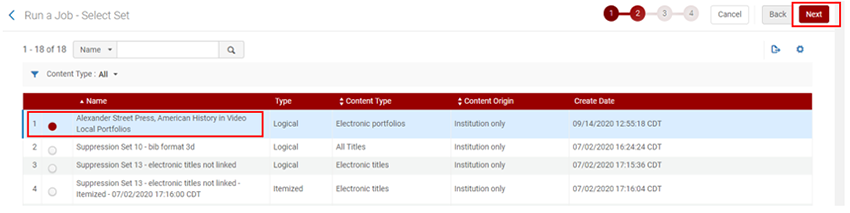
6. On the next screen, you select the set that you are running the job on. Find your set in the list of sets. You can use the field with Name selected from the drop-down menu to search the list of sets by the name. When you have located the set, click on the radio button to the left of the set name, and then click the Next button in the top right of the screen. In the screenshot below the Set name, "Alexander Street Press, American History in Video Local Portfolios" is outlined in a red rectangle, as well as the Next button.
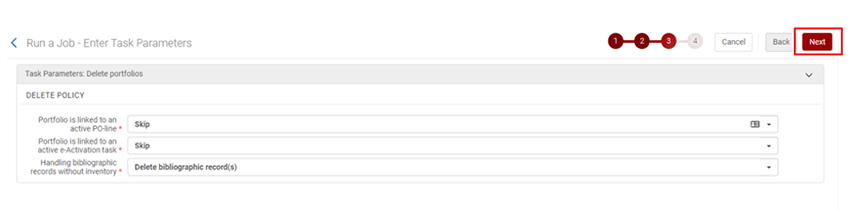
7. On the next screen you need to Enter Task Parameters. There are three fields to select from drop-down menus for DELETE POLICY, they are:
Portfolio is linked to an active PO-line, Portfolio is linked to an active e-Activation task, and Handling Bibliographic records without inventory.
In the example screenshot below, "Skip" is selected for Portfolio is linked to an active PO-line and also for Portfolio is linked to an active e-Activation task, and "Delete bibliographic record(s)" is selected for Handling bibliographic records without inventory. Once, you have made your selections, click the Next button in the top right (this is outlined in a red rectangle in the image below).
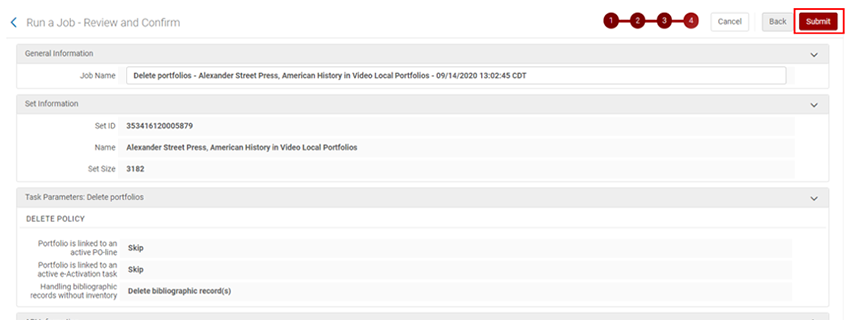
8. The final screen is to Review and Confirm. As seen in the image below, this screen shows General Information for the Job Name, the Set Information like Set ID; Set Name; and Set Size, and the Delete Policy Task Parameters that you selected on the previous screen. Once, you have reviewed these and they are correct, click on the Submit button in the top right (outlined in a red rectangle in the image below).
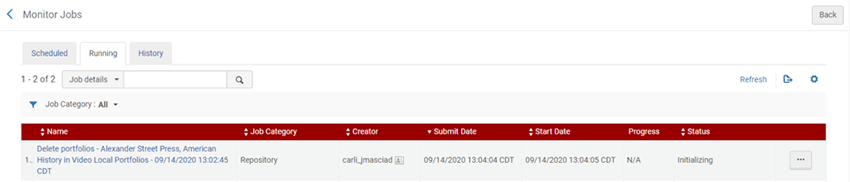
9. If you have time and want to keep tabs on the status and progress of the job you ran, you can view this from Admin > Monitor Jobs > Running tab. Depending on the size of the file, the job can minutes to several hours to complete. In the image below, the Monitor Jobs Running tab is displayed with a Delete portfolios job with N/A for Progress and Initializing for Status. If you stay on this screen and notice after a few minutes no change has occurred, you can click the Refresh button link in the middle right of the screen.
10. When the job has completed, it will move from the Running tab to the History tab in Admin > Monitor Jobs > History tab. From the History tab, you can click on a job report to view details of what occurred during the job. In the image below, the Job Report shows that 3,182 portfolios were successfully deleted.
Note: If any errors or failures to delete occur, they will be listed in the job report with their MMS ID to manually address.
Relink Purchase Order Line (POL) Associated with a P2E Resource
Scenario: A POL is associated with P2E migrated bibliographic records, but you would like it to be associated with your CZ linked records.
Cause: The P2E records represented your former ILS data, therefore any Acquisitions data is linked to those records.
You have this problem if: You used former ILS to keep track of Acquisitions data relating to electronic resources and want to link those POLs to different records in Alma.
Solution: You can relink the POL to the preferred record, then delete the record from the P2E process. This method can be applied to Databases, e-Collections, and Portfolios you migrated via P2E.
Steps to Move the POL from one Portfolio to Another
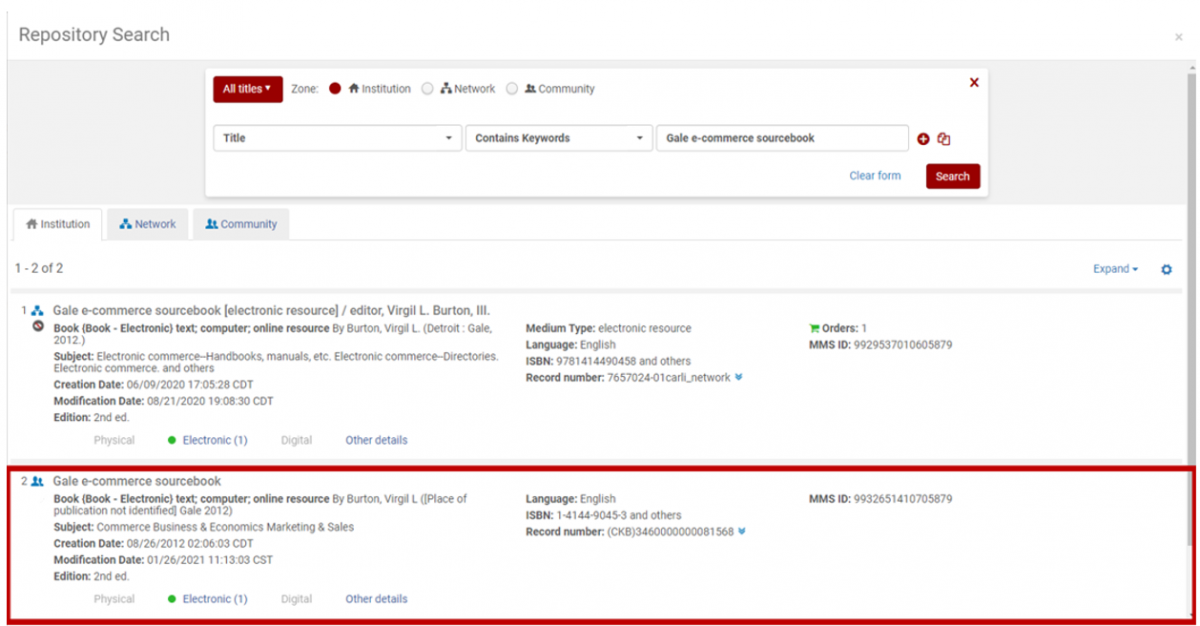
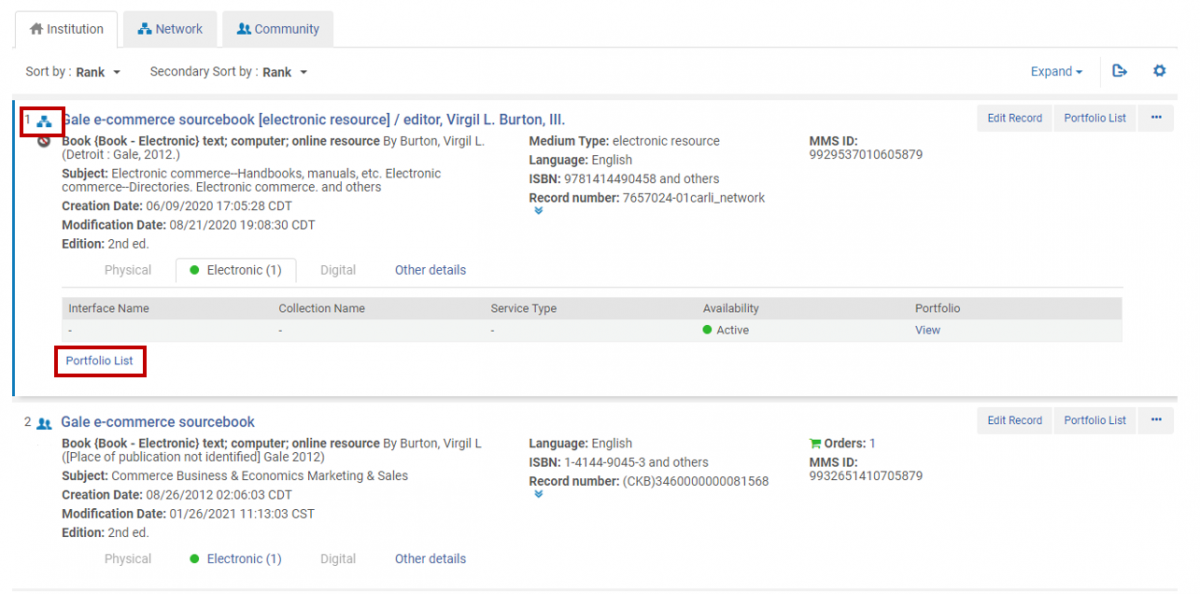
1. Do an All Titles search for the title you want relinked, in this case, “Gale e-commerce sourcebook” is the example in the image below.
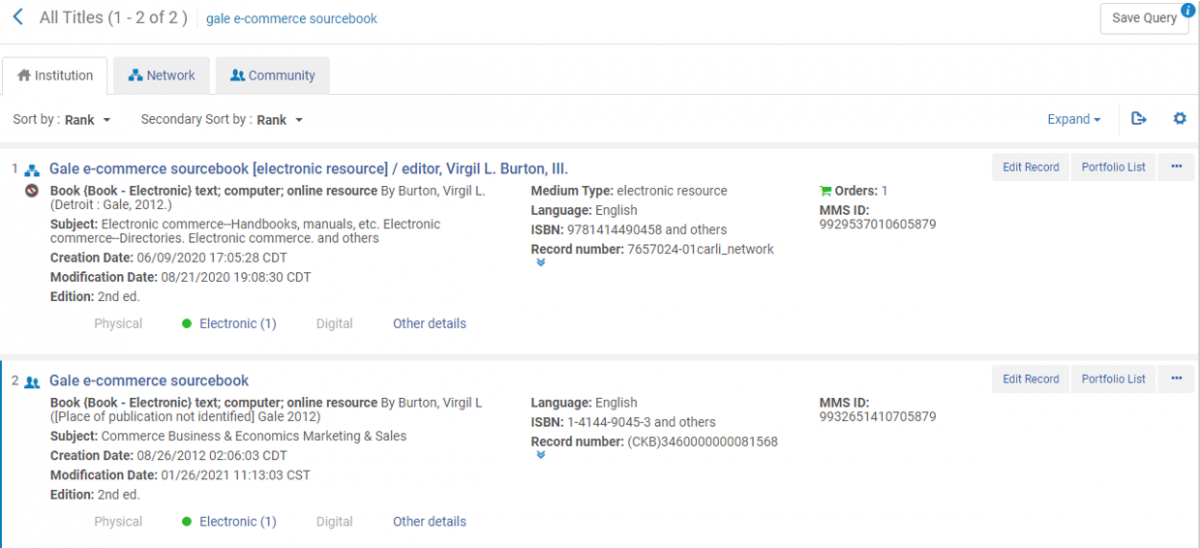
2. Identify the migrated record to be relinked. The migrated record will have a POL attached which is symbolized by a green shopping cart icon next to the word, "Orders" and the number of orders follows.

3. Select the hyperlinked number of orders to view Orders linked to this record. This is shown below outlined in a red rectangle.
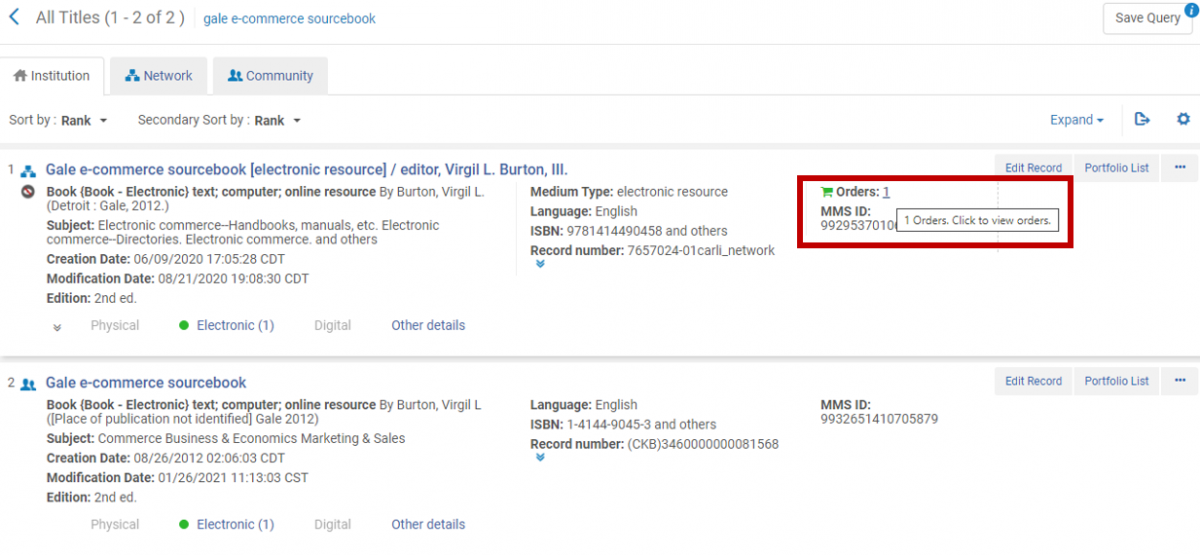
4. From the hyperlink, a button labeled, Change Bib Reference will display. Click on this button. It is outlined in a red rectangle in the image below.

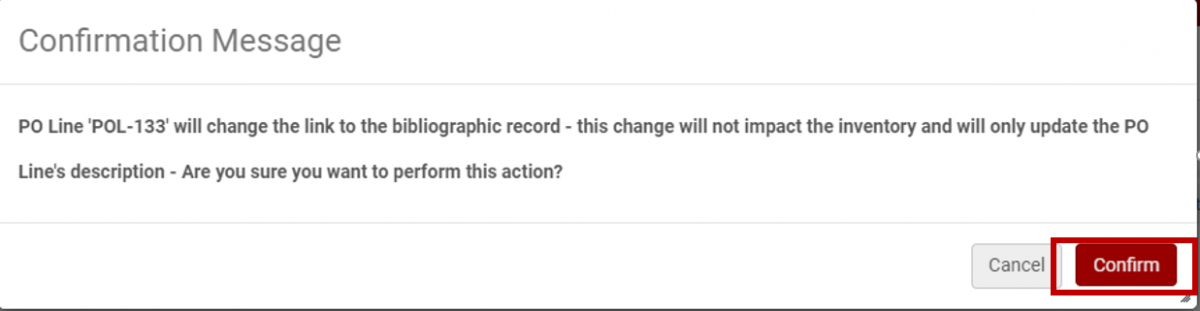
5. A Confirmation Message screen will pop-up. Click on the Confirm button. It is outlined in a red rectangle in the lower right corner of the image below.
6. The Repository Search screen opens with a Title and ISBN search as seen in the image below.
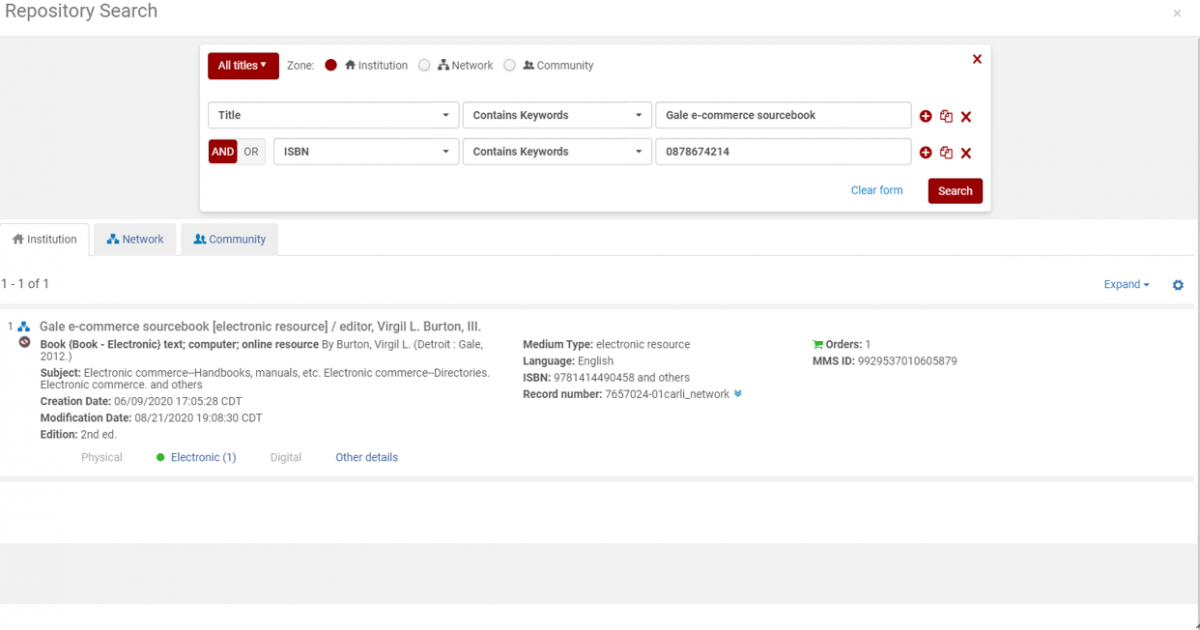
7. You may need to simplify the search (click on the red X to the right of the search field to remove it) to find your Community Zone record. In the following example image, the ISBN search fields were removed, so that only the title was being searched. The CZ linked record appears as the second search result in the image below and is outlined in a red rectangle.
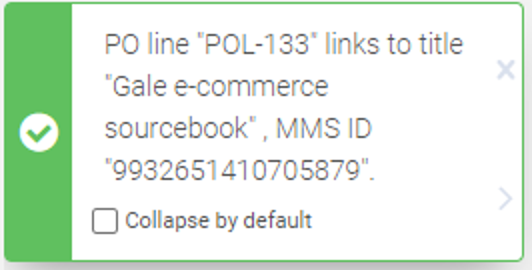
8. When you select the record result, a screen pops up on the upper right confirming that the POL is now linked to the title. This is in the screenshot below as a rectangle with a vertical green bar on the left with a checkmark in the middle, and text stating that the PO line is linked to the title.
9. To confirm that the order has been linked to the correct record, do a search on the title. This should result in a record with the green cart icon with the word Orders and the number of orders for the title. This is imaged below with a red rectangle surrounding it and a thin red arrow pointing right at Orders.
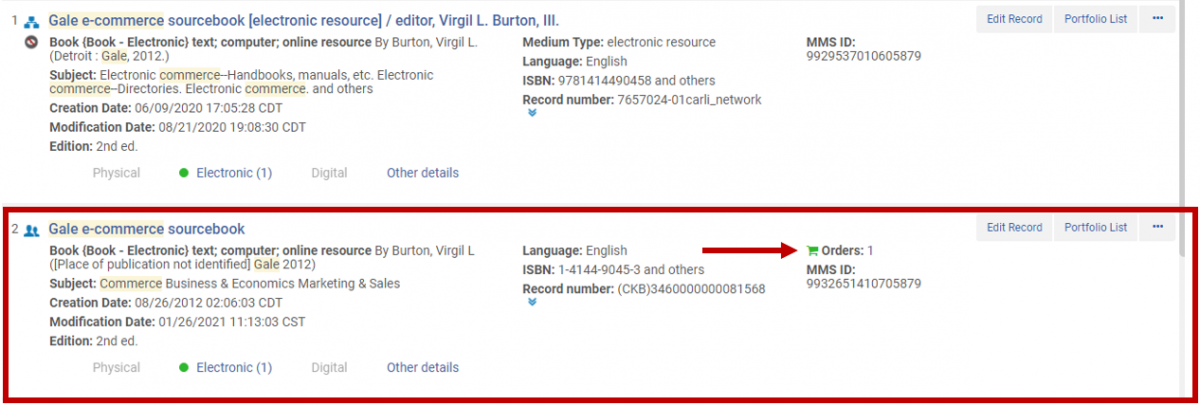
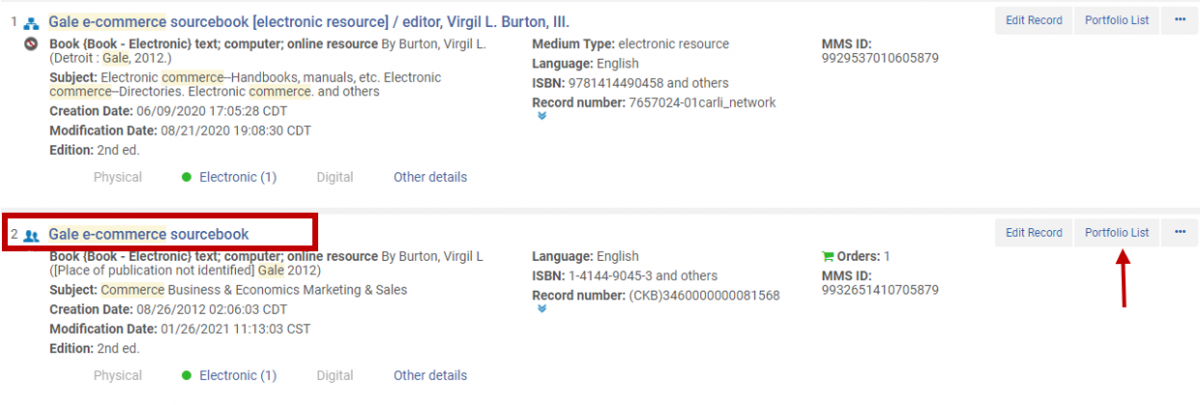
10. Next, you want to Add the Order to the CZ Portfolio. Click the Portfolio List button to the right of the name. This is in the screenshot below with a red rectangle outlining the CZ linked name and an up arrow pointing towards the Portfolio List button.
11. Then, click the Edit Portfolio button. It is outlined in a red rectangle in the image below.

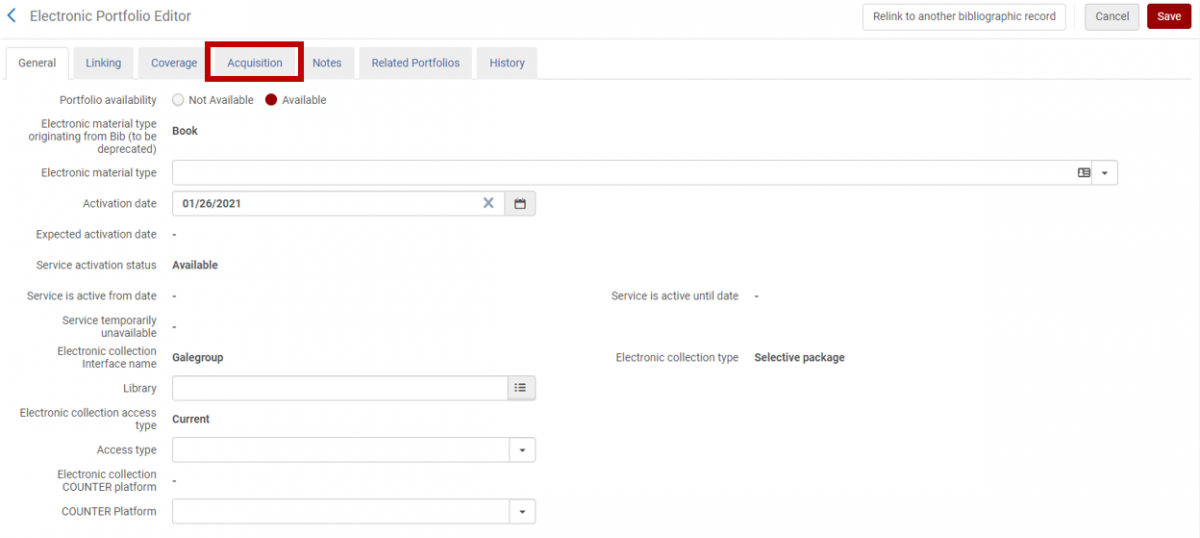
12. This opens the Electronic Portfolio Editor. It defaults to the General tab, click on the Acquisition tab. The Acquisition tab is pictured below outlined in a red rectangle.
13. On the Acquisition tab, search for title or POL in the PO Line field. Press Enter on your keyboard. On the upper right corner of the screen, click on the Save button. The Save button, PO Line field, and PO Line details field are outlined in red rectangles in the image below.
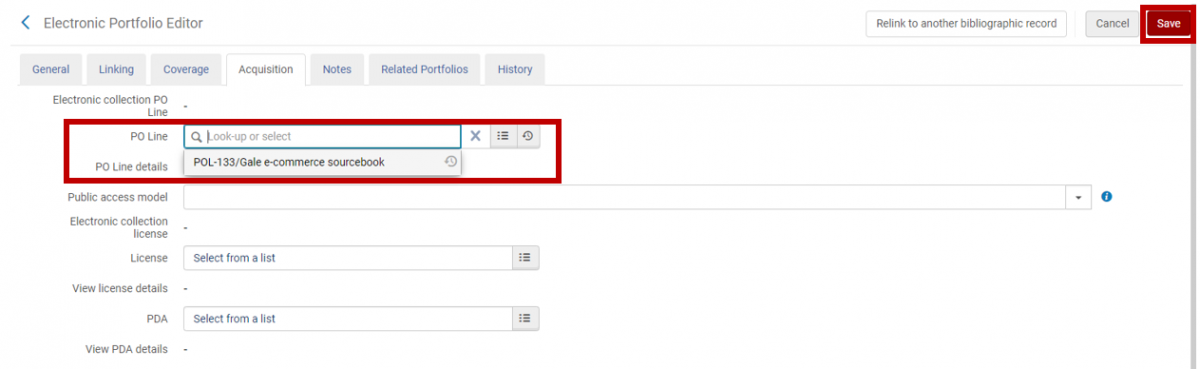
TIP 1: You can edit your search by clicking the “Select from a List” option, which is shown as a menu button (three dots each followed by a dash). This is imaged below.

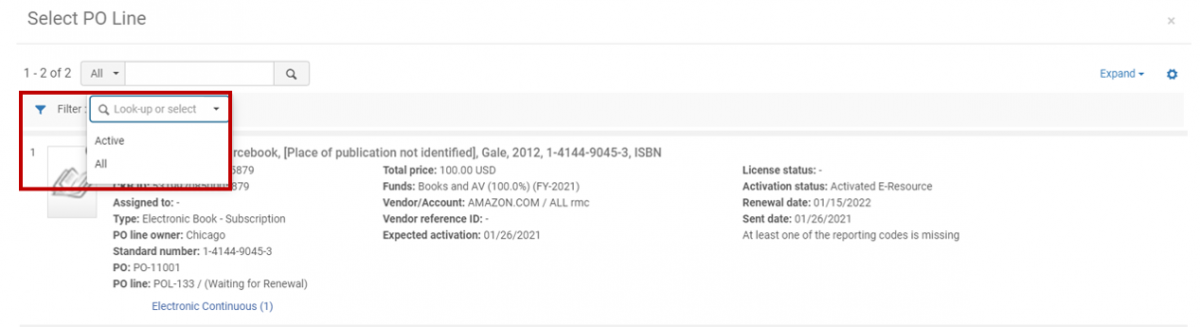
TIP 2: The menu button will take you to the "Select PO Line" screen and allow you to filter the search to All POLs or Active POLs. This is useful if the POL you are relinking is closed, or otherwise not considered active by Alma.
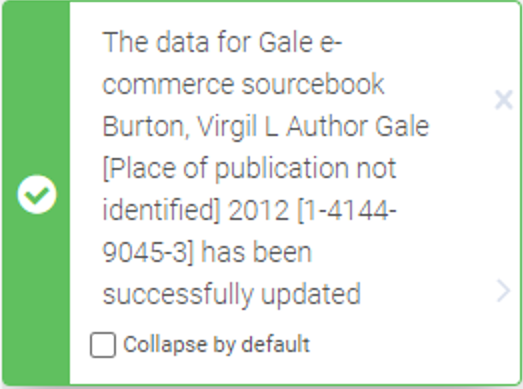
14. Once, you have selected the POL and clicked Save, a Confirmation screen will pop out from the upper right saying that the data has been successfully updated. Shown below is a screenshot of this, where the left edge has a vertical green bar with a checkmark in the center and text about the confirmation to the right.
15. The final step is to delete the P2E Portfolio, with the option to either Delete* or Suppress the P2E Bib record. Return to the search results, click the Portfolio List button for the NZ linked record. The blue, active NZ icon is shown outlined in a red rectangle in the image below, as well as the Portfolio List button hyperlink.
*Deleting the bib is the preferred option. This is to reduce the amount of orphaned bibs/bibs with no inventory in Alma.
16. On the next screen, your P2E record shown as an IZ linked (blue house icon) with no name just a dash is one way you know this is a P2E standalone portfolio. Click on the three ellipses button to the right of the IZ icon and dash, then select Delete from the drop-down menu. This is shown below as outlined in a red rectangle with a thin arrow pointing right next to the word, "Delete."
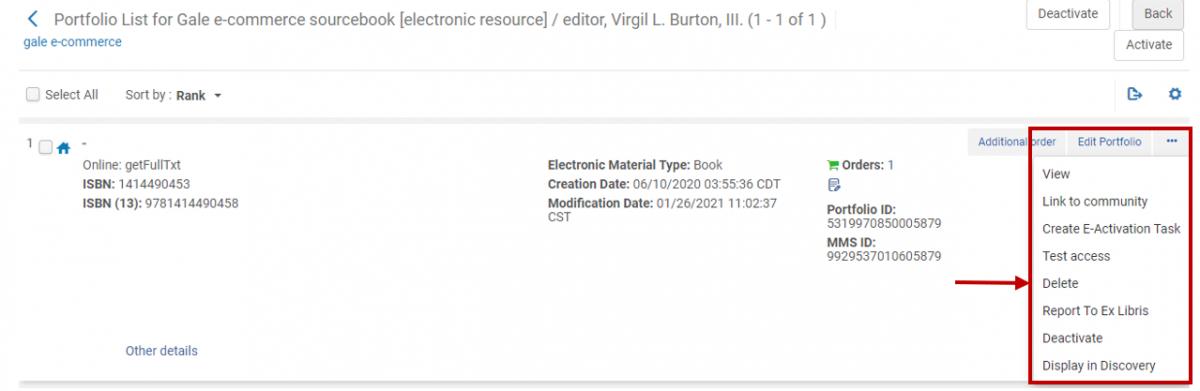
17. On the next screen, select "Delete bibliographic record(s)" from the drop-down menu for "Handling bibliographic records without inventory. Then, select Confirm. The menu is pictured below with a thin, red arrow pointing left towards the arrow for the drop-down menu and the Confirm button is outlined in a red rectangle.
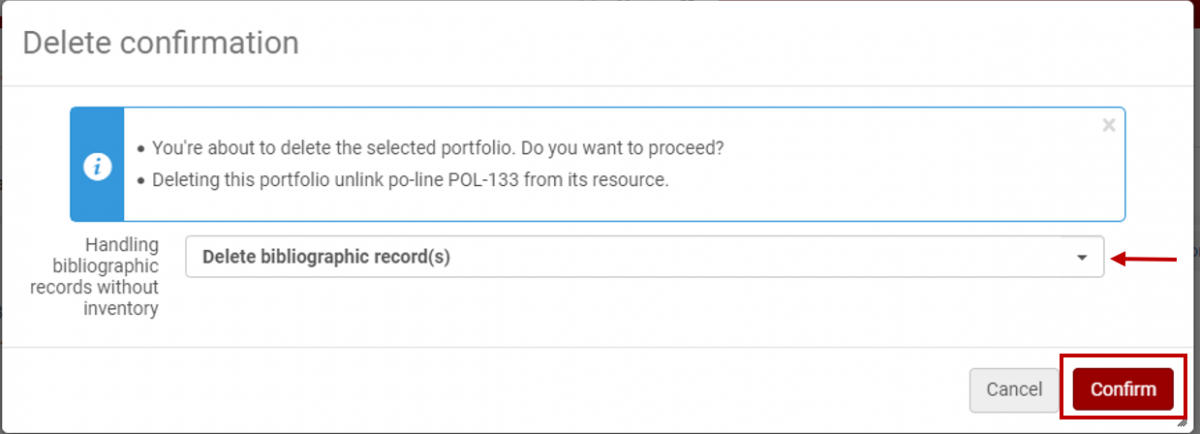
18. A Confirmation message will pop-out from the upper right with text indicating that the portfolio has been successfully deleted. This is shown in the screenshot below with a blue rectangle that has a blue vertical bar on the left side and a lower case "i" in the center, and text to the right.

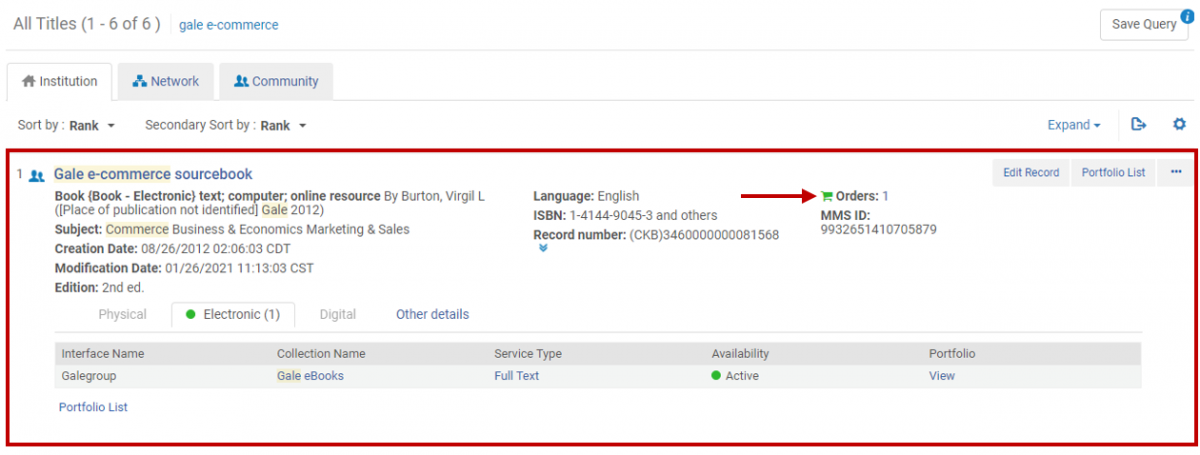
19. Now only the CZ Bib and Portfolio with the POL linked remains. This is shown inside of a red rectangle in the image below with a thin, red arrow pointing right towards Orders.
Group ILS Migrated P2E Portfolios Into Local Collections to Make Them Easier to Manage
Follow the link below to Ex Libris Documentation on:
Post migration clean-up of eResources in Alma, section on "Group ILS Migrated P2E Portfolios."
Link ILS Migrated P2E Portfolios to CZ but Retain ILS Migrated Bib Records
Follow the link below to Ex Libris Documentation on:
Post migration clean-up of eResources in Alma, section on "Link ILS Migrated P2E Portfolios to CZ."
P2E Clean-Up Webinars
January 27, 2021
CARLI Technical Services Q&A, - Better P2E Clean-up

Session Chat and Poll Results
March 14, 2024
Back 2 P2E

Slides with script/notes
20240314 Office Hours Transcript