Alma User Purge
updated 9/17/2024
Alma User Purge Basics
Ex Libris User Purge documentation
Alma does not automatically delete any user records. Libraries should routinely remove the records and personal information for users no longer affiliated with their institutions, as well as records for users no longer participating in transactions with the institution (e.g., resource sharing loans, fines, or fees).
Library staff must manually run the user purge job to delete records that are eligible for purge. Any user record that has a Purge Date value of the current date or earlier will be considered eligible-for-purge. Staff may modify the job criteria to limit the scope of the job. User records that are associated with active transactions in your institution are automatically excluded.
The CARLI Office staff will handle the purging of the I-Share user group linked user records.
Please do not purge users with the I-Share user group assigned.
- Linked User Records:
- Are copies of patron home records copied to other IZs for transactions.
- Have I-Share user group.
- CARLI Office staff will:
- Manage the purging of the I-Share user group records.
- Finalize steps to routinely purge linked user records that are no longer needed for transactions.
- Send an announcement once steps are in place.
Roles required:
The User Administrator role is required to run the purge users job. CARLI expects that staff with this role will have completed Alma Certification.
To run reports directly in Analytics, users must have the Design Analytics role.
Recommended Practice: Purge Users Via Sets
Ex Libris knowledge article on "Purge users based on a set, carefully."
The purge job by itself is a rather blunt instrument. If the purge date for a user record is in the past, the job may delete it, except under a few situations. The job does not consider if the record is still active (i.e., the expiry date is not in the past) or if the record is linked to another institution. Conversely, the purge job will not consider any records that should be purged but haven't yet reached their purge date; for example, linked records for other institutions' users (I-Share borrowers) who borrowed items in the past but the transaction is complete. Therefore a recommended best practice is to create sets of users that library staff have reviewed and approved as eligible for deletion, setting those users with a distinct user group, then running the purge on only that user group.
CREATING A Unique User Group for THE PURGE
You'll start by creating and configuring a new user group. This step only needs to be done once and then the user group can be used again for all future purges.
Reports to consult
CARLI has developed analytics reports related to user management and shared them via CARLI's shared network folder in Analytics or from your institution's secure FTP folder.
- Users with Purge Dates of Current Date or Earlier
- Run this report from Analytics and export/download to your computer. Navigate to Shared Folders > Carli NETWORK 01CARLI_NETWORK > User Management Reports.
- This report identifies all user records in your institution that have a purge date prior to or equal to the current date.
- The report outputs columns of: Primary Identifier, User Group, Expiry Date, Purge Date, Days between Today and Purge Date, User ID, First Name, Last Name, Has Role other than Patron and Instructor
- The Days between Today and Purge Date column is calculated by the analysis. You may use this value to help identify what number to enter in the Number of Days after Purge Date field of the purge job.
- The Has Role other than Patron and Instructor column will identify if the user record has Alma staff roles. You will want to review these records and exclude any user that should still have access to Alma.
- PIDs for users with loans or fines at other i-share libraries XXX.xlsx
- Found in your library's secure FTP folder on files.carli.illinois.edu.
- Includes only Primary IDs for home institution
- Combines daily reports of users with loans at other institutions and fines/fees at other institutions
- These are named, Users with fines at other i-share libraries LNC.xlsx and User loan counts at other i-share libraries LNC.xlsx.
- You may find these useful to review visually.
Additional useful reports may include:
Creating the set of Users with Purge Dates in the Past
- In Alma, go to Admin > Manage Jobs and Sets > Manage Sets.
- Click Create Itemized Set.
- On the Set Details screen, enter a clear set name identifying the set of users you are loading, e.g., UG with purge date before 5/31/2022.
- Optionally enter a description and note to the set. These are useful references for your future self or other staff who will find your sets.
- Select a Set content type of User.
- Uncheck the Private box.
- Under Add Items to Set, select From File, and click Upload File. Browse your computer to the report you'll be using, e.g., Users with Purge Dates of Current Date or Earlier.xlsx. Click Open.
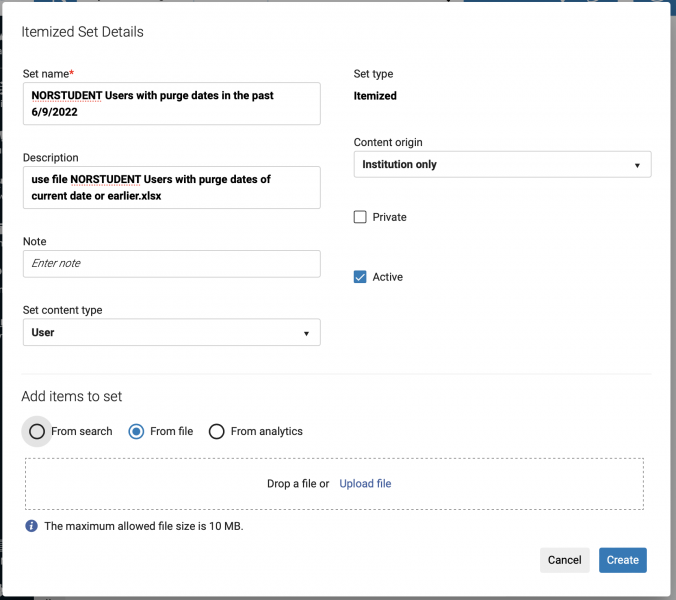
- Click Create.
Alma will create a job to prepare the set. You will receive an email when the set creation is complete.
Creating the Set of Users to Exclude from Purge
At the beginning of this step, you will connect to your secure FTP folder and download a copy of the PIDs for users with loans or fines at other i-share libraries XXX.xlsx file. Then you will follow a similar process to creating the set of users with purge dates in the past.
- Open your secure FTP program (for example, WinSCP), and connect to files.carli.illinois.edu on port 22. Use your xxxftp login and your institution's password for that account.
- Locate the PIDs for users with loans or fines at other i-share libraries XXX.xlsx file and download it to your computer, for example, by dragging and dropping the file from the ftp site to your "Downloads" folder.
- Close your secure FTP program
- In Alma, go to Admin > Manage Jobs and Sets > Manage Sets.
- Click Create Itemized Set.
- On the Set Details screen, enter a clear set name identifying the set of users you'll be purging, e.g., Users with activity at other I-Share 5/31/2022.
- Optionally enter a description and note to the set. These are useful references for your future self or other staff who will find your sets.
- Select a Set content type of User.
- Uncheck the Private box.
- Under Add Items to Set, select From File, and click Upload File. Browse your computer to the report you'll be using, e.g., PIDs for users with loans or fines at other i-share libraries XXX.xlsx. Click Open.
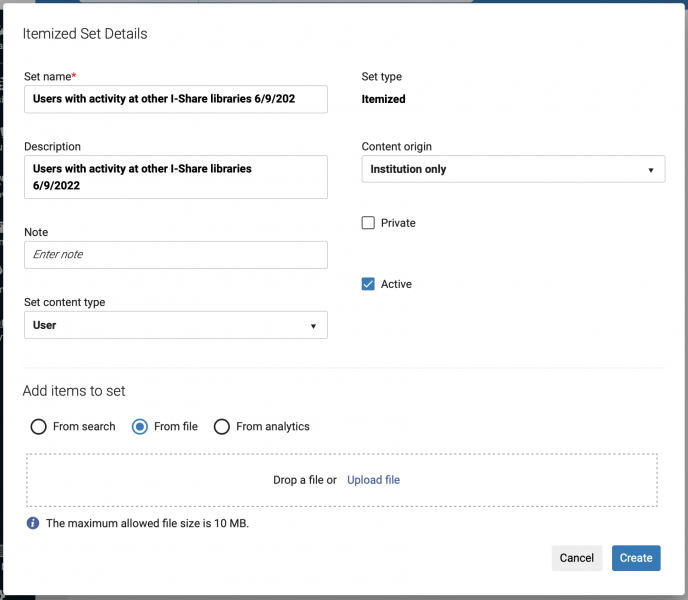
- Click Create.
Alma will create a job to prepare the set. You will receive an email when the set creation is complete.
Combining the two user sets
With both sets created, you will now combine these sets by creating a new set that has users with purge dates in the past but not any users with I-Share activity.
- In Alma, go to Admin > Manage Jobs and Sets > Manage Sets.
- Locate your set of users with purge dates in the past. Click the actions menu button [...]for that entry, then select Combine Sets.
- On the Combine Sets (User) pop-up, change the "Operation" to Not. Click the list button under "With" to browse to lists of other available sets, and select your set of Users with activity at other I-Share 5/31/2022.
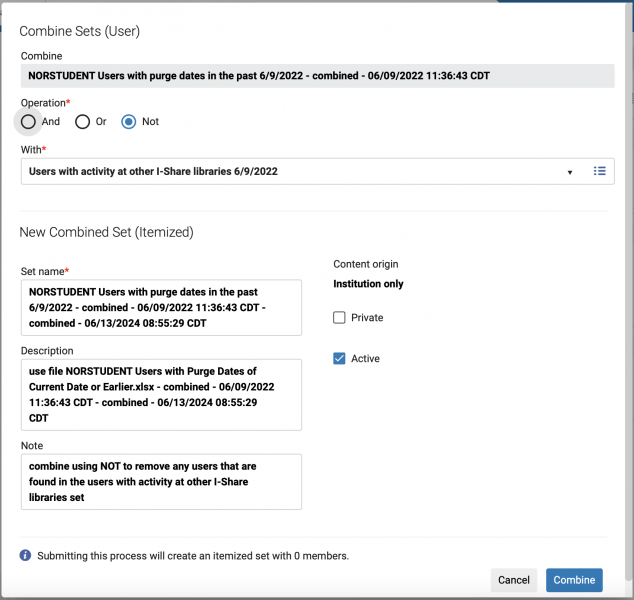
- Enter a clear set name identifying the set of users you'll be purging, e.g., UG users to purge, no I-Share activity, 5/31/2022.
- Optionally enter a description and note to the set. These are useful references for your future self or other staff who will find your sets.
- Uncheck the Private box.
- Click Combine.
Modify the users that will be purged
With the set created, you will now update those users' records using the Update and Notify Users job. With this job, you will change the user group to a value that identifies them as having been reviewed and approved for deletion. For example, "OK to Purge".
- In Alma, go to Admin > Manage Jobs and Sets > Run a Job.
- Locate the Update/Notify Users job. You may use the description filter or scroll the job list. Select the job with the button on the left. Then click Next.
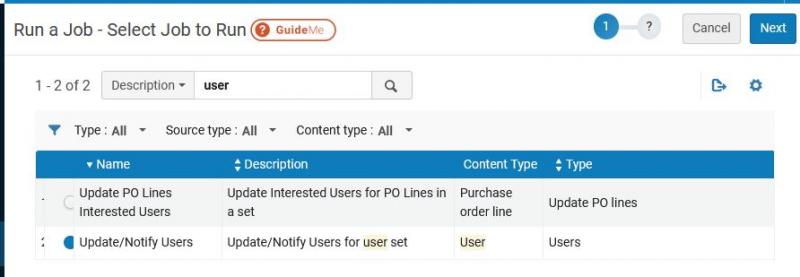
- On the Select a Set page, select the set that you created above. Then click Next.
- On the Update Task Parameters page, scroll down to the row for User Group. Tick the box on the left of the field. Then select the "OK to Purge" user group. Use the condition of Unconditionally.

- Click Next.
- Optionally modify the job name that will appear in the jobs list and job history. The default job name will include the job title, set name, and date. For example, "Update/Notify Users Set UG users 5/31/2022 as ok to purge."
- You may want to take screen captures of the job settings, as most of these settings will not be visible later.
- Click Submit. Then click Confirm to start the job.
- You will receive an email when the job has completed.
Run the Purge job
Now, run the purge job as documented above, but with the criteria to purge only the user group that you selected as approved for deletion.
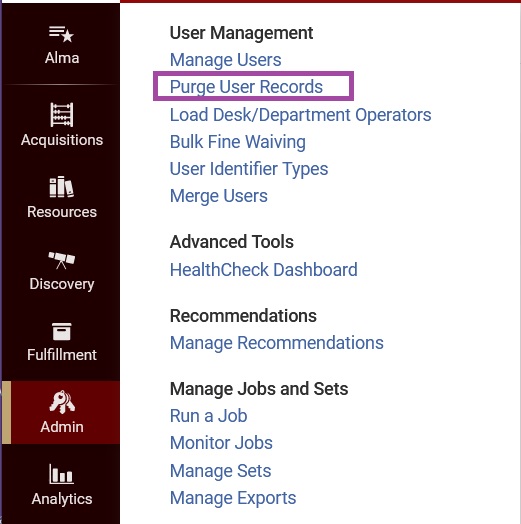
- In Alma, go to Admin menu > User Management > Purge User Records.
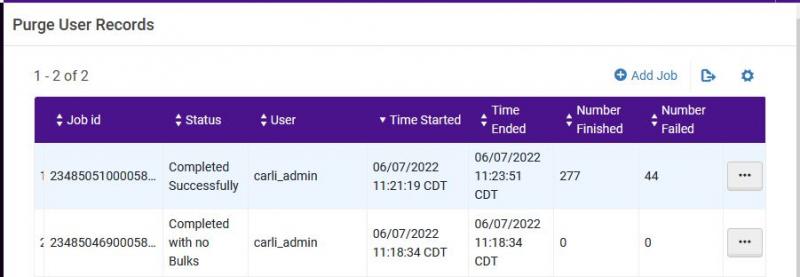
- The Purge User Records screen will list all previous purge jobs. You may view the reports of these jobs from the actions menu button for each row. To run a new purge job, click Add Job.
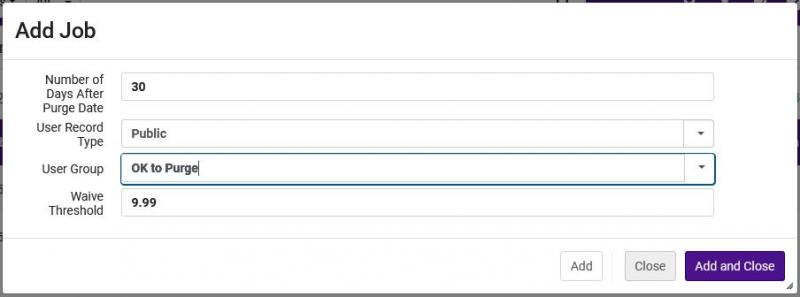
- The Purge job screen provides four types of criteria to identify which eligble-for-purge records will be deleted.
- Number of days after purge date: Extends the active purge date for the job into the past, starting from the current date.
- Example: If the current date is May 31, setting a value of 30 forces the job to only consider records with a purge date of May 1 or earlier.
- Leaving this value blank or entering a 0 will allow the job to consider records that have a purge date of yesterday or earlier.
- User record type: Select from All, Staff, Public, Contact.
- Most institutions will select Public.
- Staff or Public must be selected before a User Group may be selected.
- User Group: Select one user group to consider for purge.
- Waive threshold: Identifies if any outstanding fines and fees are low enough to not block record deletion.
- If your institution would forgive any fines or fees under a certain amount, you may enter that here to allow the user to be deleted.
- Example: Institution A forgives any fines and fees of 9.99 or less, they would enter 9.99.
- Enter at least 1 to ensure that most records are deleted.
- Number of days after purge date: Extends the active purge date for the job into the past, starting from the current date.
- Submit the job by clicking Add and Close, then Confirm. This submits the job and returns you to the Purge Users job page. You may navigate elsewhere.
- You will receive an email notification when the job completes. To view the job report, go back to the Purge Users page, go to Admin menu > User Management > Purge User Records. Locate the row for the job you ran, then click the actions menu button [...], and select View.
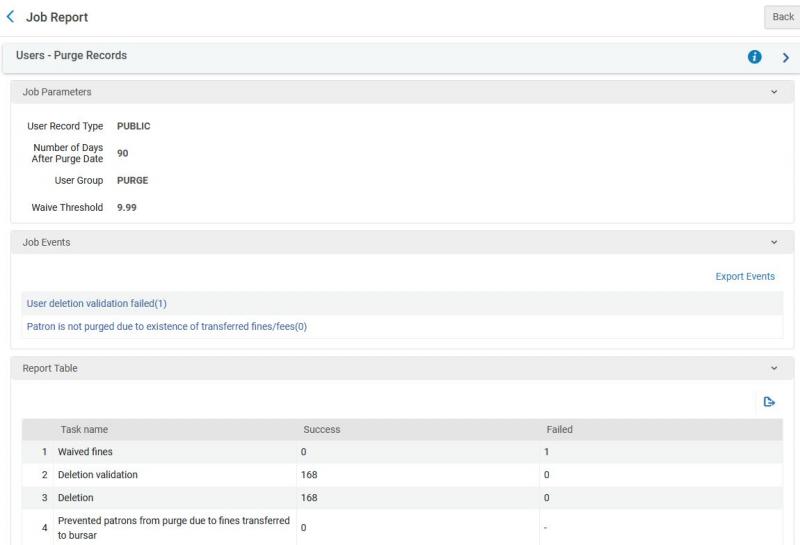
- The Users - Purge Records job report will identify the settings used for the purge job, then identify any situations where records were not purged, and finally a count of records purged and retained.
- Under Job Events, different failure reasons will be linked to a report of the user record Primary ID values for records not purged.
- "User deletion validation failed" may indicate users that were retained because loans were still active on the account, or because fines/fees were too high for the waive value.