How-To: Withdrawing Inventory and Deleting Records
Last update: September 6, 2024
When deleting any physical inventory, one must start with the end-most parts first. Delete items, then holdings, then bibs. The approach to deleting item records is to Withdraw the item. This is true even if you are deleting a record you created accidentally. Options for deleting items include manual deletion from the items list and creating a set then processing the set with the Withdraw Items job.
When deleting any electronic inventory, the order in removing inventory and bibs depends on what types of inventory are present. Titles on standalone portfolios should be removed similar to physical inventory: deactivate and delete portfolios then bibs. For titles within collections, deactivating portfolios will affect the visibility of titles; while removing a collection in full affects all titles.
Contents
- Roles
- Withdraw and Delete a Single Item Title
- Withdraw Multiple Items
- Deleting Itemless Bibliographic and Holding Records
- Deleting Bibliographic Record and Standalone Portfolios
- Deleting Portfolios and Bibs in Collections
- Deleting Bibliographic Records with No Inventory
- Frequently Asked Questions
Webinars and Tutorials
CARLI Technical Services Q&A, December 7, 2020. Deleting and Withdrawing.
Deleting and Withdrawing Session Chat
Deleting and Withdrawing Draft Instructions
Roles
Deleting item and holding records requires the Physical Inventory Operator and Physical Inventory Operator Extended roles.
Deleting electronic inventory requires the Electronic Inventory Operator and Electronic Inventory Operator Extended roles.
Deleting bibs within the metadata editor requires the Cataloger Extended role in combination with either the Cataloger or the Catalog Manager role.
Deleting inventory using jobs requires the Catalog Manager or Repository Manager role.
Bib records may be deleted when the following conditions are true:
• No inventory exists;
• Any PO lines that are present must be either Closed or Cancelled.
Alma will prevent deletion of items when when active PO lines are present on inventory being withdrawn.
- When active PO lines for one-time purchases are present, check and change the PO line to be Closed or Cancelled before withdrawing the item. You may also want to copy any receipt data from the item to a PO line note.
- When active PO lines for continuations (e.g., subscriptions, standing orders) are present, staff will need to unlink the inventory from the PO line before proceeding to withdraw and delete the object. See the Unlink Active PO Lines from Inventory before Withdrawing below for more details.
Withdrawing and deleting inventory does not delete the title information stored in closed PO lines, but may remove data on receipt dates.
For physical continuations, such as subscriptions and standing orders, it may be common to withdraw older volumes and issues after a certain period of time. For instance, the library may retain only the current 12 issues of a magazine; or the oldest edition of a standing order title may be withdrawn when the latest edition arrives. Because the continuation order should remain active, staff will need to disconnect the item(s) being withdrawn from the PO line. The options for this depend on the type of order and the ways that items and PO line are linked.
Withdraw Inventory for an Active Serial Subscription
In Alma, a subscription purchase type is used for most continuing resources that are received as a serial and typically located together in collections. This includes regular serials such as journals, magazines, and newspapers, as well as irregular serials such as reference works and law reporters. For physical subscriptions, the PO line creates inventory via a holding record, so the PO line and holding are linked accordingly. When individual issues or volumes are received, the PO line will appear on the item record, though it is inherited from the holding.
To unlink an item or items from the PO line before withdrawing, the items must be moved to a different holding record from that used for receiving the order.
- Locate the bibliographic record:
- If starting from the PO line, click the link under Items Received on the PO Line, then click View All Holdings.
- If not starting from the PO line, perform a Physical Items search using a known detail, like title, call number, or barcode. Select an item, then click View all holdings.
- If starting from the PO line, click the link under Items Received on the PO Line, then click View All Holdings.
- Add new holdings.
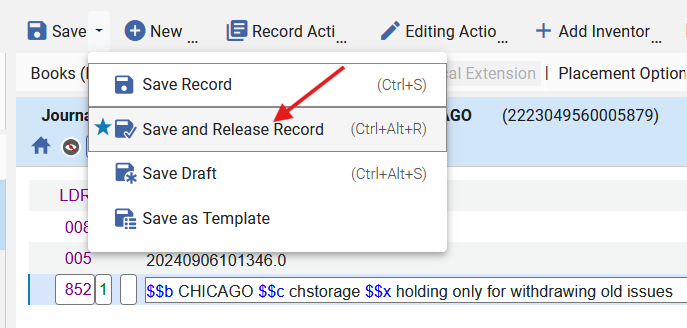
- The metadata editor will open with an empty or template holding record. Modify the 852 field to have different values than the holding used for the order.
- 852$$b and 852$$c are required, and should contain the library code and location code, respectively. Using the form editor (Ctrl+F) allows selection of codes from a list.
- Optionally add other details; for example, $$x holding only for withdrawing old issues.
- Optionally suppress the holding: Record Actions > Suppress from Discovery.
- Click Save > Save and Release Record.
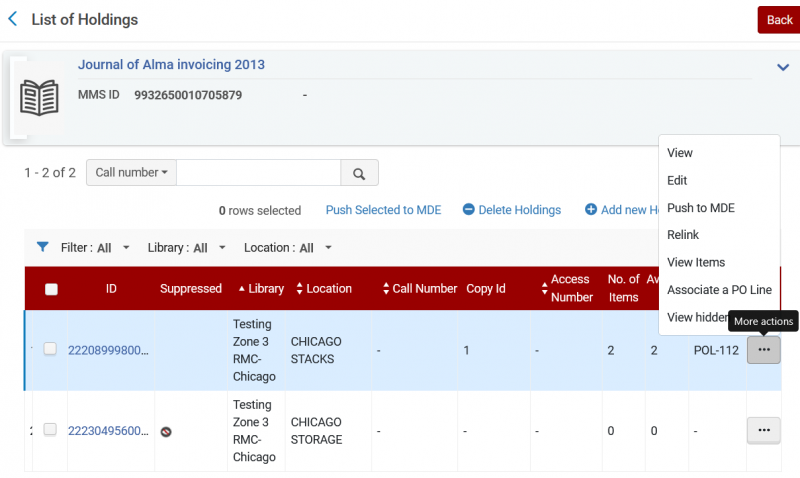
- Hide the metadata editor. If not back at the List of Holdings screen, search again for an item, select the item, then select View all holdings.
- On the List of Holdings, locate the holding associated with a PO line. Select the ... menu button, then select View Items.
- On the list of items screen, use the checkboxes to select the items that should be moved for withdrawal.
- With the items selected, select Manage Selected, then select Change Holdings.
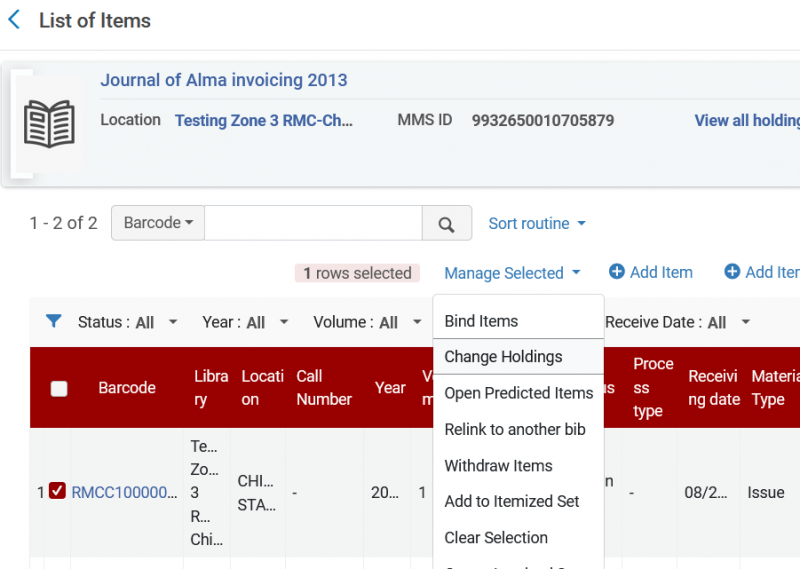
- A list of holdings screen will appear. Select the destination record with the radio button on the left, then click Select.
- The item will be relinked. Alma may return you to the previous list of items screen. To view the results, click View all holdings.
- Locate the holdings record with items to be withdrawn, select the ... menu button, then select View Items.
- On the list of items screen, select the items to withdraw.
- Select the Manage Selected menu, then select Withdraw Items.
- When prompted for confirmation, select Confirm.
- If the last item of the holding is deleted, Alma will prompt for what to do with the holding.
- Select Don't change the holdings record if you will use this process again in the future. This allows several steps above to be skipped.
- Select Delete the holdings record if necessary; if this process is used again for this title, all of the above steps will be used for each withdrawal.
- Select Suppress the holdings record from discovery if you will use this process again in the future and you didn't suppress the record while creating it.
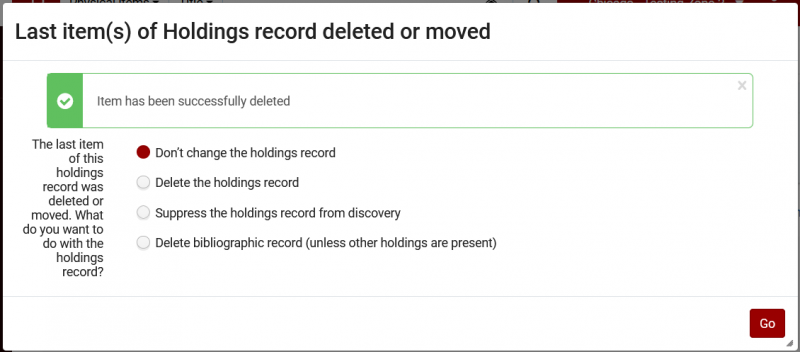
- Click Go.
Withdraw Inventory for an Active Standing Order
In Alma, a standing order purchase type is used for resources that are ordered within a series or other criteria, received irregularly and cataloged separately. For example, the Library of America series is typically ordered by the series or publisher, but each volume cataloged individually. Alma's receiving workflow for standing orders differs from the workflows for subscriptions and one-time orders, in that inventory is not created as part of the order process. Instead, newly received items (e.g., edition, volume, part) are cataloged independently, and associated with the PO line as a part of item creation.
Before withdrawing volumes associated with an active standing order PO line, staff will break the link to the POL before withdrawing.
- Search and retrieve the item:
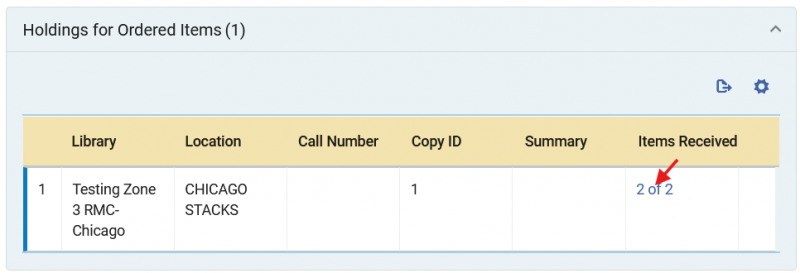
- If starting from the PO line, click the Barcode link under Ordered Items as shown below.

- If not starting from the PO line, perform a Physical Items search using a known detail, such as title or barcode.
- If starting from the PO line, click the Barcode link under Ordered Items as shown below.
- Edit the item record.
- Locate the PO Line field; click the X at the right of the field to clear the contents.
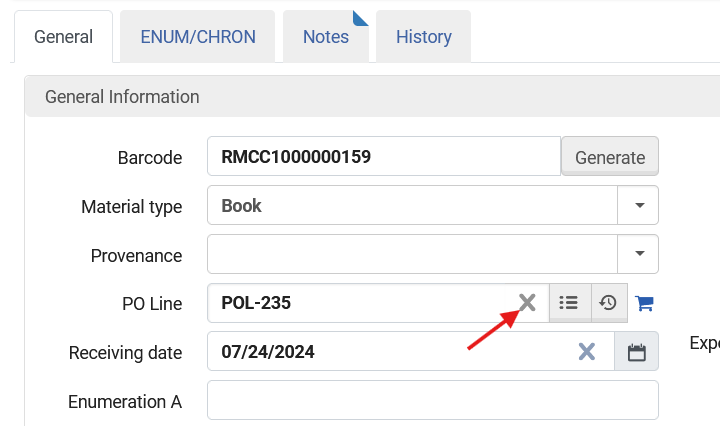
- With the PO Line field empty, click Save.
This removes the link between the item and the PO line, and the item may be withdrawn using the either the Withdraw and Delete a Single Item Title or the Withdraw Multiple Items workflow
Withdraw and Delete a Single Item Title
By Title
- Perform a Physical Titles or Physical Items search scoped to your institution to locate the record, e.g., using Title or Keywords.
- Expand details view and click Items; or select Items from the actions menu.
- If Alma brings you to the item record editor, expand the information bar, then click View All Items.
- On the List of Items screen, click the actions menu for the item record, then select Withdraw.
- At the Confirmation Message, click Confirm.
- When the item is the only/last item on a bib, you will be prompted about what to do with the holding and bib; under this scenario, select Delete Bibliographic Record, then click Go.
- After the screen refreshes, you may still be viewing the list of items screen. Click the go back arrow; Alma should refresh the results with the title no longer listed.
By Item (e.g., by Barcode)
- Perform a Physical Items search on Barcode scoped to your institution.
- Click the actions menu, then select Withdraw.
- At the Confirmation Message, click Confirm.
- When the item is the only/last item on a bib, you will be prompted about what to do with the holding and bib; under this scenario, select Delete Bibliographic Record, then click Go.
- Alma should refresh the results with the item no longer listed.
If you’re unsure whether there are additional items associated with the bib or holding, you may want to select the searching by title method.
Withdraw Multiple Items
When deleting multiple items across multiple titles, it may be the most effective to run the deletions in a batch. Please note that there are many ways to create itemized sets; the process described below uses only one of those options (e.g., a list of barcodes from items that are being withdrawn).
- Enter the barcodes of items to delete into an Excel file. Make sure the column heading reads “Barcode”.
- Save the file somewhere on your workstation that is easy to find.
- Go to Admin > Manage Jobs and Sets > Manage Sets.
- Click Create Set, then select Itemized set.
- Provide a set name and description.
- Select the Set Content Type of Physical items, then change Private to No.
- Under Add Contents, select From File. Then click the folder icon to browse to the location of your Excel file.
- Select the report that you created earlier, then click Open. Click Save to create the set. Allow some time for the set to be created. You should receive an email notification when the set is ready.
- Optionally, review the itemized set and remove any set members that you don’t want to delete.
- Go to Admin > Manage Jobs and Sets > Run a Job.
- Locate and select the Withdraw Items job, then click Next.
- Locate and select your barcode set, then click Next.
- On the task parameters screen, select options for how associated records should be handled, whether holdings and bibliographic records should be deleted or suppressed. Tick the boxes to block deletion of items with requests and work orders. The options include:
- Keep holdings and bibliographic records
- Delete holdings; delete bibliographic records that have no other holdings
- CARLI recommends using this option unless there are compelling reasons for retaining records.
- For NZ-linked records, this option will delete your copy of the shared bib; the NZ-shared bib will remain in the NZ as long as other libraries have inventory present.
- Suppress holdings from publishing; suppress bibliographic records that have no other holdings from publishing
- Delete holdings; suppress bibliographic records that have no other holdings from publishing.
- Click Next.
- Review the job settings, click Submit, then click Confirm when prompted. You will receive an email notification when the job completes.
Deleting Itemless Bibliographic and Holdings Records
Within Metadata Editor
- Perform a Physical Titles search scoped to your institution to locate the record.
- Click Edit Record to open the bib in the MDE.
- Get inventory with Ctrl+I, or go to Tools > MARC Bibliographic > View Inventory (old MDE), or go to View Related Data > View Inventory (new MDE).
- Click Edit to open the holdings record in the split-screen view.
- Go to the File menu (old MDE) or the Record Actions menu (new MDE).
- Select Delete Record, click Yes when asked for confirmation.
- If the holding is the last holding on the record, you will be asked about deleting the bib record. Click Yes to confirm deletion if no other holdings are present.
- The MDE should refresh with an empty workspace.
- You may sometimes get a warning that a NZ bib cannot be deleted as other members are still using the bib, or that they have a local version of the record that cannot be deleted. When this happens, go to the process for unlinking and deleting NZ bibs below.
Using a Set and the Delete Holding Records with No Items Job
- Perform an advanced Physical Titles search, scoped to your institution, with index of Has Items equals No. Include other indexes and criteria as needed.
- Click Save Query.
- Provide a set name and description. Change Private to No. Then click Save.
- Go to Admin > Manage Jobs and Sets > Manage Sets, click the Public Sets or My Sets tab to see when the set is ready.
- Locate the set, then click the actions [...] menu, and select Itemize to create an explicit set of records to delete. Optionally update the set name, description, and privacy setting. Click Submit when done. Itemizing a set may take a while. You will receive an email notification when the set has been created.
- Optionally, review the itemized set by locating it on the My Sets tab, click the actions [...] menu and select Members. Tick the box for any set members that you don’t want to delete, then click Remove Selected. Click Done when ready.
- Go to Admin > Manage Jobs and Sets > Run a Job.
- Locate and select the Delete Holding Records with No Items job, then click Next.
- Locate and select the record set you created above, then click Next.
- On the task parameters screen, you may choose to limit the action to a specific library and location, or to filter by an indication rule. Select whether to delete or suppress bibliographic records. Then click Next.
- Review the job details, then click Submit. You will receive a notification when the job completes.
Deleting Bibliographic Records and Standalone Portfolios
Manual Deactivation and Deletion
- Perform an Electronic Titles or Electronic Portfolios search scoped to your institution to locate the record.
- Locate the title in the results, click Portfolio List.
- On the portfolio list for the title, click the actions menu, then select Deactivate. Wait for Alma to refresh the screen before continuing.
- On the portfolio list for the title, click the actions menu, then select Delete.
- You’ll be asked to confirm deletion and decide what to do with the bib.
- If you need to retain the bib (e.g., for acquisitions data), select Suppress bibliographic record(s) then click Confirm.
- Otherwise, Select Delete bibliographic record(s) then click Confirm.
Using a Search Set and the Delete Portfolios Job
- Perform a search for electronic titles or electronic portfolios, scoped to your institution.
- Click Save Query.
- Provide a set name and description. Change Private to No. Then click Save.
- Go to Admin > Manage Jobs and Sets > Manage Sets, click the Public Sets or My Sets tab to see when the set is ready.
- Locate the set, then click the actions [...] menu, and select Itemize to create an explicit set of records to delete. Optionally update the set name, description, and privacy setting. Click Submit when done. Itemizing a set may take a while. You will receive an email notification when the set has been created.
- Optionally, review the itemized set by locating it on the My Sets tab, click the actions [...] menu and select Members. Tick the box for any set members that you don’t want to delete, then click Remove Selected. Click Done when ready.
- Go to Admin > Manage Jobs and Sets > Run a Job.
- Locate and select the Delete Portfolios job, then click Next.
- Locate and select your portfolio set, then click Next.
- On the task parameters screen, select options for what should happen if the portfolio is linked to active PO lines or activation tasks; select whether to delete or suppress the bib. Click Next.
- Review the job settings, click Submit, then click Confirm when prompted. You will receive an email notification when the job completes.
Using an Analytics Set and the Delete Portfolios Job
- Open Analytics, then create a new analysis to locate portfolios that you want in your results. Make sure that Portfolio ID is one of the fields in the results display.
- Save the analysis into your institution’s shared folder, e.g., /Shared Folders/[institution name]/Reports.
- In Alma, go to Admin > Manage Jobs and Sets > Manage Sets.
- Click Create Set, then select Itemized set.
- Provide a set name and description.
- Select the Set Content Type of Electronic Portfolios, then change Private to No.
- Under Add Contents, select From Analytics. Then choose the shared reports folder.
- Select the report name that you created earlier, then click Save. Allow some time for the set to be created. You should receive an email notification when the set is ready.
- Optionally, review the itemized set by locating it on the My Sets tab, click the actions [...] menu and select Members. Tick the box for any set members that you don’t want to delete, then click Remove Selected. Click Done when ready.
- Go to Admin > Manage Jobs and Sets > Run a Job.
- Locate and select the Delete Portfolios job, then click Next.
- Locate and select your portfolio set, then click Next.
- On the task parameters screen, select options for what should happen if the portfolio is linked to active PO lines or activation tasks; select whether to delete or suppress the bib. Click Next.
- Review the job settings, click Submit, then click Confirm when prompted. You will receive an email notification when the job completes.
Deleting Portfolios and Bibs in Collections
- Perform a search for electronic collections scoped to your institution, for example, using Electronic Collection Name.
- Locate the collection and click the actions [...] menu, then select Delete.
- You will see a confirmation message that identifies the number of portfolios that will be deleted. Select whether to suppress or delete the associated bib records, then click Confirm.
- Deleting collections results in a delete job being submitted, and the collection should be updated as being “(in deletion process)”. You should receive an email notification when the job completes. DO NOT add any new collections that may overlap with this collection while the delete job is running.
Deleting Bibliographic Records with No Inventory
From the Metadata Editor
- Perform an All Titles search scoped to your institution to locate the record.
- Click Edit Record to open the bib in the MDE.
- Go to the File menu (old MDE) or the Record Actions menu (new MDE).
- Select Delete Record, click Yes when asked for confirmation.
- If the bib is linked to the NZ, and other libraries still have holdings, you will receive a message that the bib may not be deleted.
- Go to the File menu (old MDE) or the Record Actions menu (new MDE), then select Copy to Catalog. This breaks the link and copies the record contents into the IZ shell for your record. Wait for the MDE to refresh, then return to step 3 above.
- The MDE should refresh with an empty workspace.
Using a Set and the Delete Bibliographic Records Job
This approach may be used to delete bibliographic records with inventory as well, using different searches or a set created from an Excel file.
- Perform an advanced All Titles search, scoped to your institution, with index of Has Items equals No. Include other indexes and criteria as needed.
- Click Save Query.
- Provide a set name and description that will remind you what you’ve included and what you plan to do with the set. Change the Private value to No. Click Save. You should receive an email notification when the set has been created.
- Go to Admin > Manage Jobs and Sets > Manage Sets, click the Public Sets or My Sets tab to see when the set is ready.
- Locate the set, then click the actions [...] menu, and select Itemize to create an explicit set of records to delete. Itemizing a set may take a while.
- Refresh the sets page or wait for the notification to arrive. Locate the itemized set, click the actions [...] menu, and select Members.
- You may export the list to Excel for review, or page through results. If you need to remove any records that shouldn’t be deleted, tick the box next to the record number and click Remove Selected. Click Done when ready to move on.
- Go to Admin > Manage Jobs and Sets > Run a Job.
- Locate and select the Delete Bibliographic Records job. Click Next.
- Select the itemized set that you created above, then click Next.
- Tick the option for Delete all associated inventory resources. Click Next.
- Review the job details, then click Submit. Click Confirm when prompted.
- You will receive a notification when the job completes.
- Go to Admin > Manage Jobs and Sets > Monitor Jobs, click the History tab.
- Locate the report with “Delete Bibliographic records – [your set name]”, click the actions [...] menu, then select Report. From the report screen, you may choose to download an Excel version of the Detailed Counters report to identify any records that were not deleted.
Frequently Asked Questions
Will Alma send OCLC details on deleted holdings, or will my catalogers need to delete holdings directly from WorldCat?
CARLI: Alma uses publishing jobs to send details to OCLC regularly about holdings additions and deletions. Holdings changes for physical inventory are sent daily; electronic inventory changes are sent weekly. Alma sends deletion data to OCLC and any OCLC bibliographic records shown as held by your institution will have holdings removed. CARLI staff continue to refine this process, as there have been some titles excluded from processing. At present, catalogers should plan to delete holdings directly from WorldCat if holdings are not deleted within a week of deletion from Alma.
Is it true that Alma Analytics retains historical data about titles and inventory that I have withdrawn?
CARLI: Yes, Alma Analytics retains details about bibliographic records, holdings records, item records, and portfolios that were present at one time. Data in Analytics are identified with a Lifecycle value of "In Repository" or "Deleted." Libraries may create analyses to generate lists of deleted records or counts of deletions.
One exception found to the above is that Analytics appears to not retain holdings information for holdings that did not include any inventory (i.e., item records).
How do I mark inventory as withdrawn if my institution is required to retain records for HathiTrust membership?
CARLI: At a minimum, your institution may continue to use a "withdrawn" location for physical inventory. This location should be include in a fulfillment rule group that does not permit any borrowing or requesting. Institutions may also prefer to set an Item Policy of "withdrawn." CARLI staff suggest also that institutions use one or more of the following fields to identify records for future reporting: Weeding date, Weeding number, Internal Note 1-3, Statistics Note 1-3.
Is it possible to restore deleted data into my IZ?
CARLI: Alma maintains a deleted record repository that keeps a copy of data that were deleted from your IZ. A staff user with the Repository Manager role may access the repository via the Resources menu, Advanced Tools > Manage Deleted Repository. Deleted records may be searched by the job or user that deleted the record, by MMS ID, or by date range. The repository screen provides an option to restore data.