How To: Staff workflows for Alma Requests- Local and AFN
This document covers workflows for both the local requests (your patrons requesting your items) and AFN requests (another I-Share library's patron requesting your items).
The Automated Fulfillment Network (AFN) is the name given to the Alma configurations that support allowing patrons from one I-Share institution to borrow materials directly from another I-Share institution.
Please send any suggestions for enhancements/clarification to this documentation CARLI support.
(updated 4/4/2025)
expand / collapse all
Known Issues with Alma and Primo VE
Review the Alma/Primo VE Known Issues page.
User Roles, Settings, and Permissions for Staff and Patrons in Alma
Users need to be assigned the appropriate roles in Alma:
- Library Staff:
In order for library staff to process requests in Alma, their user account needs to have:- Overall:
- an expiration date and purge date in the future,
- the ability to log into Alma with their assigned username and password.
- Role(s):
Each institution’s Alma-certified User Manager should check that all staff working with requests have the appropriate roles needed to perform the transactions, and that those roles are set as "Active":- Role- Requests Operator: Staff who work with pick lists to process requested materials need Requests Operator role scoped to the librar(ies) and circulation desk(s) where they perform those transactions.
- Role- Fulfillment Services Operator or Fulfillment Services Manager scoped to the institution level AND Resource Sharing Library: Staff who supervise the Circ/ILL department, and/or staff who should be able to place I-Share requests for local patrons in Alma, or staff who are going to convert local requests into Automated Fulfillment Network I-Share requests, should have either Fulfillment Services Operator or Fulfillment Services Manager scoped to the institution level AND ALSO to the Resource Sharing Library.
- Role- Circulation Desk Manager, Circulation Desk Operator, and/or Circulation Desk Operator-Limited: Staff who will check materials in and check materials out to patrons should have a Circulation Desk Manager, Circulation Desk Operator, and/or Circulation Desk Operator- Limited role scoped to each library/circulation desk where they work.
- Staff may have additional roles assigned as needed to complete their work in Alma.
- Overall:
- Patrons placing requests:
In order for a user to place requests, their user account needs to have:- Overall:
- an expiration date and purge date in the future,
- an I-Share eligible user group assigned,
- and contain information in all of the mandatory user fields.
- Role(s):
- Role- Patron: assigned (typically assigned by default), and set as active.
- Overall:
Supplying Library: Logging in and Retrieving Requests
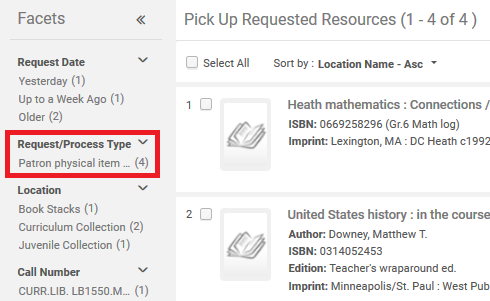
The Pick From Shelf List, aka Pick List (and formerly in Voyager- call slip queue) queues the requests for a library's materials, for a specific library, help library staff retrieve material from the shelves.
The Pick From Shelf list collates requests for physical items for multiple workflows in Alma, including:
- Patron physical item requests
- Acquisitions or cataloging workflow requests
- Materials past their shelving return date
- Other workflows (some may be customized to your institution).
For processing both AFN requests and patron local requests, the category to focus on is "Patron physical item requests."
Logging in and Retrieving Requests
- Log into Alma with your staff username and password; select the Circulation desk for the library where you will be processing the requests.
- Under Fulfillment> Resource Requests> Pick from Shelf
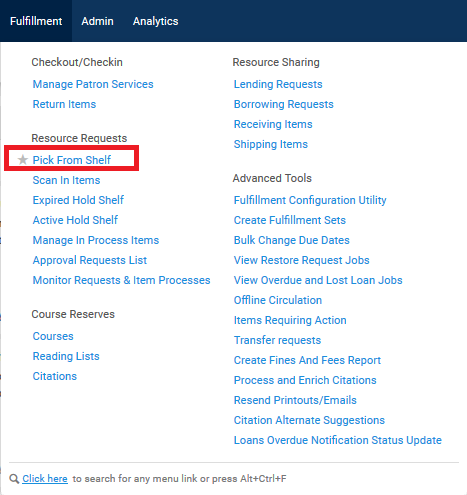
- Limit the Request/Process Type facet to Patron Physical Item Requests
- For the requests in your library's Pick from Shelf list, your library will have decided how you should work with the pick slips listed in the Pick from Shelf list. Those options include:
- Print individual requests using Quick Print
- Print multiple simultaneous requests using Quick Print
- Sending requests directly to an email address-enabled printer (or email address)
- Sending requests to a print queue, processing that print queue
- Download the Print Slip Report
- NOTE: Downloading the Print Slip Report is an efficient way to work with the requests for testing purposes; this Excel file view includes the item barcode and the requested volume number.
- Email the Print Slip Report to a staff member.
- Print the Print Slip Report to an email address-enabled printer (or email address) [email address for staff or printer will need to be white-listed in Alma to receive emails during test].
- Use the Alma Mobile App.
- Bring another internet-enabled device to the stacks for reference for retrieval; no pick list slips are physically printed.
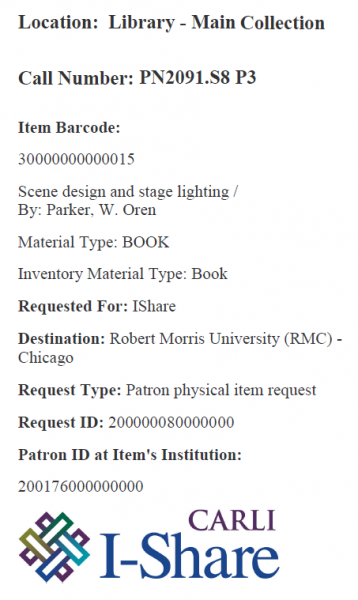
- If printing a Pick list slip, the slip that will print is consortially formatted and managed by the CARLI Office in the Network Zone. The name of the letter that produces the slip is the "Ful Resource Request Slip Letter."
- Note: If no item barcode prints on the request/is included in the request, the request is likely a title-level request; any copy/any barcode from the title can fill the request.
- The fields in the letter were selected in consultation with the CARLI Resource Sharing Committee.
- Sample Pick list slip, as of 7/15/2020:
- Use the pick list/pick list slips to retrieve materials from the shelves for processing.
Supplying Library: Processing Requests that Can Be Filled
To fill a request from the pick list:
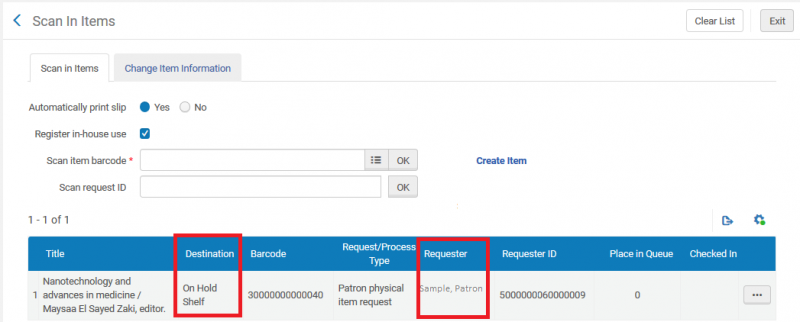
- Go to Fulfillment> Resource Requests> Scan in Items
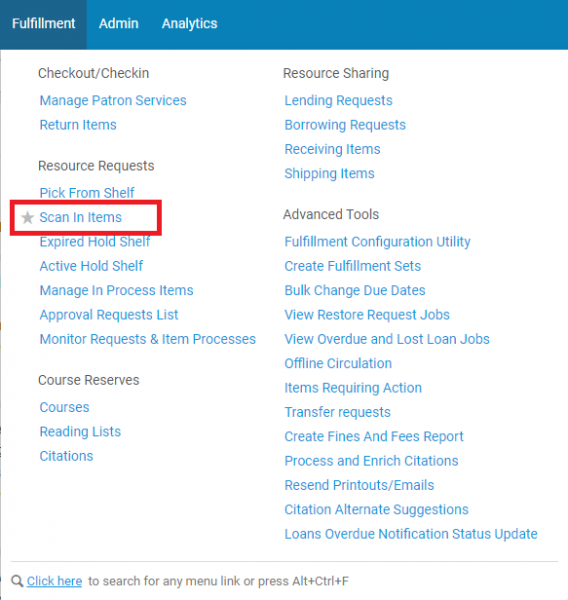
- The Scan in Items window will open.
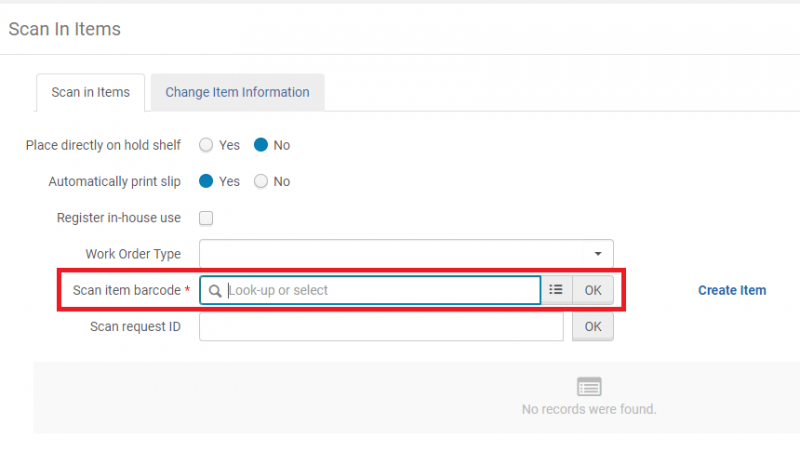
- Scan/enter the barcode for the item. Please scan/enter the barcode from the item itself.
- Alma will display where to transit the material to, or, whether to place it on the hold shelf at your library.
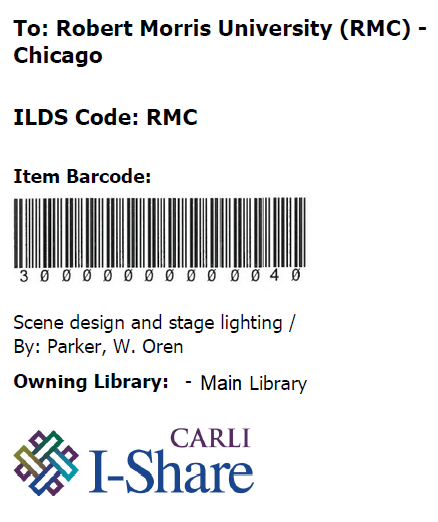
- If the item should be transited to another I-Share institution, your library should print a paper transit slip as part of this process (using whichever Alma printing method works best at your library).
- The Transit slip that will print is consortially formatted and managed by the CARLI Office.
- The fields in the letter were selected in consultation with the CARLI Resource Sharing Committee.
- Sample Transit Letter, as of 3/10/2020.
Supplying Library: Processing Requests that Need Additional Attention
Title-level requests when library owns multiple available copies on the same holdings record
When an institution owns multiple available copies of the same title on the same holding, Alma will accept any available copy of the title on that holding to fulfill the request. These requests will not include a barcode for a specific item attached to the request, if mutiple copies are attached to the same holdings record in Alma.
Note: This is different than a title having multiple volumes. Volume-specific requests are a different workflow.
How to detect these requests:
- When library staff go to the shelf to retrieve the requested item, there are multiple identical copies shelved together.
- When staff print the patron physical item requests listed in the Fulfillment> Resource Requests> Pick from Shelf list (directions for printing included above under the section "Supplying Library: Logging in and Retrieving Requests"), the pick from shelf slip will not include a barcode for a specific item.
- Note: Please double-check that the pick from shelf slip DOES NOT include the volume-specific details as described in the subsection below: "Requests with submitted Volume details." Volume-specific requests are a different workflow.
- Sample pick from shelf slip with no barcode included on the slip, and no volume-specific details.
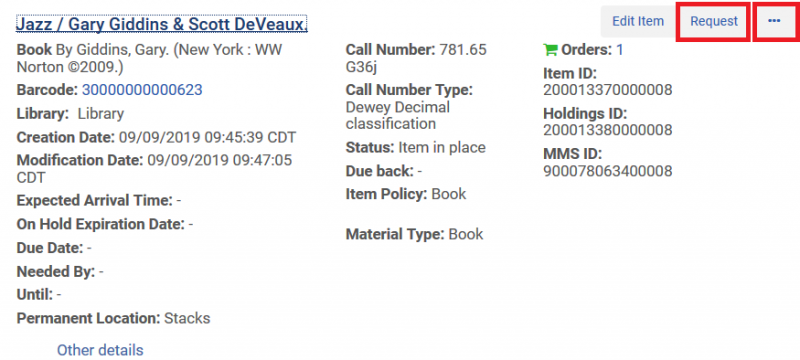
- Additionally, if reviewing the request in the pick from shelf list, staff can click to select the hyperlinked digit following the "Requests" label. This will open the request details screen.
- Sample request in the pick from shelf list:

- After the request details screen opens, notice that the Barcode field in the details table is blank, and the "Maximum Active Requests" value in the title information area of the request includes a value higher than 1.
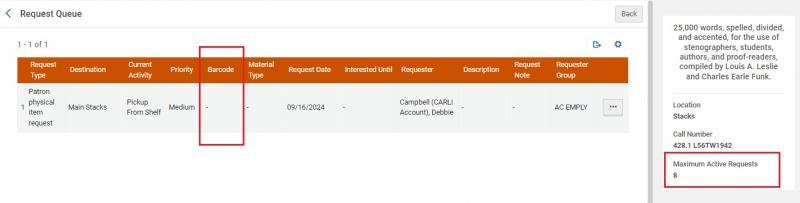
- Sample request in the pick from shelf list:
Steps to fill these request with the appropriate item:
- Locate any available copy of the title from the shelving location indicated in the reqeust.
- In Fulfillment> Scan in items> scan the barcode for the selected item. This will fulfill the request.
- The item will either prompt to be placed on the hold shelf, or to be placed in transit, depending on the patron's chosen pickup location.
Copy requested from Location A is unavailable, but copy in Location B is available
When an institution owns multiple available copies of the same title, on different holdings, it is possible to have Alma transfer the request between holdings if the material(s) in the originally-requested location are unavailable.
How to detect these requests:
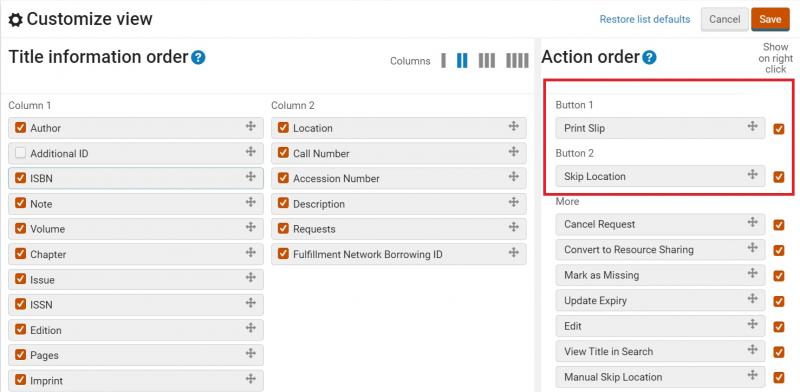
- When when reviewing the request in the pick from shelf list, staff will see the option to "Skip Location" in the action buttons for the request, or, listed as an option under the row action ellipsis button for the request.

- Whether the "Skip Location" option displays as a button or as an option under the row action ellipsis, when an available action for a request, depends on the column display choices set by each individual staff user. To adjust the column display choices:
- Open the Fulfillment> Resource Requests> Pick from Shelf list. Locate the "gear" symbol in the upper right corner of the display.

- After selecting the "gear" symbol, adjust by dragging and dropping your "Action order" buttons so that "Skip Location" is either Button 1 or Button 2.
Remember, the button will only be offered in the pick from shelf list if the choice is an option for the request; if there are no other holdings for the title at your institution, you will not see the "Skip Location" button, and the first-listed option under the "More" area of configuration will display as a button instead.
- Open the Fulfillment> Resource Requests> Pick from Shelf list. Locate the "gear" symbol in the upper right corner of the display.
- Whether the "Skip Location" option displays as a button or as an option under the row action ellipsis, when an available action for a request, depends on the column display choices set by each individual staff user. To adjust the column display choices:
Steps to fill these request with the appropriate item:
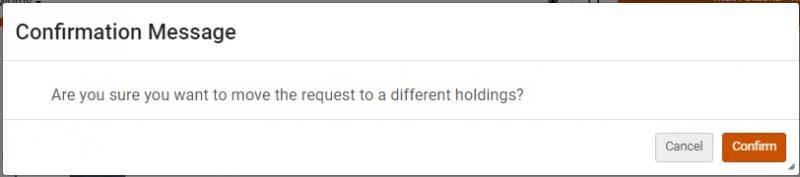
- After determining that all copies of the requested title at this location (aka, attached to the current holding) are unavailable to fulfill the request, but that there are available copies in another location at your institution (aka, attached to a different holding), select the "Skip Location" button or menu item to prompt Alma to move the request to the items on your library's other holding.
- After selecting "Skip Location," Alma will prompt you to confirm that "Are you sure you want to move the request to a different holdings?" Select "Confirm".
- After confirming, Alma will display a pop-up informational message that says "Request location was changed to [the Name of the Next Location]."
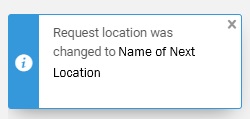
- The request should now display in the Pick From Shelf List for the library circulation desk associated with the next holdings location.
Requests with submitted Volume details
Requests with submitted Volume details
If the request contains patron-added volume information, Alma will be unable to confirm (on its own) that a specific item owned by the library receiving the request will be able to fill it; the request will need staff intervention.
How to detect these requests:
- When staff visit Fulfillment> Scan in Items to scan the item's barcode, the item will prompt to be reshelved. A pop-up on the side of the pick-from shelf screen will notify staff that there is possibly a request the item could fulfill.
- Pop-up note from Pick from Shelf screen:
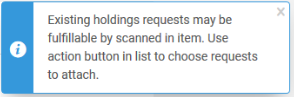
- Pop-up note from Pick from Shelf screen:
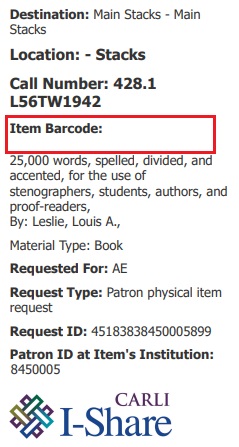
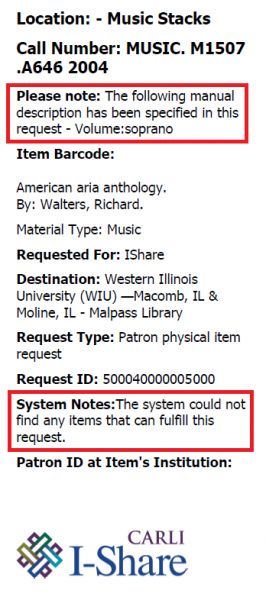
- If the request contains patron-added volume information, the pick from shelf slip (if printed) will contain two details that staff can review:
- Please Note: The following manual description has been specified in this request [info here]
- System Notes: The system could not find any items that can fulfill this request.
Steps to fill these request with the appropriate item:
- After staff scan in the item under Fulfillment> Scan in items> Scan item barcode, the pop-up note mentioned above should display on screen.

- Note that the "Destination" field in the table states that the item should be "reshelved" to its current shelving location as well.
- To fill the request with the item, select the Ellipse in the row for the item on the Scan in Items screen, and then select "Attach to request."
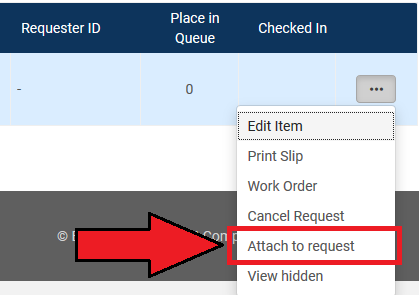
- A new pop-up menu should open, listing the requests for that title, associated with that scanned item.
Select the checkbox for the request.
Then select the "Attach" button.
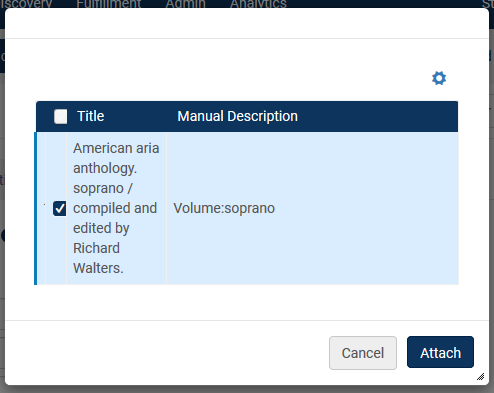
- Selecting the "Attach" button will automatically scan in the item a second time; this time the destination should be the patron's pick-up location and a Transit Letter may be printed.
Patron requested multiple volumes of a title in a single request
Since the volume field in the request form is a free-text field, a patron could potentially enter multiple volume numbers into a single request. However, Alma can only send one item per request.
Below are steps to fill the initial request for one item, and steps for staff to place and fill additional requests for the additional requested volumes. This workflow should work for both your own local patrons placing such a request, or an I-Share patron placing such a request.
- When a patron requests multiple items on a single request, begin by making notes of details about the initial request to use for the subsequent request(s) for the additional volumes.
Copy down:- Requesting patron's name
- Title requested by the patron, including ISBN or MMSID to help identify.
- Volume numbers requested by the patron
- Fill the request initially placed by the patron for one of the Volumes the patron requested, using the steps above for "Requests with submitted Volume details."
As you fill the request, make additional note of:- Patron's pick up institution
- Patron's pick-up library
If your library CAN fill an additional request for other volume(s) requested by the patron:
- Do a Physical Items search for the title, and locate the additional volume of the title you are able to supply.
- A Physical Items search allows you to request a specific copy of the title from your catalog.
- Locate the volume you wish to request in the results.
- To the right of the display, locate the Request button (not Resource sharing request). You may need to click the ellipse if the Request button is not visible.
- The Create Request form will open and prompt you to select the request type. Select the Request Type of Patron physical item request.
- The full Create Request form for Patron physical item requests will open.
- Fill out Requestor information, Pickup Institution, and Pickup At location.
- Submit the request in the upper right. The request for the volume should now display in the holding library's Fulfillment> Pick from Shelf list.
If your library CANNOT fill an additional request for other volume(s) requested by the patron:
- Contact the patron's home library with the request details, and ask them to submit the request for the additional volume(s) in Alma on behalf of their patron.
- Since the patron is not your library's home patron, and the item is not your library's item, the I-Share request you would have to place would NOT work if your library tried to place one for the patron.
- A library who is contacted with this information can use the directions on this page under "Staff Workflow for Placing Requests on Behalf of a Patron" then "In Alma: To place an I-Share request for another I-Share library's copy of a title not-owned by your library."
Patron requested an item from a multi-volume set, but did not specify which volume(s)
Since the volume field in the request form is a free-text field, which requires the patron to manually input their desired volume, patrons may forget to input that volume information.
From talking with staff at the I-Share libraries during the "Let's Talk About Fulfillment" sessions, many library staff are choosing one of two options, outlined below.
Option 1) Send all volumes for the title: When the multi-volume set was a small number of volumes, such as 2 or 3, many libraries are choosing to automatically send all volumes for the title, rather than taking the additional step of contacting the patron.
You can send multiple volumes using the directions above for: Patron requested multiple volumes of a title in a single request (even though there is no volume information entered into the request itself).
Option 2) Contact the requesting patron to inquire which volume(s) they had intended to request. To contact the patron to ask which volume(s), here are the steps to find the requesting patron's email address or phone number:
- Locate the request for the title in the Pick from Shelf List.

- The line in the request labeled "Fulfillment Network Institution Code" will contain the user's home institution's 3 letter I-Share code. In this example, 01CARLI_SIC, the SIC represents Southern Illinois University- Carbondale. Make note of the patron's home institution.
- The line in the request labeled "Requests" should be followed by a number. Select that number to learn more about the request, including the requesting user's name.
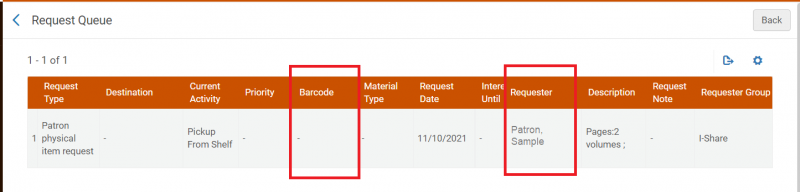
- Note that the Barcode column is blank; since this request is in Alma as a title-level request, Alma has not decided which specific item should be used to fulfill the request.
- Note the Requester column: it should contain the requesting patron's name.
- Copy the user's name from the Requester column.
- Use the persistent search bar to do a User search for the requester's name.
- Since the user has an active request at your institution, Alma has automatically saved a linked user record to your Alma IZ.
- As such, you can look up the user through the "User" search, without needing to do a Fulfillment> Manage Patron Services> "Find user in other institution" search.
- However, you may do Fulfillment> Manage Patron Services> "Find user in other institution" search if the patron has a common name.
- Since the user has an active request at your institution, Alma has automatically saved a linked user record to your Alma IZ.
- After locating the user's record from the search, open their record to confirm their home institution.
- Contact the patron to ask which volume(s) they wanted to request.
- The Contatct Information tab should include their preferred email address, and/or their preferred phone number.
- You can contact the requester directly to inquire which volume(s) they wanted from the title.
- You can also contact the requester's home library to ask for assistance in contacting the patron, if you prefer.
- Note: Since this is a title level request, the request does not display for the user on the Requests tab under "Manage fulfillment activities."
- The Contatct Information tab should include their preferred email address, and/or their preferred phone number.
- If/when you hear back from the patron before the request is automatically cancelled in Alma (after 7 days):
- If they want only one volume, you can fill the request using the directions above for: Requests with submitted Volume details (even though there is no volume information entered into the request itself).
- If they want multiple volumes, you can fill those requests using the directions above for: Patron requested multiple volumes of a title in a single request (even though there is no volume information entered into the request itself).
Supplying Library: Processing Requests that Cannot be Filled
Requests by Local Patrons
Requests by Local Patrons
The directions for local patrons vary depending on several factors including, 1) The patron's user group is I-Share eligible, 2) Your library is participating in AFN lending/borrowing, and 3) The material is of a type that can be requested through I-Share.
- If the answer is NO to any of those three conditionals, then you will use the "Cancel" workflow below.
- If the answer is YES to all of the three conditionals, you can use the "Convert" workflow below.
Cancel Workflow
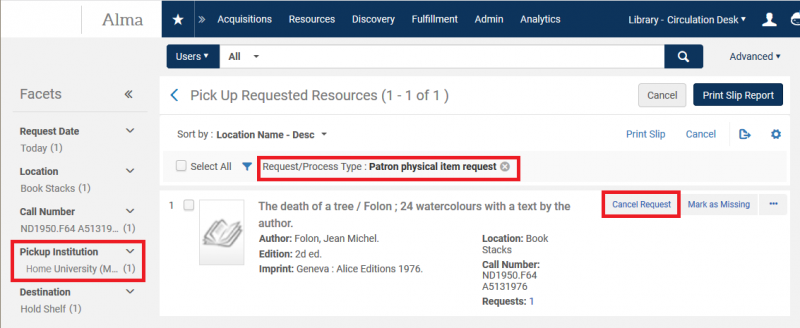
When your library has a local request that you are unable to fulfill, and you are also unable to convert it into an I-Share Resource Sharing request, you can cancel the request from the Fulfillment> Pick from Shelf screen. Before canceling, double-check that the request is a "Patron physical item request."
You can also confirm that the request is a local request because the request on the Pick from Shelf screen will not mention the Network Identifiers (See the Request by I-Share Patrons section below for an example of network identifiers). The patron may have also selected your institution as the Pickup Institution.
- After confirming the request is a local request, that is unable to be filled, in the Alma> Fulfillment> Pick from Shelf list, locate the request and select the "Cancel" button.
- The cancel window will open.
On this screen, you can:- Update the cancellation reason that will be recorded for record keeping, as well as included in the letter emailed to patrons.
- Add an additional cancellation note, that would be included in the Cancellation letter emailed to patrons.
- Check or uncheck the "Notify user" checkbox; this checkbox determines whether Alma will email a Cancellation letter to the patron.
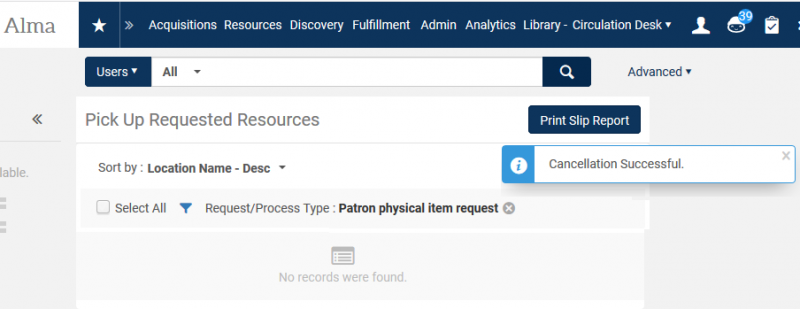
- After you've made your selections, select the "Confirm" button.
- After clicking confirm, you should receive a "Cancellation Successful" alert. The request will disappear from the pick from shelf list. If you chose to notify the patron, they should receive the email.
Convert Workflow
When your library has a local request that you are unable to fill, where the request was placed by an I-Share eligible patron, where the patron selected your institution as the Pickup Institution*, and your library is lending/borrowing through the AFN, your library can convert it into an I-Share Resource Sharing request.
*If the patron selected another I-Share library as their pick-up location, staff will want to place a new I-Share request for the patron using the steps on this page under "Staff Workflow for Placing Requests on Behalf of a Patron" and then cancel the original request using the Cancellation step above. Alma cannot directly convert a local request into an AFN resource sharing request, if the patron's pick-up institution is another I-Share library.
Library staff must have either the Fulfillment Services Manager or Fulfillment Services Operator role scoped to the Resource Sharing Library to convert requests.
- Preparation for converting a local request for Resource Sharing:
- Double-check that the request is a "Patron physical item request."
- Confirm that the request is a local request by noting the Pick from Shelf screen does not display the Network Identifiers (See the Request by I-Share Patrons section below for an example of network identifiers) for the request.
- Confirm that the patron selected your institution as their pick-up institution by using the
- After confirming the request is a local request, in the Alma> Fulfillment> Pick from Shelf list, locate the request and select the ellipse for the request.
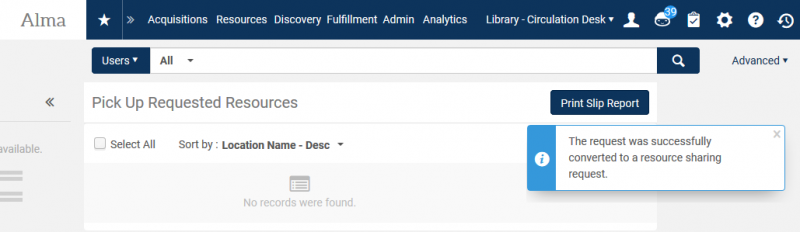
From the menu that opens, select "Convert to Resource Sharing."

- A confirmation message will display asking you to confirm the conversion. Select Confirm.

- You should receive a confirmation message that the request was successfully converted to a resource sharing request, and the request will disappear from the pick from shelf list. Behind the scenes, Alma will build the lender string, and forward the request to an I-Share library.
Requests by I-Share Patrons
Requests by I-Share Patrons
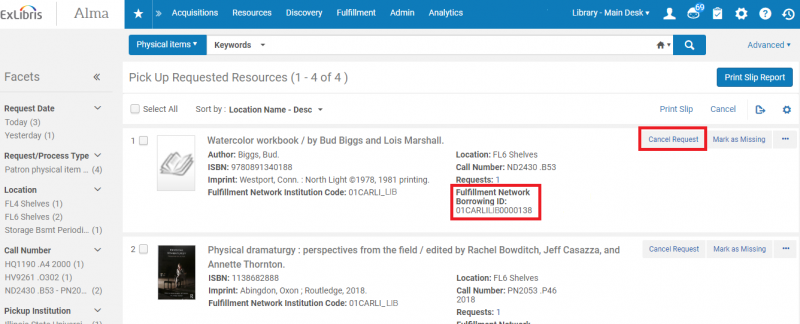
When you are unable to fill a request for an I-Share patron, "canceling" the request is the process used by Alma to promote the request to the next I-Share library in the lender string.
You can tell a request is an I-Share request when it is a patron physical item request AND it contains Fulfillment Network Borrowing identifiers. See secreenshot below for the location of those identifiers.
- When you are unable to fill a requets for an I-Share patron, select the "Cancel Request" button.
- The Confirm Request Cancellation box should open.
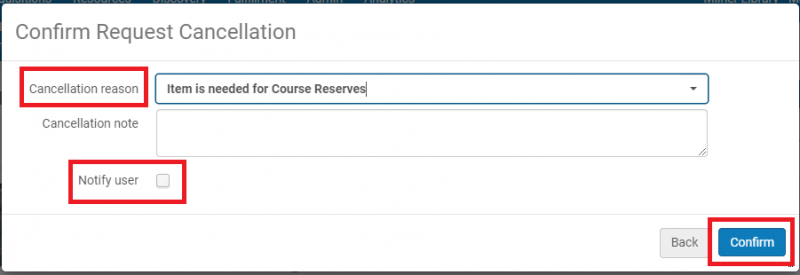
On this screen, you should:- Update the cancellation reason that will be recorded for record keeping.
- Optional: Add an additional cancellation note, that would be recorded in Alma.
- Uncheck the "Notify user" checkbox- since the request may promote to another I-Share library after your library cancels the request, we don't want to over-notify the patron with cancellation messages.
- After you've made your selections, select the "Confirm" button.
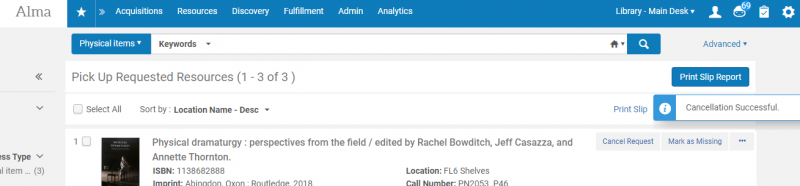
- You should receive a confirmation message that the request was successfully cancelled, and the request will disappear from the pick from shelf list. Behind the scenes, Alma will promote the request to the next I-Share library in the lender string.
Supplying Library: Preparing Filled Request for Sending
If the item should be transited to another I-Share institution:
- As requests are filled, Transit letters are printed. Staff should pair the Transit slip with the appropriate items. These items can then be prepared for ILDS shipping.
- Identify the ILDS code on the letter and package the items in the ILDS bags, being careful to not overfill the bags.
- For more information on preparing materials for shipping, visit the FAQ on the ILDS website.
If the item should be transited to another library at your institution:
- If the should be transited to another library at your institution, the workflow will vary depending on how your institution manages internal routing.
- When the item arrives at the patron's pick-up location, staff should follow the directions for "Receiving Library: Route Items in for the Hold Shelf."
Receiving Library: Route Items in for the Hold Shelf
Routing items in for hold
- Log into Alma with your staff username and password; select the appropriate Circulation desk.
- To route either local or AFN materials in for your hold shelf, go to Fulfillment> Resource Requests> Scan in Items
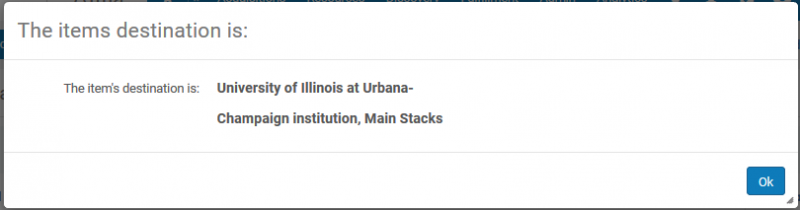
- Scan/enter the barcode for the item.
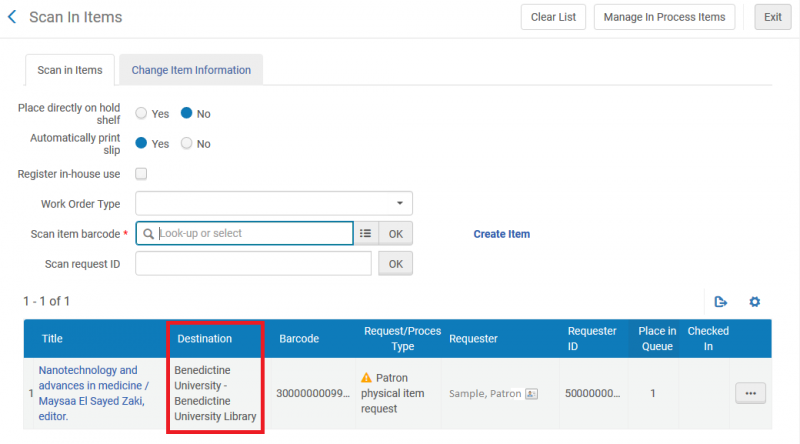
- Alma will display where to transit the material to (such as another branch library for patron pick-up), or, whether to place it on the hold shelf at your library. An item to be placed on the hold shelf is shown in the following screenshot.
- NOTES:
- If the slip does not print automatically, you can click the ellipse, and then "Print Slip." Alma should print the "Hold Shelf Request Slip Letter," or send it to the printouts queue, depending on the setup at your library.
- The value in the Requestor ID will not be helpful to you; this is the patron's linked user ID at the Item's Institution's library.
- NOTES:
- After scanning in the item for hold, place the item on your library's hold shelf.
- NOTES:
- The patron will be emailed the "On Hold Shelf Letter" letting them know the item is available for them to pick up; the letter is sent by the item's home library.
- For local requested materials, you can set a "delay for hold notification" period which will pause the sending of the On Hold Shelf Letter until after the delay has passed.
- For AFN requested materials, the "delay for hold notification" period at the patron's pick-up library should be consulted before the item's home library sends the letter.
- Since the "On Hold Shelf Letter" is sent by the item's home library, rather than the patron's pick-up library, the letter is consortially formatted.

- The patron will be emailed the "On Hold Shelf Letter" letting them know the item is available for them to pick up; the letter is sent by the item's home library.
- NOTES:
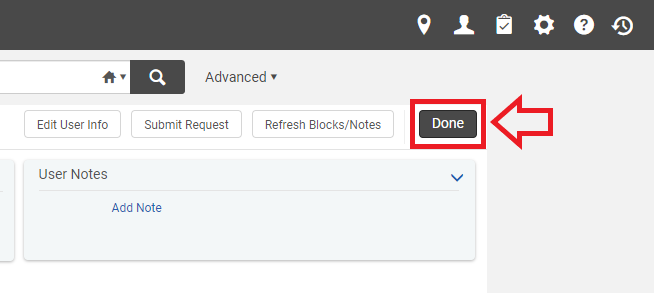
Receiving Library: Charging Materials from the Hold Shelf to the Patron
Charge materials to patron from Hold Shelf
See How To: Fulfillment in Alma for more step-by-step directions.
- Log into Alma, and select your appropriate Circulation location.
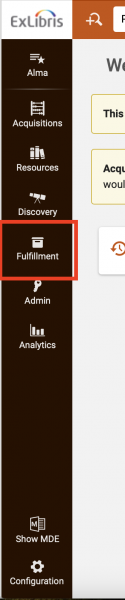
- At the top of the main Alma screen, select "Fulfillment".
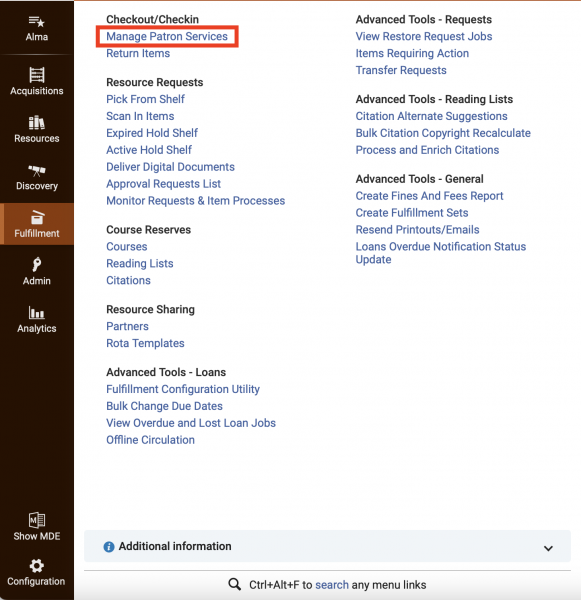
- From the resulting drop-down menu, under Checkout/Checkin, select "Manage Patron Services".
- The Patron Identification screen will open.
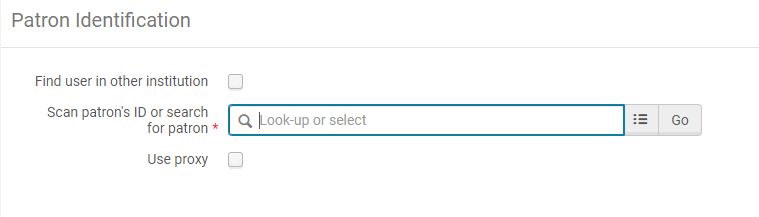
- At this point patron records can be brought up three different ways:
- scanning the patron's identification card barcode;
- looking up the patron by name; or
- looking up the patron by identification number.
- If the patron is a local patron, proceed to step 7.
If the patron is from another I-Share institution, check the "Find user in other institution" box and proceed with the steps outlined below.
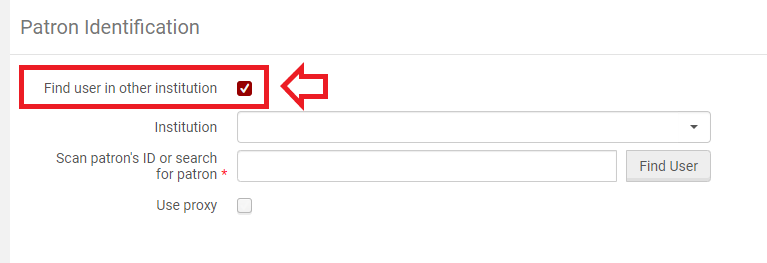
- Click on the drop-down arrow on the right of the "Institution" box to display the list of options.
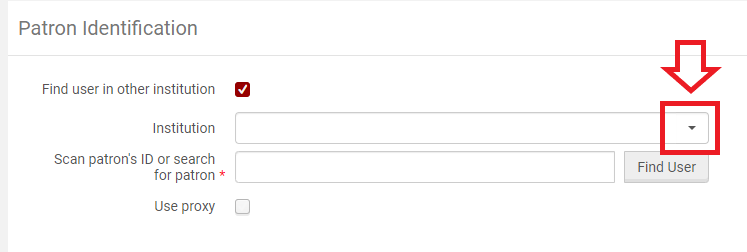

- Select the appropriate institution from the list.
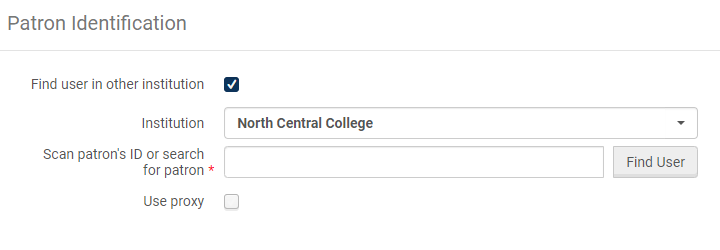
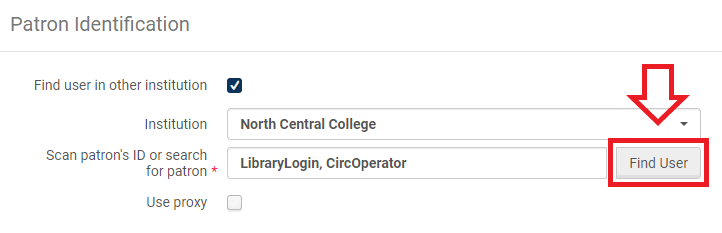
- Enter the patron's name or identification number and select "Find User".
Please note:- When searching for patrons from another institution, the name or ID number must match exactly and cannot apply to more than one account at that institution.
- If the patron has a common name, you will need to enter an ID number instead (Primary ID, Institution ID, or Barcode).
- If the I-Share patron already has a user record saved to your Institution Zone, their record open automatically to the Loans tab and you can proceed to step 7.
If the I-Share patron does not have a user record saved, the Quick User Management screen will open.
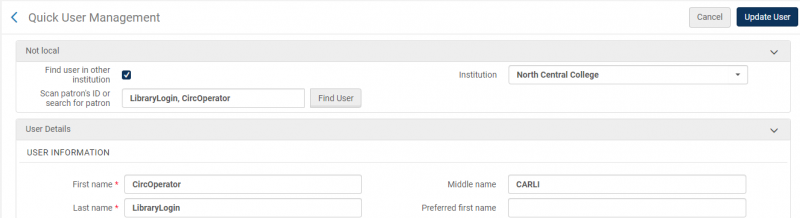
- Many fields may auto-populate, but make sure that all fields marked with a red star
 have been filled out correctly.
These required fields include:- First name
- Last name
- Primary identifier
- User group
- Expiration date
- Purge date
- Email types
- Address types
- Address line 1
- City
- State/Province
- Postal code
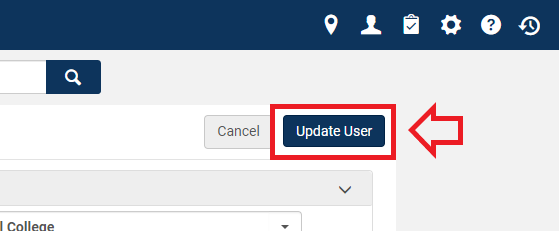
- Click on the "Update User" button.
- Many fields may auto-populate, but make sure that all fields marked with a red star
- Click on the drop-down arrow on the right of the "Institution" box to display the list of options.
- The patron record will automatically open to the Loans tab.
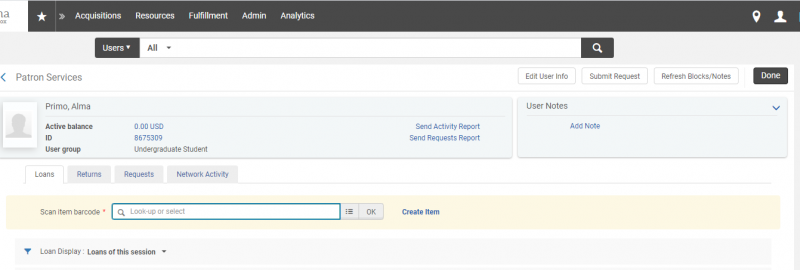
- At this point items can be checked out to the patron by:
- scanning the item's barcode;
- manually entering the item's barcode; or
- looking up the item in the catalog.
- After selecting the item and entering/pressing OK, item is now checked out to the patron.
- When you are finished checking items out to the patron, click the "Done" button.
Receiving Library: Return Items to Item's Home Library
Return items to items home library
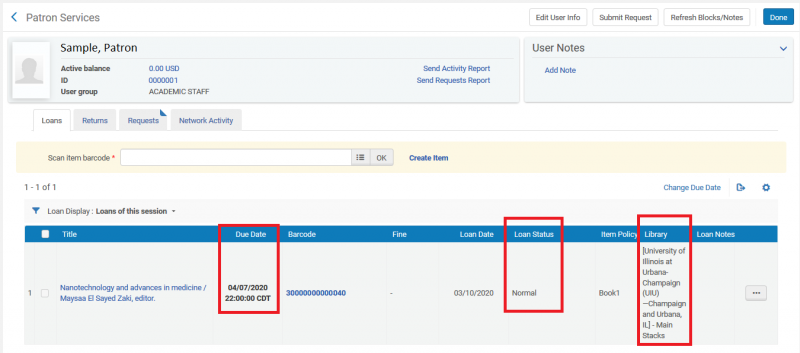
- When you are ready to return an I-Share item, go to Fulfillment> Return Items.

- The Return Items window will open. Scan/enter the item barcode that you are discharging (returning) from the patron.

- If the item needs routed back home to its library, or to another library, Alma should display a pop-up, as well as display the destination in the "Next Step" column on the Manage Item Returns screen.
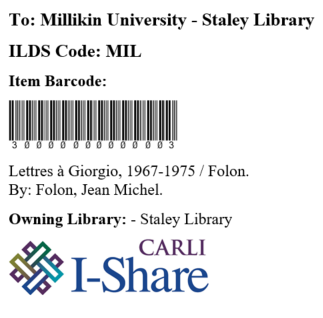
- If the item should be transited home to another I-Share institution, your library should print a paper transit slip as part of this process (using whichever Alma printing method works best at your library).
- The Transit slip that will print is consortially formatted and managed by the CARLI Office.
- The fields in the letter were selected in consultation with the CARLI Resource Sharing Committee.
- Sample return Transit Letter, as of 7/15/2020.
- The Transit slip that will print is consortially formatted and managed by the CARLI Office.
Supplying Library: Route Items in to "Return Home"
Routing items in to "return home"
- Log into Alma with your staff username and password; select the appropriate Circulation desk.
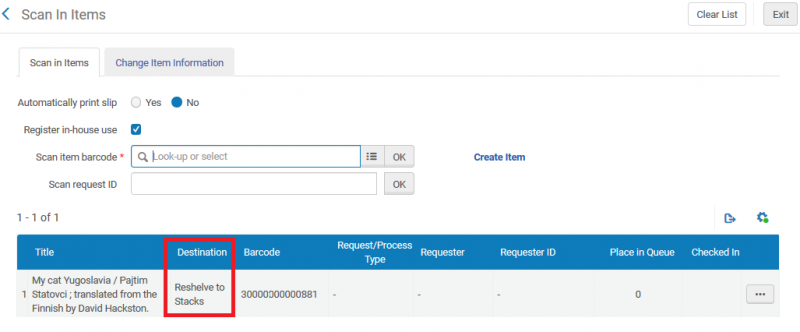
- To route materials in to return home, go to Fulfillment> Resource Requests> Scan in Items
- Scan/enter the barcode for the item.
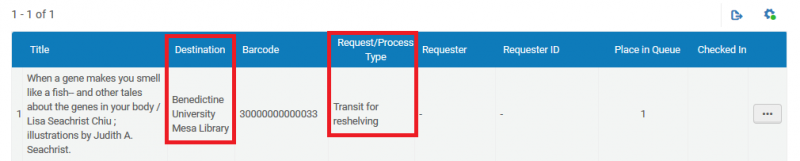
- Alma will display where to transit the material to (such as another library for final reshelving), or, whether to "reshelve" it at your current library where you are logged in.
- Screenshot showing an item with the Destination of "Reshelve to x" where x is the item's shelving location.
- Screenshot showing an item with the Destination of another library at the institution, and a Request/Process type of "Transit for reshelving".
This item will need to be routed to, and then scanned in, at its home library before it can be reshelved.
- Screenshot showing an item with the Destination of "Reshelve to x" where x is the item's shelving location.
- Once the item is ready to reshelve at its home library, the transaction is complete in Alma!
Determining the current status of your patron's request
As the patron's I-Share requests progress through the system, the request status in the Fulfillment> Borrowing Requests list does not update beyond "Request sent to partner."
The best place for you, as a library staff member, to see the status of the request is in the patron's record in Alma.
Old Manage Patron Services UI (interface that will be deprecated in May 2025)
- Retrieve your patron's record through a user search.
- Select the "Manage fulfillment activities" link.
- Review the tabs:
- The "Requests" tab will list both the patron's local and I-Share requests.
- For local requests, the "Task" column will update as staff work with the request.
- For I-Share requests, the "Task" column will always say "Not Started." The "Resource Sharing Request" column will accurately list at which I-Share library the request is "active".
- The "Network Activity" tab gives better information for I-Share requests and loans.
- The Network Activity tab is divided into a requests and a loans section; each only displaying if there is a transaction of that type for the patron.
- The "Task" column will have the most recent status for the request, including whether the item is in transit to the patron's pickup location with the status "Transit Item" or if the item is on hold at the patron's pickup location.
- The "Requests" tab will list both the patron's local and I-Share requests.
New Manage Patron Services UI (Interface that became default in February 2025; will become only UI in May 2025)
- Retrieve your patron's record through a user search.
- Select the "Requests" list.
- Review the tabs:
- The House icon, aka "Institutional Requests" will list both the patron's local and I-Share requests.
- For local requests, the "Workflow Step" information will update as staff work with the request.
- For I-Share requests, the "Workflow Step" information will always say "Not Started."
- The "Resource sharing information" line will say "Status: Request sent to partner" with a symbol of "Ready."
- Once the I-Share item is on the hold shelf at the patron's pick up location, the request will ONLY show on the Network Activity information; it will no longer be cross-listed on the local Institutional Requests (house icon) screen.
- The Network icon, aka "Network Activity" gives better information for I-Share requests.
- Note: You will need to clear the filter at the top of the Network Activity request list to see the requests on this tab. Ex Libris has confirmed the auto-application of a filter is a bug, and it will be fixed with a future release.
- The "Workflow step" information will have the most recent status for the request, including whether the item is in transit to the patron's pickup location with the status "Transit Item" or if the item is on hold at the patron's pickup location.
- The "Institution" information, if enabled for display by the library staff member, will show the item's home institution and managing library.
- Once the I-Share item is on the hold shelf at the patron's pick up location, the request will ONLY show on the Network Activity information.
- Note: You will need to clear the filter at the top of the Network Activity request list to see the requests on this tab. Ex Libris has confirmed the auto-application of a filter is a bug, and it will be fixed with a future release.
- The House icon, aka "Institutional Requests" will list both the patron's local and I-Share requests.
The patron should also be able to see these more accurate statuses in Primo VE, but, they'd need to look under the specific I-Share library in their list, that is sending the material.
Looking at the ROTA for the request can provide a little additional information, primarily if the request has moved beyond the initial library where the request was sent, but seeing the ROTA itself also doesn't let you know more about the current status of the request beyond which library it is/was last in the pick from shelf queue.
To see the Rota for the request:
- Locate the request in the Fulfillment> Borrowing Requests list.
- Select the "Edit" button for the request.
- The edit request page will open; there will be tabs across the top of the screen- one will be the ROTA tab.
- The ROTA tab will show you which I-Share library is "active" and which are the upcoming libraries in the list.
- To exit this view, use the arrow on the left side of the top of the screen to go back to the list of results.
Fixing Errors and Troubleshooting
- As you place requests and process transactions, you are to evaluate your individual institution/library settings, and the structure of the AFN overall, are working as anticipated.
- You can email the CARLI office when you encounter something unexpected. Please include the expected behavior, the unexpected behavior that occurred, and examples that can help us to replicate the situation.
Staff Workflow for Placing Requests on Behalf of a Patron
In Alma: To place a local request (if your institution allows local requests)
Use the Request button to place local requests, where your patron is requesting your library's item, for pick-up at either your library, or at another I-Share library.
- Log into Alma with your staff username and password; select the appropriate Circulation desk from your available locations.
- Do a Physical Items or Physical Titles search.
- A Physical Items search allows you to request a specific copy of the title from your catalog.
- A Physical Titles search allows you to place the request for any copy of the title from your catalog.
- Locate the title you wish to request in the results.
- To the right of the display, locate the Request button (not Resource sharing request). You may need to click the ellipse if the Request button is not visible.

- The Create Request form will open and prompt you to select the request type. Select the Request Type of Patron physical item request.
- The full Create Request form for Patron physical item requests will open.
- Fill out Requestor information, Pickup Institution, and Pickup At location.
- Submit the request in the upper right. The request should now display in the holding library's Fulfillment> Pick from Shelf list.
In Alma: To place an I-Share request for another I-Share library's copy of a title owned by your library
Use the Resource Sharing Request button to place an I-Share request for another I-Share library's copy of a title owned by your library.
The request can be picked-up at either your library, or at another I-Share library.
- Log into Alma with your staff username and password; select your appropriate Circulation desk from your available locations.
- Do a Physical Items or Physical Titles search. The results will display in your Institution zone.
- Locate the title you wish to request in the results.
- To the right of the display, locate the Resource sharing request (not Request button). You may need to click the ellipse if the Resource sharing request button is not visible.
- If you still do not see the Resource sharing request button, your user account may not have the roles needed to permit the action in Alma. Staff who should be able to place I-Share requests for local patrons in Alma, should have either Fulfillment Services Operator or Fulfillment Services Manager scoped to the institution and to the Resource Sharing Library.
- The Resource Sharing Borrowing Request form will open.
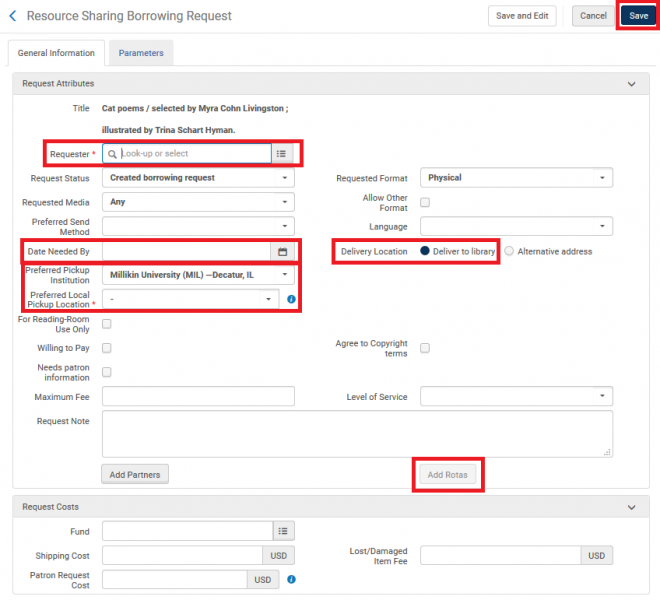
- Fill in the following information:
- Requestor information,
- Date Needed By,
- Delivery Location should be set to "Deliver to Library,"
- Preferred Pickup Institution,
- Preferred Local Pickup Location,
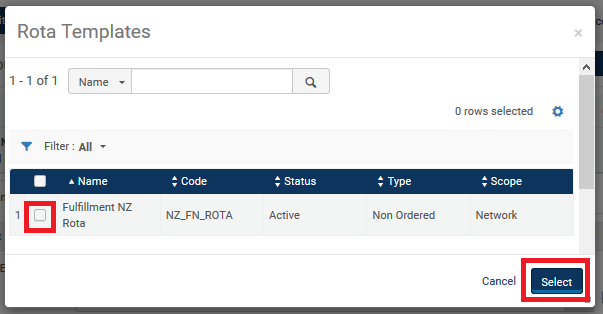
- then select the Add Rotas button, and select the checkbox next to "Fulfillment NZ Rota" then Select.
- Note: "Add Rotas" is the preferred option in this process, as it does not usually matter which library fills the request. However, it is also possible to select "Add Partner" to select a specific I-Share library's copy of a title. If that library is unable to fill the request, or unable to receive the initial request, Alma will be able to promote it to another I-Share library (if available).
- Fill in the following information:
- Save the request in the upper right.
In Alma: To place an I-Share request for another I-Share library's copy of a title not-owned by your library
Use the Resource Sharing Request button to place an I-Share request for another I-Share library's copy of a title owned by your library.
The request can be picked-up at either your library, or at another I-Share library.
- Log into Alma with your staff username and password; select your appropriate Circulation desk from your available locations.
- Do an All Titles search. Review the results on the Network Zone tab.
- Locate the title you wish to request in the results.
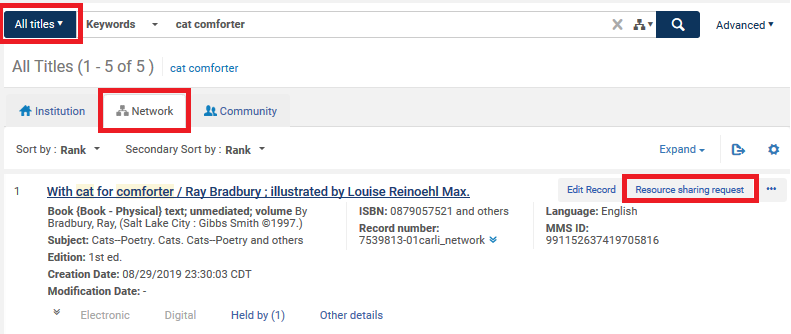
- To the right of the display, locate the Resource sharing request (not Request button). You may need to click the ellipse if the Resource sharing request button is not visible.
- If you still do not see the Resource sharing request button, your user account may not have the roles needed to permit the action in Alma. Staff who should be able to place I-Share requests for local patrons in Alma, should have either Fulfillment Services Operator or Fulfillment Services Manager scoped to the institution and to the Resource Sharing Library.
- The Resource Sharing Borrowing Request form will open.
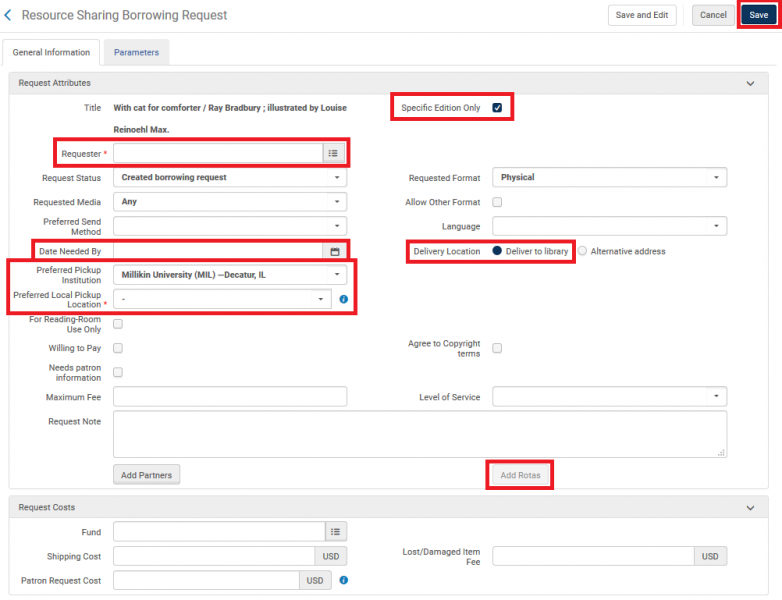
- Fill in the following information:
- Requestor information,
- Specific Edition Only
- Date Needed By,
- Delivery Location should be set to "Deliver to Library,"
- Preferred Pickup Institution,
- Preferred Local Pickup Location,
- then select the Add Rotas button, and select the checkbox next to "Fulfillment NZ Rota" then Select.
- Note: "Add Rotas" is the preferred option in this process, as it does not usually matter which library fills the request. However, it is also possible to select "Add Partner" to select a specific I-Share library's copy of a title. If that library is unable to fill the request, or unable to receive the initial request, Alma will be able to promote it to another I-Share library (if available).
- Fill in the following information:
- Save the request in the upper right.
Best Practices: Alma Hold Shelf Maintenance
Alma has an internal hold shelf list, where library staff can review the materials that are On Hold for pick-up at their library. Voyager did not have this functionality.
With the inclusion of these internal hold shelf lists, there are extra steps and extra options when working with materials on hold.
The directions below are for the hold shelf at library circulation desks, where the desk is NOT a Reading Room; Reading Room desks have alternate options and workflows.
Ex Libris Hold Shelf Management Documentation
Hold Shelf Overview
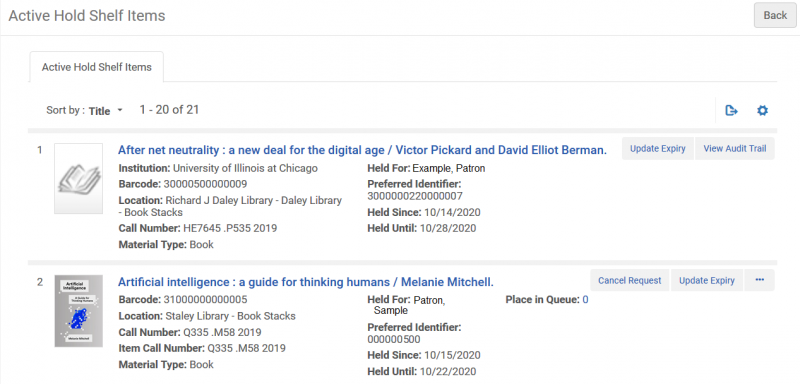
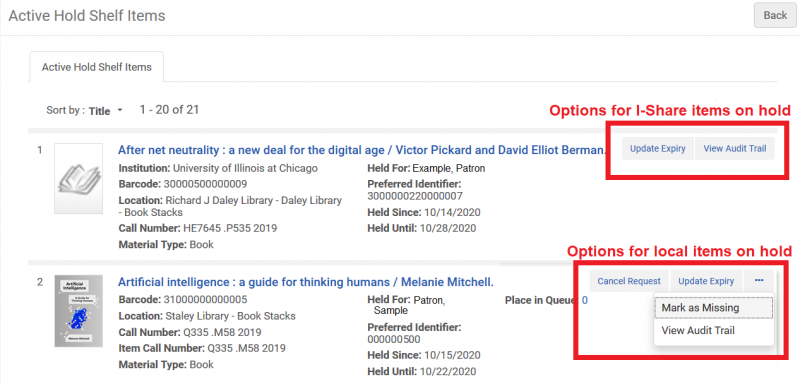
The hold shelf includes both local and I-Share material on hold at the circulation desk for patrons.
To view the hold shelf lists:
- Log into Alma and select the appropriate library circulation desk for where materials are on hold.
- Under Fulfillment> Resource Requests> locate the Active Hold Shelf and the Expired Hold Shelf options.
- The "Active Hold Shelf" is a bit of a misnomer; it should be called the "Entire Hold Shelf". The Active Hold Shelf includes material with a hold expiration date in the future, as well as material with a hold expiration date in the past.
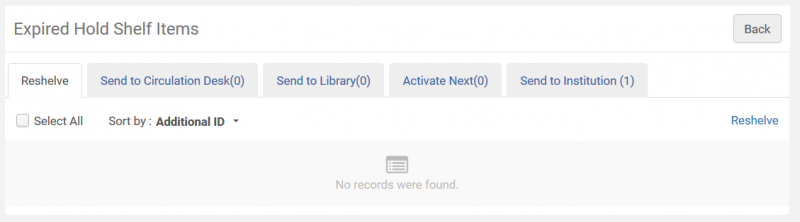
- The "Expired Hold Shelf" list is subdivided into tabs based on the next action for staff to take with the item. Not all tabs will contain items to work with each day. The tab name is followed by a number to denote if items are listed on the tab.
- The "Active Hold Shelf" is a bit of a misnomer; it should be called the "Entire Hold Shelf". The Active Hold Shelf includes material with a hold expiration date in the future, as well as material with a hold expiration date in the past.
To tell the difference between a local item and an I-Share item on hold:
- When reviewing the Active Hold Shelf Items:
- An I-Share item on hold will have two options: "Update Expiry" and "View Audit Trail."
- A local item will have additional options. In addition to "Update Expiry" and "View Audit Trail," you may see "Cancel Request" and "Mark as Missing."
How to Return an on-hold I-Share item the patron does not want
If a patron notifies you that they do not want an item that is on the hold shelf, but the hold shelf period has not yet expired:
- In Alma, go to Fulfillment> Active Hold Shelf
- Find the item the patron did not want in the list, and select the Update Expiry button.
- Change the expiration date to be yesterday's date.
- You should then find the item on the Fulfillment> Expired Hold Shelf list> "Send to Institution" tab.
- Refer to the steps below for "How to Return an item to another I-Share library after the hold has expired" for more details.
- For that item, select "Transit" to prompt Alma to create a transit slip for you to return it.
- You do NOT need to additionally Fulfillment> Return the item in Alma, selecting the "Transit" link for the item is enough.
How to Return an on-hold local item the patron does not want
If a patron notifies you that they do not want an item that is on the hold shelf, but the hold shelf period has not yet expired, you have multiple options:
Option 1: Expire the hold
- In Alma, go to Fulfillment> Active Hold Shelf
- Find the item the patron did not want in the list, and select the Update Expiry button.
- Change the expiration date to be yesterday's date.
- You should then find the item on the Fulfillment> Expired Hold Shelf list and then "Reshelve," "Send to Circulation Desk," "Sent to Library," or "Activate Next" depending.
- Refer to the steps below for these topics for more details.
Option 2: Cancel the request
- In Alma, go to Fulfillment> Active Hold Shelf
- Find the item the patron did not want in the list, and select the Cancel button.
How to Return an item to another I-Share library after the hold has expired
When an item's hold period expires, it will still be listed on the Active Hold Shelf List, but it will ALSO be listed on one of the tabs on the Expired Hold Shelf Items page. Each business day when delivery is available, library staff should check the Expired Hold Shelf for material to return to the item's home institution.
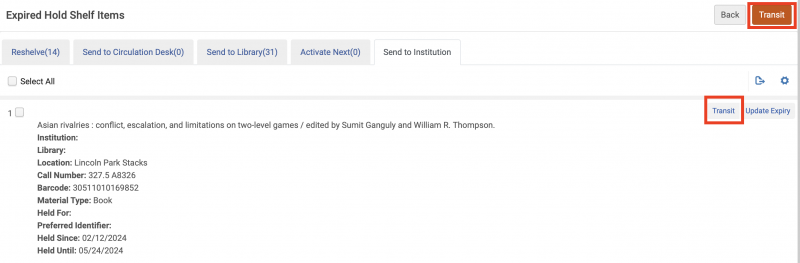
If the hold has expired for an item that belongs to another I-Share library, that item will be listed on the "Sent to Institution" tab.
- On the Expired Hold Shelf Items page, open the "Send to Institution" tab.
- Locate the item(s) on your physical hold shelf to make sure they are still available/unclaimed.
- Use the "Transit" option to direct Alma to return the item to its home institution.
- To transit a single item, select the "Transit" link under the item record.
- To transit multiple items simultaneously, check the check box for the item, and then use the Transit button.
- You do NOT need to additionally Fulfillment> Return the item in Alma, selecting the "Transit" link for the item is enough.
How to Return an item to another local branch library after the hold has expired
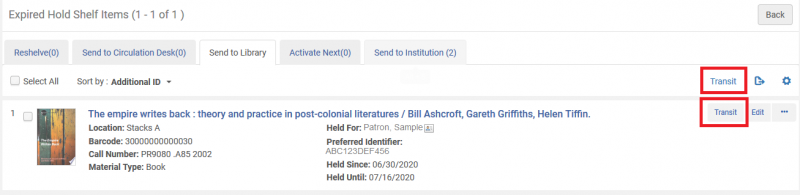
When an item's hold period expires, it will still be listed on the Active Hold Shelf List, but it will ALSO be listed on one of the tabs on the Expired Hold Shelf Items page. Each business day, library staff should check the Expired Hold Shelf for material to return to the item's home library.
If the hold has expired for a local item that belongs to another branch library, that item will be listed on the "Sent to Library" tab.
- On the Expired Hold Shelf Items page, open the "Send to Library" tab.
- Locate the item(s) on your physical hold shelf to make sure they are still available/unclaimed.
- Use the "Transit" option to direct Alma to return the item to its home institution.
- To transit a single item, select the "Transit" button listed for the individual the item record.
- To transit multiple items simultaneously, check the check box for the item, and then use the Transit button at the top of the list of all items.
- You do NOT need to additionally Fulfillment> Return the item in Alma, selecting the "Transit" link for the item is enough.
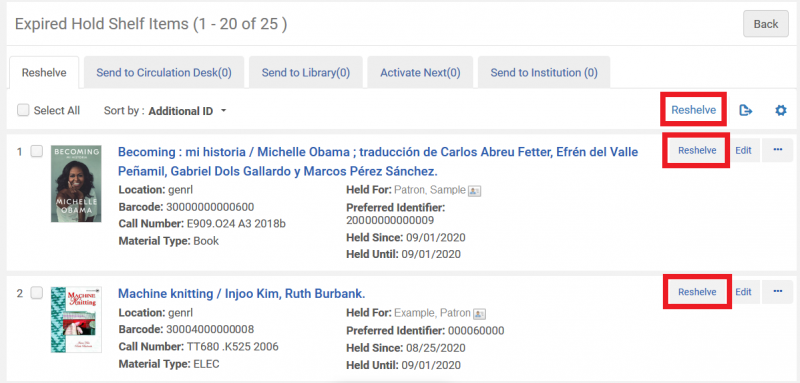
How to reshelve an item from this library when the local hold expires
When an item's hold period expires, it will still be listed on the Active Hold Shelf List, but it will ALSO be listed on one of the tabs on the Expired Hold Shelf Items page. Each business day, library staff should check the Expired Hold Shelf for material to reshelve.
If the hold has expired for an item that belongs to the library where the item was on hold, that item will be listed on the "Reshelve" tab.
- On the Expired Hold Shelf Items page, open the "Reshelve" tab.
- Locate the item(s) on your physical hold shelf to make sure they are still available/unclaimed.
- Use the "Reshelve" option to prepare the item to put back in its typical place.
- To reshelve a single item, select the "Reshelve" button for the item record.
- To reshelve multiple items simultaneously, check the check box for the item, and then use the Reshelve button at the top of the list of items.
- You do NOT need to additionally Fulfillment> Return the item in Alma, selecting the "Reshelve" link for the item is enough.
How to extend the expiration date for an on hold item
Library staff can extend the hold expiration date for both local and I-Share materials, as needed.
- Locate the item on either the Fulfillment> Active Hold Shelf, or for certain statuses, the Fulfillment> Expired Hold Shelf.
- For the item, locate either an "Update Expiry" button, or "Update Expiry" link. Select that option.
- Input the new expiration date into the pop-up window, and Save.
How to activate a next-requesting patron's hold - Forthcoming
Forthcoming. In the mean time, please review: Ex Libris Hold Shelf Management Documentation
Best Practices: Handling Local/AFN Requests When Library is Closed
Please email the CARLI Office at support@carli.illinois.edu and we will assist with adjusting your Alma Configuration.