One Time Order Steps
Monograph ordering
Scenario: Create an Alma PO Line (POL) for a single print book using the ISBN, where the bib record is available in the Network Zone, and the book was ordered at the vendor’s site.
- Log into Alma.
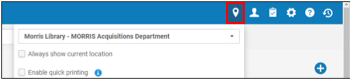
- Make sure your location is your library’s acquisitions department.
- Open Notepad or a blank Word document on your computer – this will allow you to quickly record information about the order, as needed.
- Copy the ISBN & title you are ordering into your notepad.
- Make sure your location is your library’s acquisitions department.
- Using ISBN, under All titles in Alma, run an ISBN search
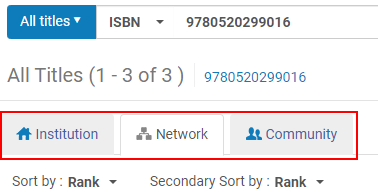
Notice the three tabs: Institution (your library), Network (I-Share libraries), Community (mostly e-resource records shared by the Alma community and vendors)- Check the Institution tab first – if there is no record displayed, your library does not hold this title.
- Click on Network tab next. Any titles held by I-Share libraries will display here. There could be multiple records listed.
- You do not need to check the Community Zone records (as of now there are no print bibs in that zone).
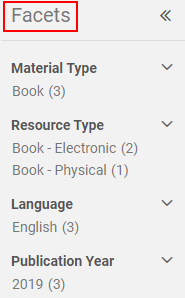
- Look at each title on the result list. Make sure to check Facets on the left side of the screen. For example, to select a print book, filter Resource Type by Book - Physical.
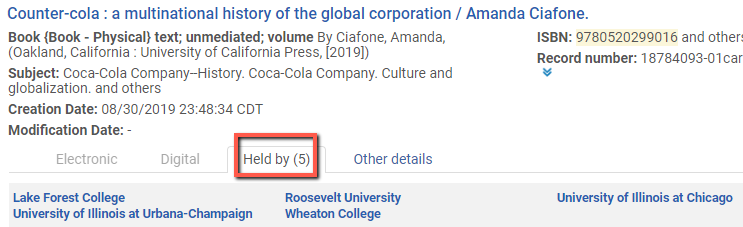
- In the Network Zone, the Held By tab under each title shows who else in I-Share holds this book. If you start with Network tab and it is held by your library, it will state “My Institution” first, instead of the name of your library.
- On the results list you will see brief bibliographic information. The ISBN displayed on this screen may not be the ISBN you searched for. Click on the title to view the detailed result screen and check the bibliographic information, ISBN (020), edition (250), title (245), publisher (260), etc.
- Once you’ve selected the correct bib record, copy the MMS ID into your notepad.
- In the results list, to start the order, click the order button on the right of the title.

Note: If the title is already attached to an order in your Institution Zone, click on the ellipsis button to see the order button. - The PO Line Owner and Type panel opens from the right. The title description displays. The ISBN you searched for may not show up as the first ISBN, it may be under “and others”. You can see all the ISBNs when you look at the full record.
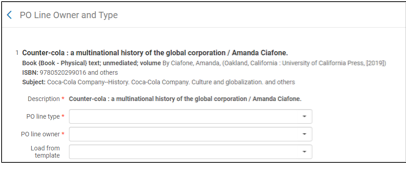
- A red asterisk indicates a required field.
- PO line type: you will see recommended options in the drop-down. Expand the Recommended section or the Other section, then select the appropriate format, e.g. Physical – One time.
- PO Line owner – select from the drop down list.
- Optionally, select Load from template to choose a set of previously saved default PO Line values.
- Next click on Create PO line on top right of screen.
- The Purchase Order Line Details panel opens with a status of In Review. Scroll down to see the full page.
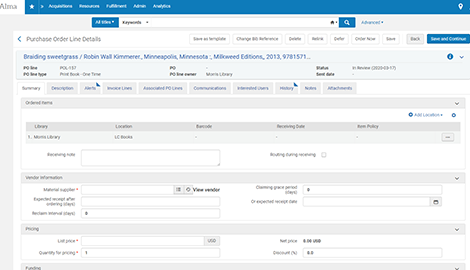
- The ordered title description appears at the top.
- PO line was filled in. Copy the PO line number (e.g. POL-257) into your notepad (highlight, click on copy, which appears above the highlighted text)
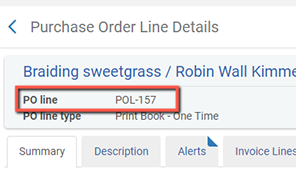
- PO line type came over from previous page, the PO number will not be filled in, Status is In Review.
- Change Acquisition Method to Purchase at Vendor System.
- Under vendor information select the material supplier from the dropdown box.
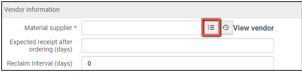
- The search defaults to Account Code, change it to Vendor Code or Vendor Name and search for the appropriate vendor. Alma requires both a vendor and vendor account for each order. Mark the desired line, then click Select.
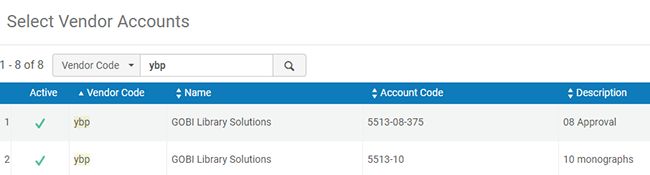
- Hold the cursor over the populated material supplier field to verify the correct account was selected.
- Expected receipt after ordering comes from the vendor record, if it has been set up. Note: If no Expected receipt date is entered it will default to the order date.
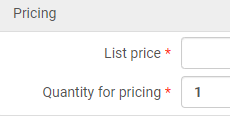
- Pricing: Enter the price in List price field. Discount information may be copied from the vendor account; follow instructions for your library on whether or not to enter discount information in the PO line.
- Quantity defaults to 1, but can be edited.
- Select Click here to add a fund. Note: this link is not active until a list price and quantity are entered.
- Enter fund or select from list. The down arrow will display the most recent used funds. The button opens a search.
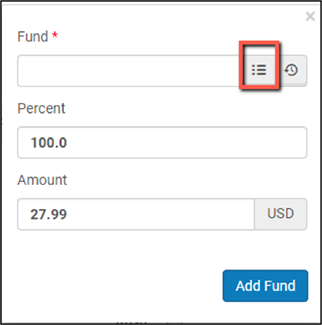
- After a fund is selected, the percent and amount will fill automatically.
- Hold your cursor over the filled in field to verify you selected the correct fund. Click the Save button under the amount.
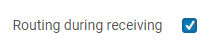
- If an item needs to be routed, click the "Routing during receiving" box. If this is selected, you’ll also need to fill out the Interested Users tab on the POL. From Alma documentation on Manually creating a PO line, “If selected, a confirmation message appears when receiving the PO line, informing the librarian that the order is marked for routing and the librarian must print the list of interested users.”
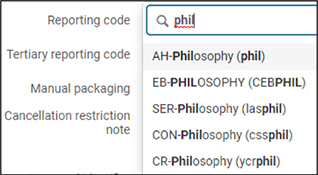
- Reporting code: If your institution uses any reporting codes, select desired reporting code for the purchase. Type in the code or select from the pop-up list of your institution’s reporting codes.
- Verify that everything is filled in on the POL.
If you wish to Manually Package POLs into Purchase Orders Check "Manual Packaging" and see below under "Save and Continue". You can also leave Manual Packaging unchecked and a job will run automatically to combine POLs from the same vendor into a Purchase Order. This requires the PO Line Packaging job to be set up (more information can be found at Packaging PO Lines into a PO).
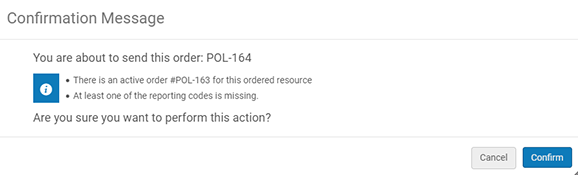
To finalize order, look at choices along the top: Save and Continue is highlighted but you can also choose Order Now. Save and Continue will save the POL and prepare it for auto-packaging. Order Now will put this one POL onto one PO and Confirm the order in one step.

Save and Continue:
Manual Packaging: Continue adding line items as above, making sure on each POL you check "Manual Packaging". Once you are done adding POLs you can package them:
- On the Select PO Line page (Acquisitions > Purchase Order > Package), select the check box to the left of each PO line you want to include in the PO.
Note: PO lines can be included in the same PO if they are for the same library, have a common vendor, vendor account and common currency, share the same order pattern (one-time/continuous), and share the same acquisition method and source type. - Select Create New PO. The selected PO lines are packaged into a PO and the PO is sent for approval.
- To Approve the PO (Acquisitions > Purchase Order > Approve) select each PO that you want to approve and send and select Approve and Send. You can approve and send individual POs by selecting Approve and Send in the row actions list for a specific PO. (See the Ex Libris document on Approving and Sending POs).
Clicking Order Now:
Using Order Now automatically packages the PO line to a purchase order with a single line and updates the PO Line status to "Sent." The PO Line is ready to be received and invoiced.
- Click Order Now.
- Order submitted pop up box shows.
- At this point you should definitely copy the POL number if you haven’t already.
- Click on Order Now.
Updated April 13, 2026