How-To: Changing Holding & Item Records Permanent Locations
Updated March 4, 2024
This How-To document addresses the setup and process for changing the location of physical inventory from one shelving location to another. The process described here may also be applied to other projects where library staff want to modify holding records in bulk.
Roles Required
- Normalization rule creation requires Cataloger, Catalog Manager, or Catalog Administrator for access to the metadata editor.
- Normalization process creation requires Catalog Administrator for access to Resources Configuration.
- Rule and process testing requires Physical Inventory Operator, and either Cataloger or Catalog Manager for access to the metadata editor and the ability to change physical holdings.
- Itemizing a set requires Cataloger, Catalog Manager, or Repository Manager for access to the Manage Sets page.
- Running the change holdings information job requires Catalog Manager, Repository Manager, or Catalog Administrator, or other roles capable of running jobs.
Process Steps
Normalization Rule Setup (New Metadata Editor)
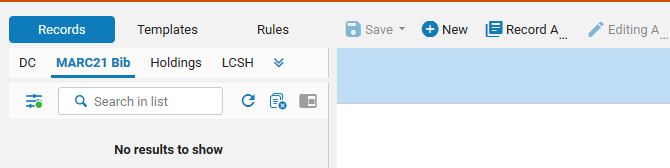
- Click on the Records tab so that the MDE has menus used with MARC records.
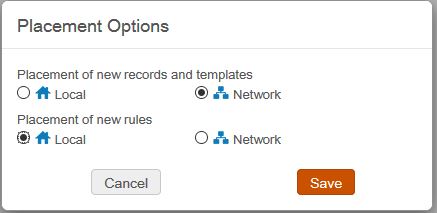
- Click the New menu, then scroll to the bottom and select Placement Options.
- In the Placement Options dialog, change the value for Placement of new rules to Local. Then click Save.
- Click the Rules tab, and watch for the menus to change to those for rules.
- Click the New menu, then select Normalization Rule.
- Enter the rule name and description, e.g., Holding Change Rule.
- Select Shared. (Private rules cannot be used in a normalization process.)
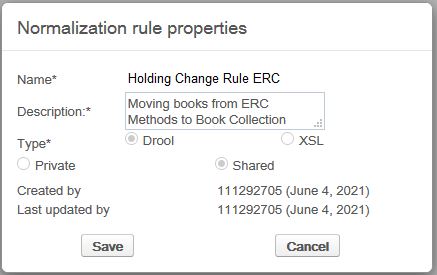
- Click Save. This will create the rule and open an empty editor workspace.
CARLI has created a sample change holding rule that may be used as a template. This rule is saved in the network zone and is visible in the rules list, though it cannot be used as is. The text of that rule follows below
rule "01 Change holding location"
when
(TRUE)
then
replaceContents "852.c.oldloc." with "newloc"
end

rule "02 Remove call number prefix"
when
(exists "852.k.*")
then
removeSubField "852.k"
end
Library staff may also choose to copy the contents from that rule into the new rule above using the following steps.
- Type the F6 key to open the Editor Split Mode.
- Filter the rules list or scroll and locate the Sample Holding Change Rule.
- Click on the rule. The sample rule should appear in the right hand pane, with your new rule in the center.
- Copy the contents of the sample rule that you need, and paste them into your new rule.
- Click in the pane for your new rule, then click Save.
You may now modify the contents of the rule to fit your library's needs.
- Modify the values oldloc and newloc to be shelf location codes in your library.
- If you do not need to remove call number prefixes, you may remove that part of the rule.
- Add other rule options as you might need by following the syntax found at Working with Normalization Rules or examples from Alma Normalization Rule Examples.
Normalization Process Setup
Normalization rules must be associated with MARC record types in Alma configuration in order to be used in batch processes.
- Go to Alma Configuration.
- Go to Resources > Cataloging > Metadata Configuration.
- Click MARC21 Holding.
- Click the Normalization Processes tab.
- Click Add Process.
- Enter a Name for the normalization process, e.g., Marc 21 Holding Change Location.
- Enter a Description that elaborates on the change that this rule applies. For example, "Change location from stx to storage."
- Click Next.
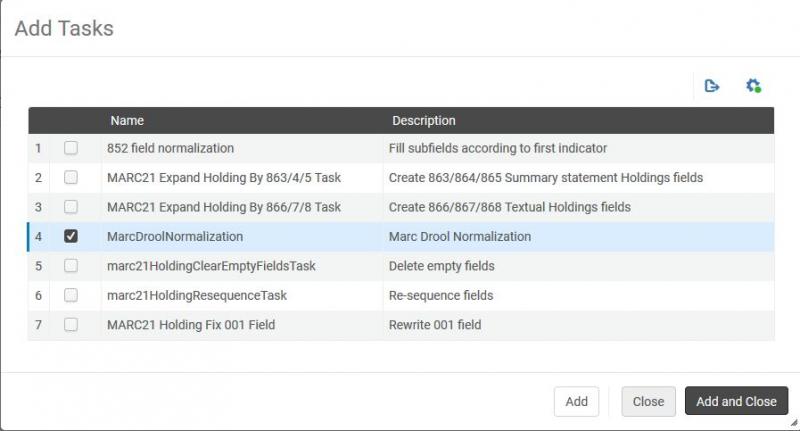
- Click Add Tasks.
- Select MarcDroolNormalization, then click Add and Close.
- Click Next.
- Click in the Drools File Key list and select your rule created above (e.g., Holding Change Rule.)
- Click Save.
- Go to Resources > Cataloging > Metadata Configuration.
- Click MARC21 Holding.
- In the top right corner, click Deploy.

Rule and Process Testing
Prior to running the normalization process as a job, you should test the process on a few records in the metadata editor. It's a good practice to select records from the set with different characteristics.
- Search for a title that will be in the set of records being changed. Edit that record in the metadata editor.
- With the bibliographic record in the MDE, go to the View Related Data menu, then select View Inventory.
- Click Edit for the holding that should be changed.
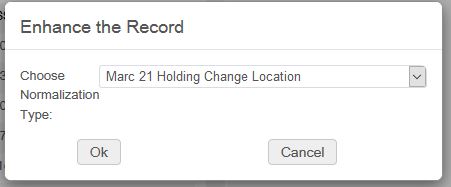
- Go to the Editing Actions menu, then select Enhance the Record.
- In the Enhance the Record dialog, click the list for Choose Normalization Type and select the process you created above. E.g., Marc 21 Holding Change Location.
- Click OK. This will apply the rule and save the holding record.
- Observe the holding record open in the MDE to verify that the rule changed only what should have been changed.
- If needed, you may revert any changes made to the holding by going to View Related Data, then View Versions. Click Restore on the previous record.
- If any changes were not applied correctly, you may click the Rules tab, then select and edit the rule. Save the rule after making a change.
- Click the Records tab and the Holdings sub tab to reselect the holding, then repeat steps 4-6.
- If changes were applied correctly, you may continue to test according to your needs.
Record Selection
You will want to create an itemized set of the records that you will change. An itemized set helps you explicitly identify the records to change. Itemized sets also remain grouped as a set after the change has been made, which may be helpful if you need to find any records after running a job.
If you already have a logical set created from a search, you may itemize the set from the list of sets.
- Go to Admin > Manage Jobs and Sets > Manage Sets.
- Locate your logical set, click the actions menu [...], then select Itemize. This will create a job to add members to the set. You should receive an email notification when the job completes and the set is ready.
You may also create the itemized set from a file containing a list of barcodes (or Item record IDs). Make sure the file has one barcode per line, and the first line has the heading, "Barcode".
- Go to Admin > Manage Jobs and Sets > Manage Sets.
- Click Add Set, then click Itemized.
- Enter a Set Name that describes the contents of the set, or what you plan to change, e.g,. Stacks Moving to Storage May 2021.
- Optionally enter a description and note.
- Change Set content type to Physical Items.
- Change Private to No.
- Under Add Contents from File to Set, select From File. Click the folder icon to browse your computer for the file of barcodes to load. Select the file then click Open.
- Click Save. This will create a job to add members to the set. You should receive an email notification when the job completes and the set is ready.
- To view the full job report:
- Go to Admin > Manage Jobs and Sets > Manage Sets;
- Click the History tab;
- Locate the most recent Add Members to Set job;
- Click the actions [...] menu, then select Report. The Add Members to Set report includes comma-delimited files identifying any matching errors.
Running the Job
- Go to Admin > Manage Jobs and Sets > Run a Job.
- Alma will present you a list of the jobs that you have permissions to run using your roles. The jobs are not listed in a predefined order, and the list has a default limit of showing 20 results per page.

- You may choose to sort the list of jobs by Name, Description, or Type.
- You may choose to use facets of Type, Source Type, and Content Type to filter the list.
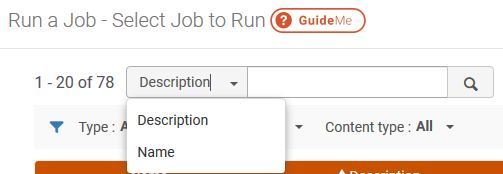
- You may choose to search the job list by Name or Description using the page search box. Description is the default option, so you will want to change
- Alma will present you a list of the jobs that you have permissions to run using your roles. The jobs are not listed in a predefined order, and the list has a default limit of showing 20 results per page.
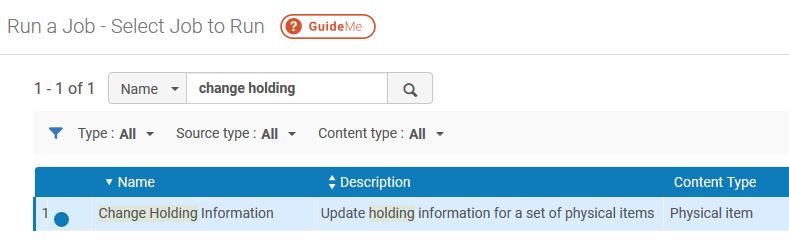
- Using one or more of the search, filter, or sort options above, locate and select the Change Holding Information job, then click Next.
- Select your set of physical items, then click Next.
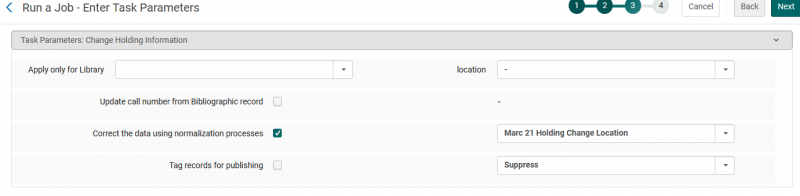
- On the enter task parameters screen, locate the parameter Correct the data using normalization rules. Select the normalization process you created above, e.g., Marc 21 Holding Change Location, then tick the box to the left. Click Next.
- Review your job name and settings, then click Submit. Click Confirm when prompted.
- You should receive an email notification when the job has completed and a brief report of the results of the job.
Suggested Good Practices
- It may be useful to create a generic holding change rule and holding change process to manage occasional location changes. In such a situation, you would modify the existing normalization rule with the new edits to make, but use the existing process to make the changes easily.
- If you have a project where not all the items will be changed at one time, or if there will be variations in the old or new locations, it will be safer to create new rules and processes that are specific to those changes.
- Be sure to review normalization rules before running a normalization process. Because the normalization rule will be shared, it's possible for other catalogers to modify the normalization rule that goes with a process. Be sure to check that the process will make the change you want.
- Example 1: Two staff members are moving items from Stacks to Storage. Since both staff are working with items moving between the same locations, they may both use the same rule and the same process to change the holdings.
- Example 2: One staff member is moving items from the 3rd Floor Stacks to Storage; another staff member is moving items from Reference to 1st Floor Stacks. Because these staff are working with different locations, they should each be using separate rules and processes that relate to the work being done.
Other Documentation
Ex Libris Knowledge Center
Working with Holdings Records: Performing Global Changes on Holdings Records
Working with Normalization Rules