Exporting Bibliographic Records from Alma
Alma provides options to export your MARC bibliographic records in case you would like to examine them outside of Alma (e.g., in MarcEdit) or in cases where you may share your records with another agency or vendor. The option described here allows you to create exports files on demand. Another option, publishing profiles, allows you to schedule periodic and incremental creation of export files.
To export records, you will start by creating a set of records, then run the Export Bibliographic Records job. Records may be downloaded from the job report, or you may send the output to an FTP server.
Create the Set of Titles
The Export Bibliographic Records job requires a set of titles to be selected. This may be a set of all titles, physical titles, or electronic titles, and the set may be a logical set created from a search, or you may create itemized sets that only export specifically identified records.
- Logical sets are dynamically updated by running a saved search strategy over the data in your repository.
- Itemized sets contain an explicit list of records. This set will not change unless the records included are deleted from the repository. Itemized sets may be created by itemizing a logical set or by creating an itemized set from a record list. Record lists may be text or Excel files, or you may use the results of an Analytics report.
- See Managing Search Queries and Sets for more details on how to create different kinds of sets.
Run the Export Bibliographic Records Job
There are several export jobs available with different functions. Select the Export Bibliographic Records job to get records.
- Go to Admin > Manage Jobs and Sets > Run a Job.
- Locate and select the Export Bibliographic Records job. You may use the filter box to search "Export" in the description or name of the job.
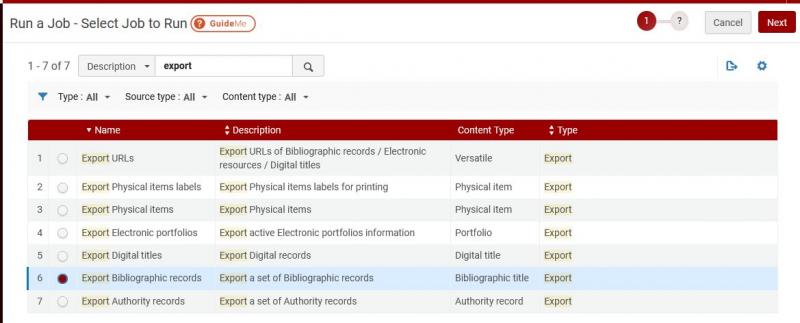
- Click Next.
- Locate and select your record set. Then click Next.
- On the Task Parameters screen, determine how the records will be exported.
- Physical Format: For MARC format, select Binary.
- Output Format: For MARC format, select MARC21 Bibliographic.
- Number of records in file: You may select One File, or you may select a maximum number of records per file.
- If you're planning to work on records in MarcEdit, smaller files might be easier to manage.
- If you're sending records to a vendor, larger files might be more efficient.
- The time to run the export job may vary based on the file size; likewise, the file size will affect the time to download or transfer files.
- Expand Routine: This field is optional. Select Add Holdings Information if you want details (e.g., 852, 863, 866 fields) from attached holding records.
- Export into folder: select Institution.
- FTP configuration: This field is optional. Select CARLI Secure FTP Server (key authentication) to have a copy of the file uploaded to CARLI's secure FTP server.
- You may configure other FTP servers in Alma configuration.
- Sub-directory (Path relative to ftp configuration): This field is optional and only relevant if you select an FTP configuration.
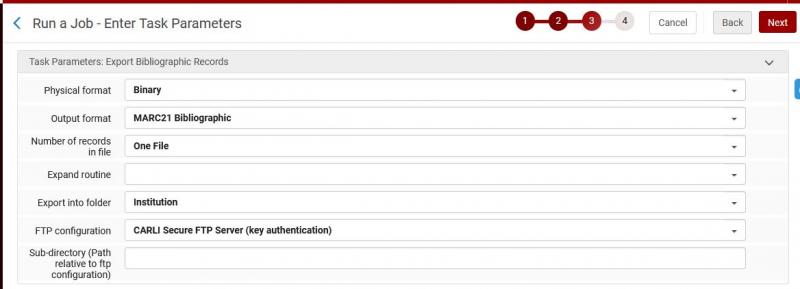
- Click Next.
- On the Review and Confirm screen, you may optionally modify the Job Name, which will appear in the Monitor Jobs list and the job report. You may want to take a screenshot of the set information and parameters for future reference, as these are not always included in the job report. Click Submit when ready, then click Confirm to start the job.
- Alma will continue to the Monitor jobs screen.
- When the job completes, you may receive two email notices from Alma. One report will have the subject message matching the job name, if you modified that name in step 7. The second email will have a subject of "Finish Job Notification." This message lets you know that the file transfer has completed.
Retrieving the Records from the Report
When Alma jobs complete, you may retrieve report details and other information from the job report, found on the Monitor Jobs > History page.
- Go to Admin > Manage Jobs and Sets > Monitor Jobs.
- Click the History tab.
- Locate your export job on the list. Depending on activity at your institution, your job may be in another position in the list, so you might use the filter box to find your job name. Click the actions menu (...) button, then select Report.
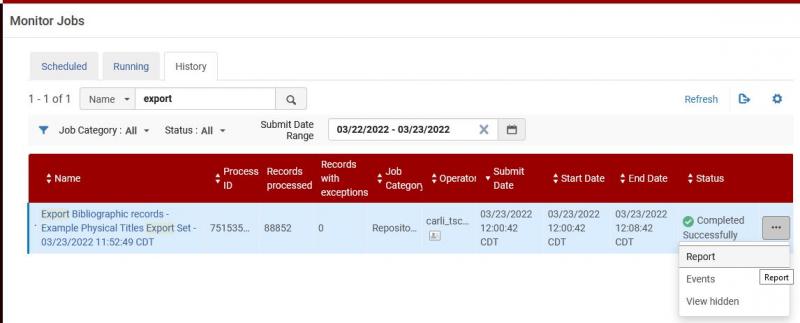
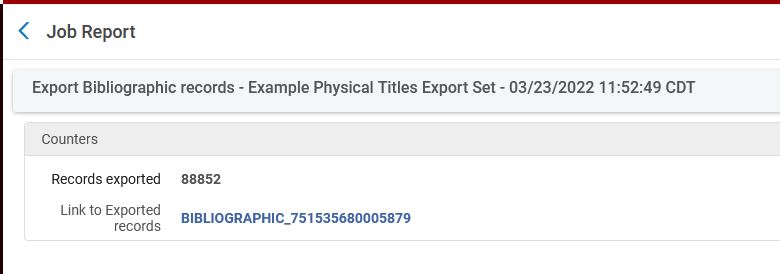
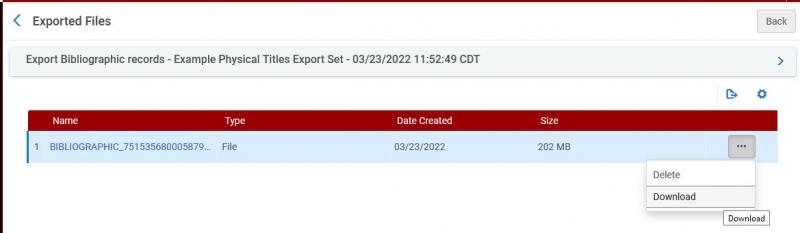
- On the Job Report detail screen, you will see the number of records exported and a link to the file of exported records. Click the linked file name.
- The Exported Files page will show you the files for your job. If you selected one file in the job parameters, then one file will be listed. If you selected a maximum number of records per file, you will see as many files as were required for the set of records. To download the file(s), you may click the linked file name, or click the actions menu (...) button, then select Download. The file will download according to your browser preferences (e.g., to ask before saving or automatically save to a folder).
If you retrieve the files through the job report, you do not need to use the FTP server method below.
Retrieving the Records from the CARLI Secure FTP Server
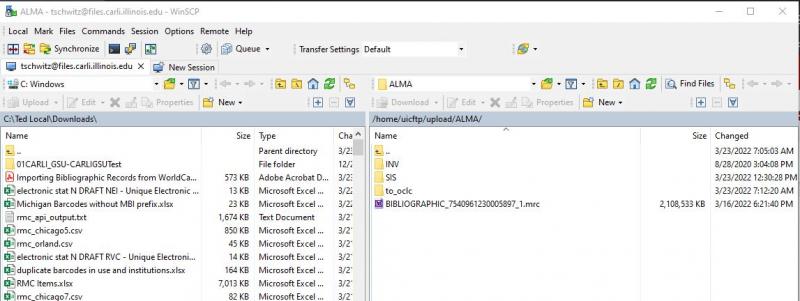
If you chose to have your exported records sent to the CARLI ftp server, you will need a secure FTP client to connect to the server. Details on connecting to the secure files server are posted on CARLI's Transferring Data Files to and from the CARLI Servers using Secure FTP page. Connect to the server using your institution's xxxftp account. Your library's I-Share Liaison should have the password to this account.
If you did not choose a sub-directory in the export job parameters, you will find the records file in the "ALMA" folder of your library's directory. The record file will be have a file name beginning "BIBLIOGRAPHIC_" followed by the process ID for the job and a file number. The file should have a .mrc file extension.
See also:
Ex Libris, Export and Publishing