How-To: Managing Alma Fulfillment Calendars
Overview of Fulfillment Calendars in Alma
- Calendars are used by Alma to define the open and closed times for your institution and its library/libraries; these times affect fulfillment activities and policies, such as:
- Due dates
- Hold shelf expiration dates
- How due dates are handled if the calculated date would be when the library is closed, aka "Closed Library Due Date Management"
- Alma Fulfillment Calendar times do NOT have to match the actual hours when your library is physically open or closed.
- Examples:
- Closing time can be set to be earlier than the actual physical close of the library space, if you do not want users checking out material past a certain time.
- Opening time can be set to be later than the actual physical opening of the library space, if you would like overnight reserve materials to be due an hour or two after the library physically opens.
- Examples:
- Calendars may be set at either the Institutional or the Library Level, depending on the structure of your institution.
- See the "Institutional vs. Library Calendars" section below.
- Roles needed to edit calendars:
- General System Administrator- can edit institutional or library level calendars
- Fulfillment Administrator, scoped to a library/libraries- can edit the library level calendar for the library in the scope(s)
Documentation:
- CARLI Office Hours: April 16, 2020: Alma Calendars, Authentication Testing, and Updating Proxy Links
- Ex Libris Documentation: Calendars (video)
- Ex Libris Documentation: Adding exceptions to override standard opening hours
- Ex Libris Documentation: Calendar FAQ
IMPORTANT NOTE:
The CARLI Office has asked all I-Share libraries to NOT edit the "Fulfillment Jobs Configuration" settings in Alma.
Most of these jobs have consortially-required settings, or, consortially-required active/inactive statuses.
However, it is possible library staff may have accidentally made a change to those jobs, if they have forgotten they should not edit them.
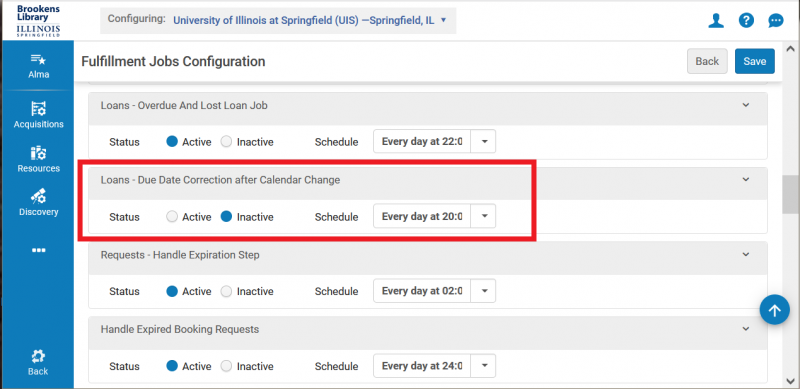
In Alma, there is a Fulfillment Job named "Loans- Due Date Correction After Calendar Change."
This job should remain INACTIVE.
Before you make changes to an Alma fulfillment calendar:
- In Configuration at the institutional level > Fulfillment > General > Fulfillment Jobs Configuration> locate the "Loans- Due Date Correction after Calendar Change" job.
- Confirm that the job is set to Inactive.
- After confirming, use the "Back" button at the top of the screen (instead of Save).
- Continue with your fulfillment calendar edits.
Managing the Institutional vs. Library Calendars
Institutional vs. Library- deciding where to make your edits:
- Standard opening hours are always set at the library level; they do not "inherit" down from the institutional calendar.
- Exceptions and Events can be defined at either the library level, or the institutional level.
- If you have only one library at your institution, you may define all calendar settings at the library level; your institutional calendar will be blank.
- Note: If want to use a date for a "term loan" in Alma, then that Term Loan event must be set at the institutional level.
- If you have multiple libraries at your institution:
- If the event or exception will be shared by ALL libraries at your institution, you can add it once in the institutional calendar, and it will be inherited at the library level.
- If the event or exception will NOT be the same at ALL libraries at your institution, instead, add it individually in each library's calendar.
- If you want to use a date for a "term loan" in Alma, then that Term Loan event must be set at the institutional level.
- If you have only one library at your institution, you may define all calendar settings at the library level; your institutional calendar will be blank.
To locate the calendar at the institutional level:
- Open Alma Configuration.
- Select the name of the institution in the Configuring dropdown if it isn’t displayed already.
- Select Fulfillment > Library Management> Opening Hours> Calendar Management tab.
Review the sections on this webpage for Editing Standard Opening Hours, Editing Exceptions, or the Editing Events, as appropriate.
To locate the calendar(s) at the library level:
- Open Alma Configuration.
- Select the name of the library in the Configuring dropdown.
- Select Fulfillment > Library Management> Opening Hours> Calendar Management tab.
Review the sections on this webpage for Editing Standard Opening Hours, Editing Exceptions, or the Editing Events, as appropriate.
Editing Standard Opening Hours
Edits to the Standard Opening Hours happen in the library level calendar.
To edit your library's open hours:
- Open Alma Configuration.
- Select the name of the library in the Configuring dropdown.
- Select Fulfillment > Library Management> Opening Hours> Calendar Management tab.
- Sort the rows on the "Calendar Management" tab by the Record Type column and locate the "Standard opening hours" in the list.
- Locate the day of the week which you would like to edit the hours> select the row ellipsis> choose Edit from the menu.
- The Calendar Management Standard opening hours form will open.
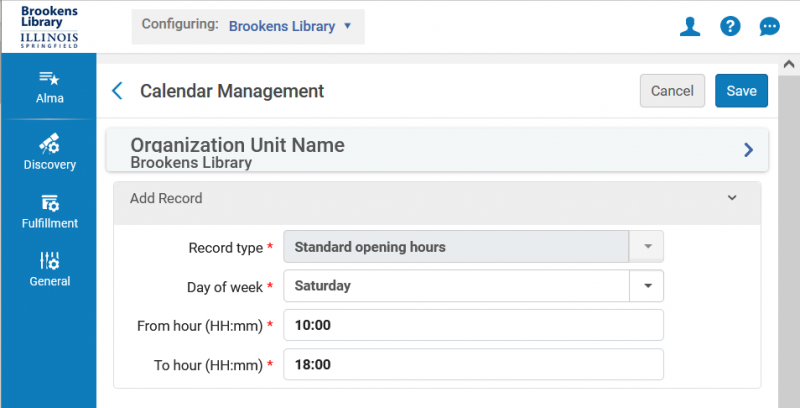
- Edit the From Hour at the time that the library opens, using a 24-hour clock.
- Edit the To Hour at the time that the library closes, using a 24-hour clock.
- Select Save on the editing screen.
- Continue making other edits to the calendar as needed.
- Once all edits are made, select Apply Changes above the calendar to implement your changes.
Then select Save the calendar at the top of the screen.
The Standard Opening Hours expire three years from the date that you set the hours.
Adding, Editing, and Deleting Exceptions
An exception adjusts the Standard opening hours, to specify open hours when the library is normally closed or closed hours when the library is normally open.
- If the library is normally open from 8:00 to 17:00, and it is open one day from 10:00 to 16:00, you would define two exceptions: one closed from 8:00 to 9:59 and another closed from 16:00 to 17:00.
- You can define a range of dates if you do not specify the "Day of the week to which the exceptions apply when adding the exception.
- However, Ex Libris recommends that you specify an exception for each particular day of the week to avoid unintended results.
- You can edit and reuse exceptions by changing the dates to be for the current year.
- You can delete past exceptions to keep your calendar tidy.
To Add an exception:
- Determine whether you will add the exception to either the institutional calendar, or the library calendar. Navigate to the appropriate calendar.
- At the top of the calendar, select the Add Record link.
The Add record window will open.
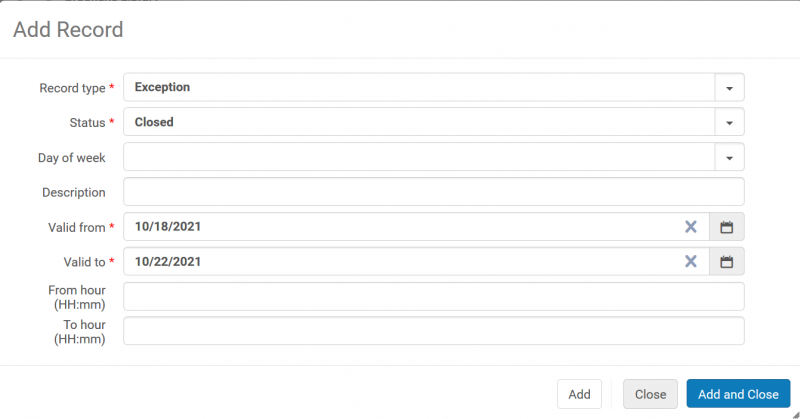
- Select a Record Type of Exception.
- Select the Status: Closed for a time at which the library is usually open, or Open for a time at which the library is usually closed.
- Optionally, select a day of the week to which this exception applies.
- Select the starting date of the exception in the Valid from field.
- Select the starting date of the exception in the Valid to field.
- Optionally, add a starting time in the From hour field and a closing time in the To hour field, using a 24-hour clock.
- Select Add and Close on the editing screen.
- Continue making other edits to the calendar as needed.
- Once all edits are made, select Apply Changes above the calendar to implement your changes.
Then select Save the calendar at the top of the screen.
If you receive the error "Error in To and From Date\Hour" when editing and adding exceptions to a calendar, you have a duplicate exception.
To Edit an exception:
- Determine whether the exception you want to edit is either in the institutional calendar, or the library calendar. Navigate to the appropriate calendar.
- Sort the rows on the "Calendar Management" tab by the Record Type column and locate the "Exceptions" in the list.
- Locate the exception which you would like to edit> select the row ellipsis> choose Edit from the menu.
- Make the changes needed to the exception.
- Select Save on the editing screen.
- Continue making other edits to the calendar as needed.
- Once all edits are made, select Apply Changes above the calendar to implement your changes.
Then select Save the calendar at the top of the screen.
To Delete an exception:
- Determine whether the exception you want to delete is either in the institutional calendar, or the library calendar. Navigate to the appropriate calendar.
- Sort the rows on the "Calendar Management" tab by the Record Type column and locate the "Exceptions" in the list.
- Locate the exception which you would like to delete and double check that you have selected the right row.
- Select the row ellipsis> choose Remove from the menu.
- Continue making other edits to the calendar as needed.
- Once all edits are made, select Apply Changes above the calendar to implement your changes.
Then select Save the calendar at the top of the screen.
Adding, Editing, and Deleting Events
Events should ONLY be added to the calendar if you will use them to affect a fulfillment activity, such as setting a Term Loan date.
Note that since Events are used to assign a specific due date, there are additional configuration steps to complete.
To add a completely new Event:
- Determine whether you will add the event to either the institutional calendar, or the library calendar. Navigate to the appropriate calendar.
- At the top of the calendar, select the Add Record link.
The Add record window will open.
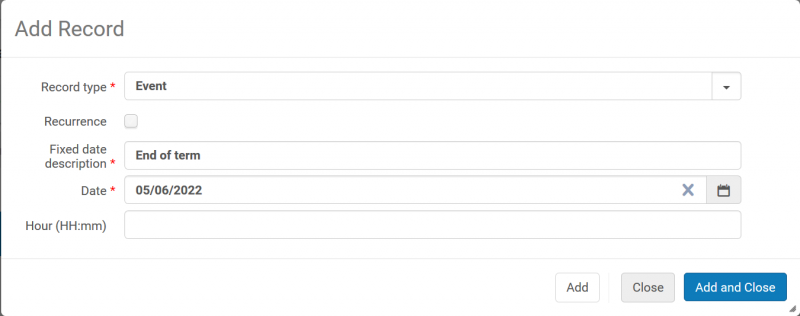
- Select a Record Type of Event.
- Add a description of the event in Fixed date description.
- If you would like to edit and reuse this event in the future, you will want the description to be more generic, such as "End of Term" instead of "End of Spring Term 2022."
- Select the date in Date.
- Optionally, add a time, other than the library's closing time, in the Hour (HH:mm) field, using a 24-hour clock.
- Select Add and Close.
- Continue making other edits to the calendar as needed.
- Once all edits are made, select Apply Changes above the calendar to implement your changes.
Then select Save the calendar at the top of the screen.
- At the Institutional Level of Alma Configuration, navigate to Fulfillment> Physical Fulfillment> Advanced Policy Configuration.
- At the top of the list, choose "Add Fulfillment Policy" and select "Due Date" from the list. Select Next.
- Set the Policy Name to match/reference the Event Description.
- Enter a Policy Description.
- Value Type: Fixed
- Value: Select the new event from the drop down list.
- Default Policy: False.
- Save the new Due Date Policy.
- This new Due Date Policy is now able to be assigned to your institution's Terms of Use. Please contact CARLI Support for any assistance or questions.
To add a new Event to replace a previous event (such as, "End of Summer 2022" to replace "End of Summer 2021"):
- Determine whether you will add the event to either the institutional calendar, or the library calendar. Navigate to the appropriate calendar.
- At the top of the calendar, select the Add Record link.
The Add record window will open.
- Select a Record Type of Event.
- Add a description of the event in Fixed date description.
- If you would like to edit and reuse this event in the future, you will want the description to be more generic, such as "End of Term" instead of "End of Spring Term 2022."
- Select the date in Date.
- Optionally, add a time, other than the library's closing time, in the Hour (HH:mm) field, using a 24-hour clock.
- Select Add and Close.
- Continue making other edits to the calendar as needed.
- Once all edits are made, select Apply Changes above the calendar to implement your changes.
Then select Save the calendar at the top of the screen.
- At the Institutional Level of Alma Configuration, navigate to Fulfillment> Physical Fulfillment> Advanced Policy Configuration.
- At the top of the list, choose "Add Fulfillment Policy" and select "Due Date" from the list. Select Next.
- Set the Policy Name to match/reference the Event Description.
- Enter a Policy Description.
- Value Type: Fixed
- Value: Select the new event from the drop down list.
- Default Policy: False.
- Save the new Due Date Policy.
- This new Due Date Policy is now able to be assigned to your institution's Terms of Use, to replace the previous Due Date Policy. Please contact CARLI Support for any assistance or questions.
To Edit an event where the Description of the Event DOES NOT change:
- Determine whether the event you want to edit is either in the institutional calendar, or the library calendar. Navigate to the appropriate calendar.
- Sort the rows on the "Calendar Management" tab by the Record Type column and locate the "Events" in the list.
- Locate the event which you would like to edit> select the row ellipsis> choose Edit from the menu.
- Make the changes needed to the event.
- Select Save on the editing screen.
- Continue making other edits to the calendar as needed.
- Once all edits are made, select Apply Changes above the calendar to implement your changes.
Then select Save the calendar at the top of the screen.
To Edit an event where the Description of the Event DOES change:
- Determine whether the event you want to edit is either in the institutional calendar, or the library calendar. Navigate to the appropriate calendar.
- Sort the rows on the "Calendar Management" tab by the Record Type column and locate the "Events" in the list.
- Locate the event which you would like to edit> select the row ellipsis> choose Edit from the menu.
- Make the changes needed to the event.
- Select Save on the editing screen.
- Continue making other edits to the calendar as needed.
- Once all edits are made, select Apply Changes above the calendar to implement your changes.
Then select Save the calendar at the top of the screen.
- At the Institutional Level of Alma Configuration, navigate to Fulfillment> Physical Fulfillment> Advanced Policy Configuration.
- At the top of the list, limit the Polcy Type to "Due Date."
- Locate the Due Date policy that used the previous Event and select the row action Ellipsis and then Edit.
- In the Value drop down field, select the Event name.
- Save the edited Due Date Policy.
To Delete an event:
- Before deleting an Event, you need to edit/delete the "Advanced Policy Configuration" due date setting that is pointing to this event.
THESE DIRECTIONS ARE COMING SOON.
- Determine whether the event you want to delete is either in the institutional calendar, or the library calendar. Navigate to the appropriate calendar.
- Sort the rows on the "Calendar Management" tab by the Record Type column and locate the "Exceptions" in the list.
- Locate the event which you would like to delete and double check that you have selected the right row.
- Select the row ellipsis> choose Remove from the menu.
- Continue making other edits to the calendar as needed.
- Once all edits are made, select Apply Changes above the calendar to implement your changes.
Then select Save the calendar at the top of the screen.
Viewing the Resulting Calendar
In Configuration
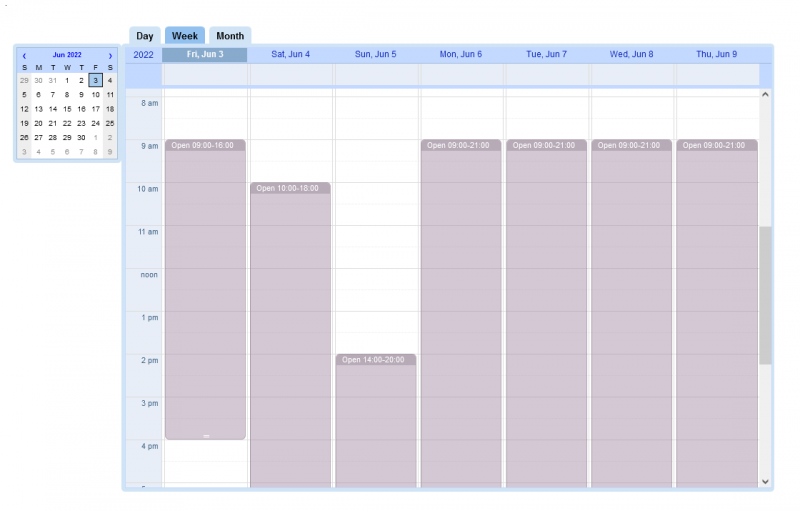
- Above the calendar in Alma Configuration, select the Full Calendar link to view the resulting open hours after the Standard Opening Hours and Exceptions have been applied.
For example:
Calendar Widget
Each individual Alma user can add a widget of your institution's calendar to their main Alma page.
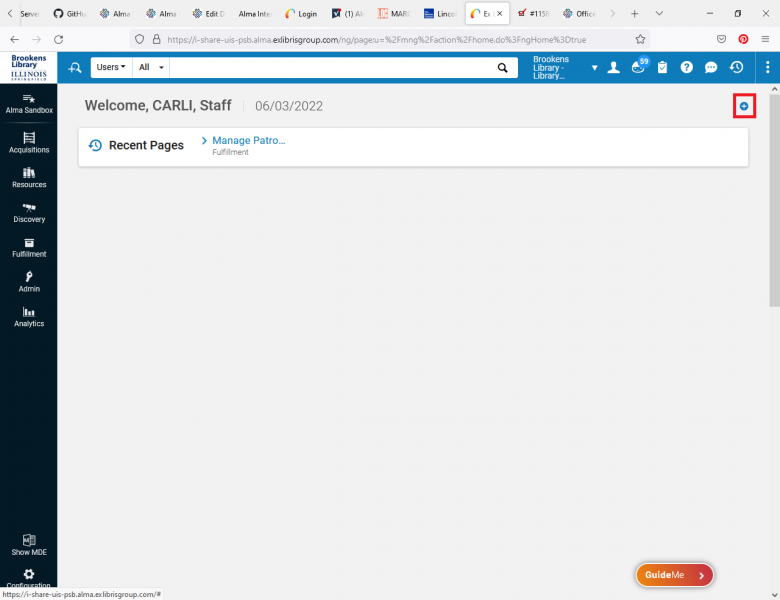
To add the widget:
- Select the plus sign at the upper right-hand corner of the page.
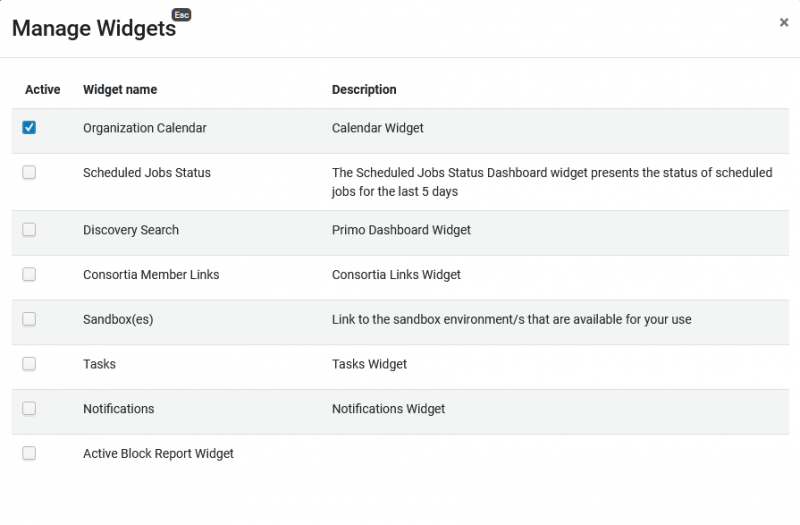
- Select the Organization Calendar.
- Alma then displays the widget on your Alma main page.
- Note that the open hours do not show by default because Alma displays the institution-level calendar:
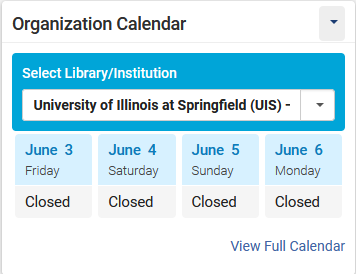
- To see the open hours, select the library from the drop-down list:

- Select View Full Calendar to view the same calendar as you see selecting Full Calendar within the Calendar Management page.