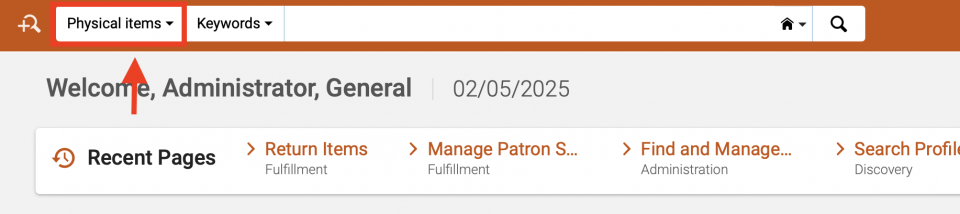
How To: Fulfillment in Alma
Overview
Comments and questions on these steps are welcome; please email CARLI support.
updated 2/13/2025
Required Roles
- The options available under the Fulfillment menu are dependent upon your assigned user roles. Your list of options may be different than the screenshots included below. If you do not have the necessary options, you will need to work with your institution's User Administrator to be assigned the appropriate roles for your work.
- To complete Fulfillment tasks outlined in this document, you must have one or more of the following roles:
- Circulation Desk Manager
- Circulation Desk Operator
- Circulation Desk Operator - Limited
- Physical Inventory Operator
Overview of Fulfillment Tasks
These topics are covered below:
- How to log into a Fulfillment workstation and change locations
- How to bring up a patron record and check items out
- How to look up a patron without an ID card
- How to add a patron to the database
- How to set up a proxy borrower and check out an item by proxy
- How to check in items
- How to check an item in or out when the barcode is missing or illegible
- How to create a work order
- How to create a record for check out
- How to set an item status to "missing"
- How to manage patron blocks
- How to manage fines and fees
- How to manage patron notes
- How to manage patron requests
- How to manage item holds
- How to manage the pick from shelf list
- How to move an item
- How to add a "Fulfillment Note" to an item
- How to count browse uses (In-house use)
Documentation from Ex Libris
- Documentation:
- Videos:
Thank you to Shelly McDavid of Southern Illinois University Edwardsville for providing the groundwork for this how to page.
How to log into a Fulfillment workstation and change locations
- Using an internet web browser, navigate to Alma at https://i-share-xxx.alma.exlibrisgroup.com/mng/login, replacing "xxx" in the web address with your institution's three-letter code.
- Login to Alma according to your institution's guidelines.
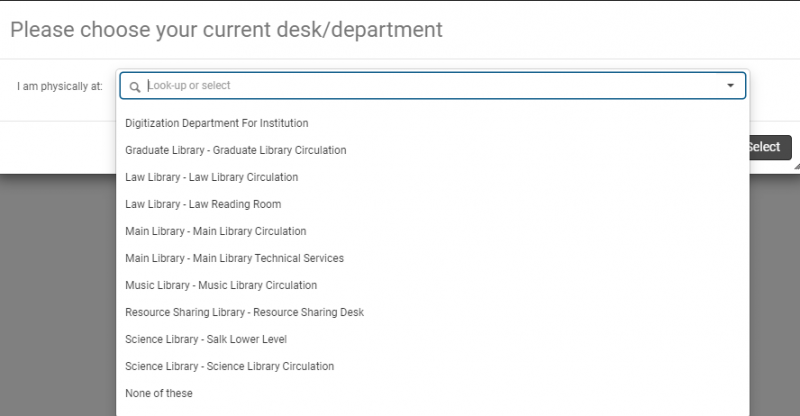
Upon login, a popup may appear asking you to choose the desk or department from which you are working. If this happens, continue to step 3. If no popup appears, skip ahead to step 6.
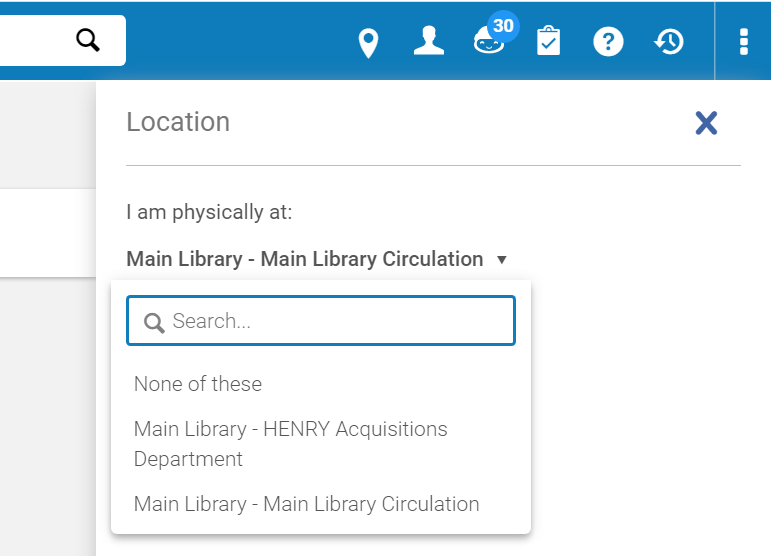
- Click on the drop-down arrow.
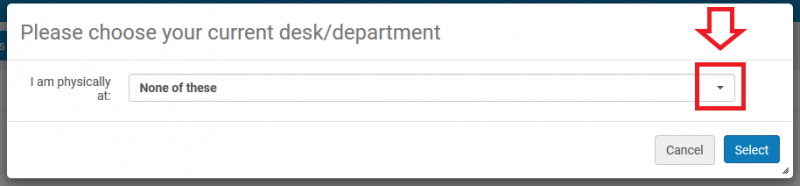
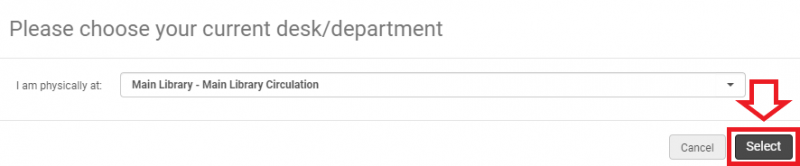
- Select the appropriate desk/department from the drop-down list. Please note that this image is for training purposes only. Your institution's selections will be different.
- Once you have chosen your desk/department, click on the "Select" button.
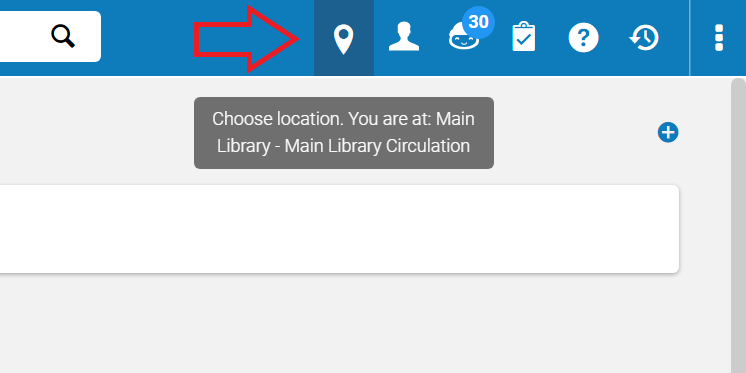
- Desks/departments are also known as locations. If you want to verify or change which location you are logged into, look in the upper right hand corner. If the task bar looks like
- this:
 proceed to step 7.
 - this:
 proceed to step 8.
- this:
- To verify which location you are logged into, hover your pointer over the location icon in the upper right of the screen. A temporary pop-up should appear displaying your current location.
- To toggle between and , click on the location icon or statement to display a drop-down menu.
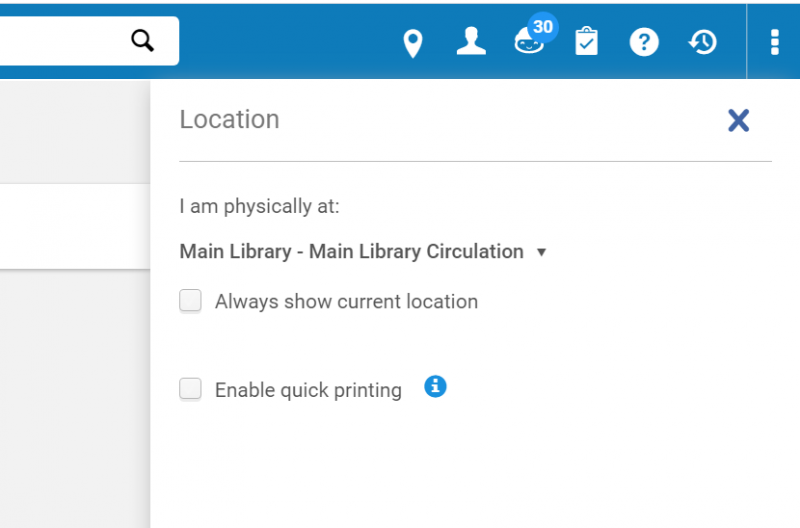
- Check or uncheck the "Always show current location" box.
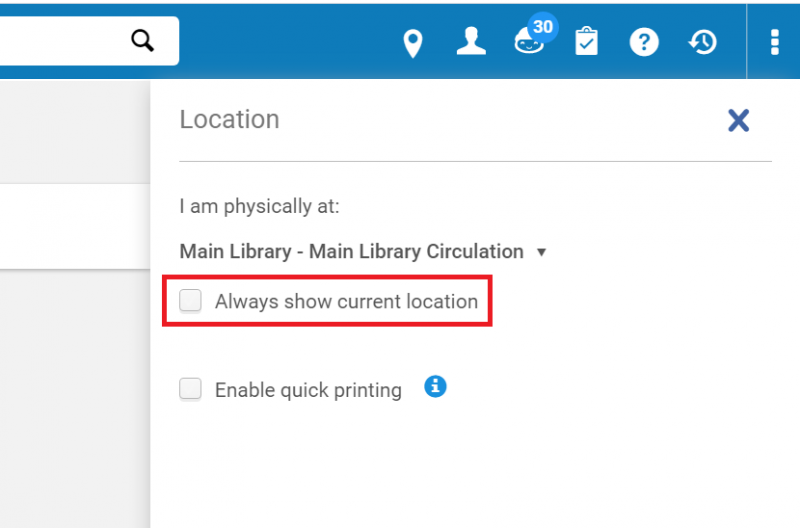
- If the "Always show current location" box is checked, the task bar will look similar to . If it is unchecked, it will look like .
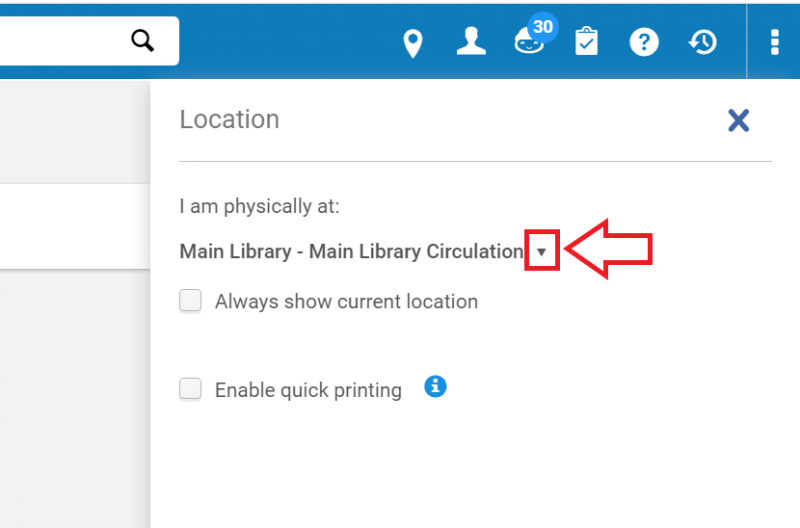
- If you would like to change your location, click on the location icon/statement and deploy the drop-down menu. Then to display the available location options, click on the drop-down arrow.
How to bring up a patron record and check items out
New Manage Patron Services UX (post-February 2025)
- Log into Alma, and select the appropriate Circulation location.
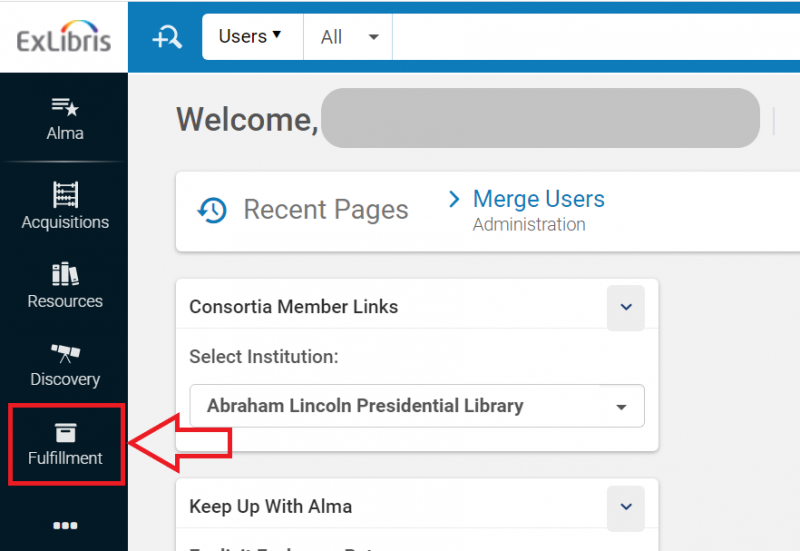
- At the side of the main Alma screen, select "Fulfillment".
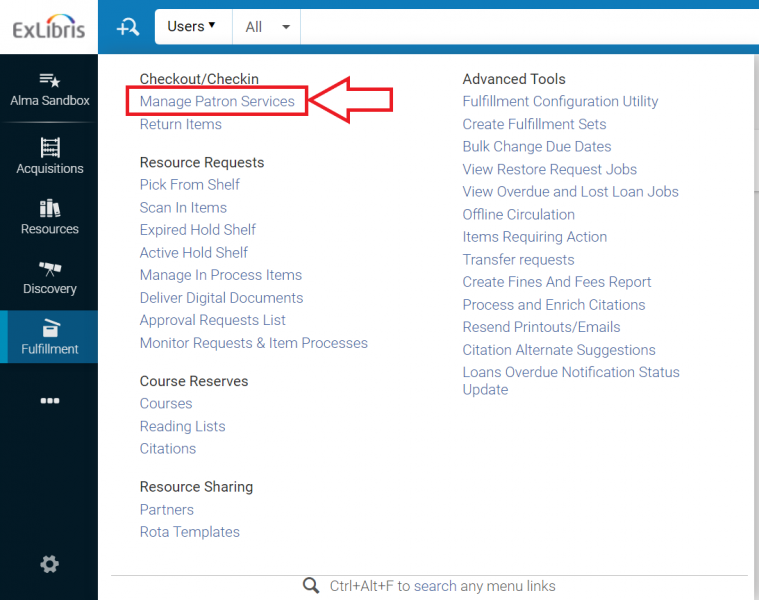
- From the resulting menu, under Checkout/Checkin, select "Manage Patron Services".
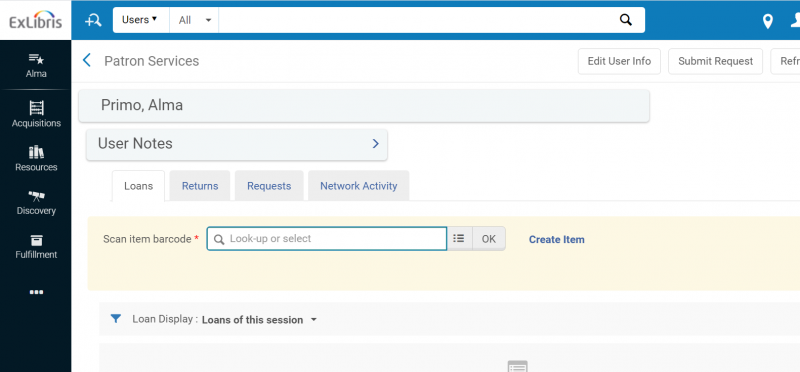
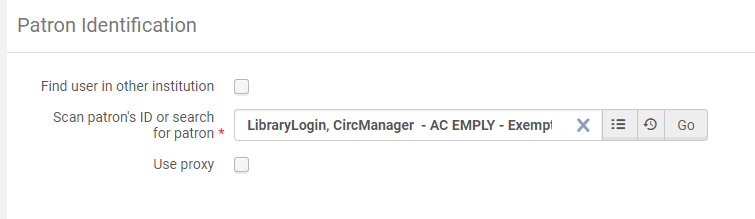
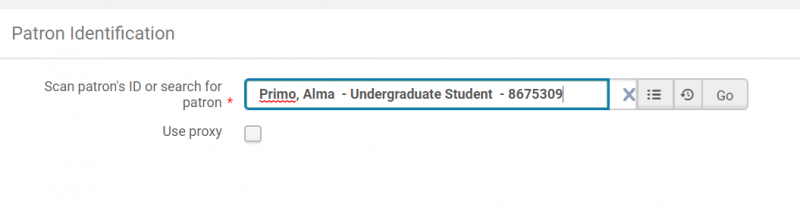
- The Patron Identification screen will open.
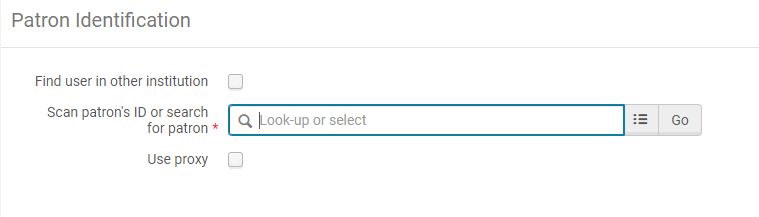
- At this point patron records can be brought up three different ways:
- scanning the patron's identification card barcode;
- looking up the patron by name; or
- looking up the patron by identification number.
- If the patron is a local patron, proceed to step 7.
If the patron is from another I-Share institution, check the "Find user in other institution" box and proceed with the steps outlined below.
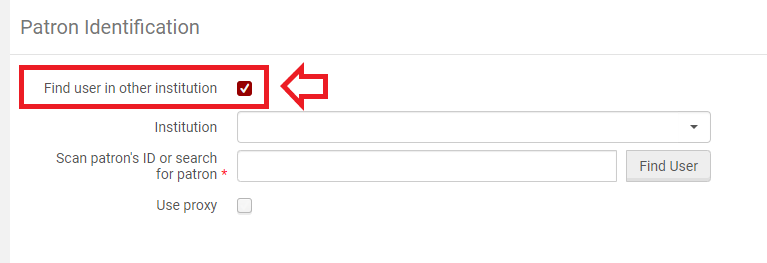
- Click on the drop-down arrow on the right of the "Institution" box to display the list of options.
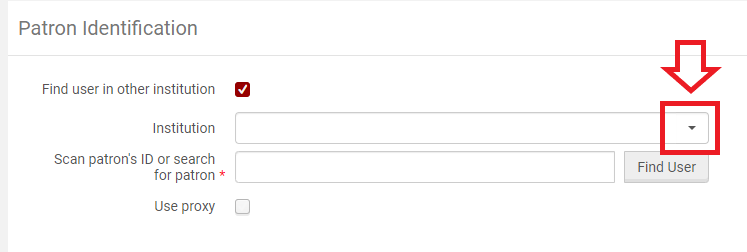

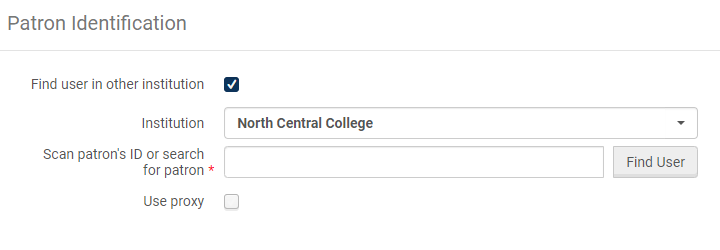
- Select the appropriate institution from the list.
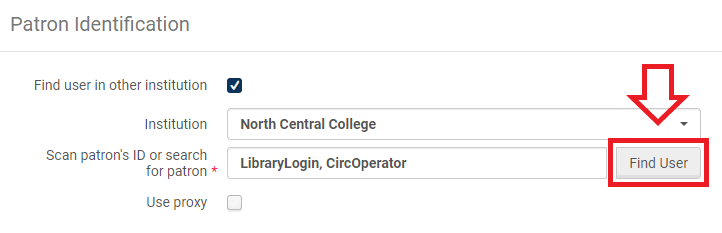
- Enter the patron's name or identification number and select "Find User".
Please note:- When searching for patrons from another institution, the name or ID number must match exactly and cannot apply to more than one account at that institution.
- If the patron has a common name, you will need to enter an ID number instead (Primary ID, Institution ID, or Barcode).
- If the I-Share patron already has a user record saved to your Institution Zone, their record open automatically to the Loans tab and you can proceed to step 7.
If the I-Share patron does not have a user record saved, the Quick User Management screen will open.
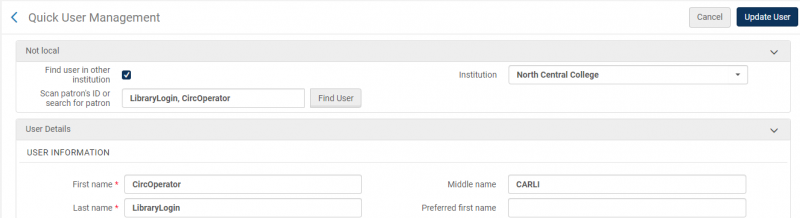
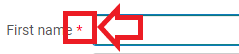
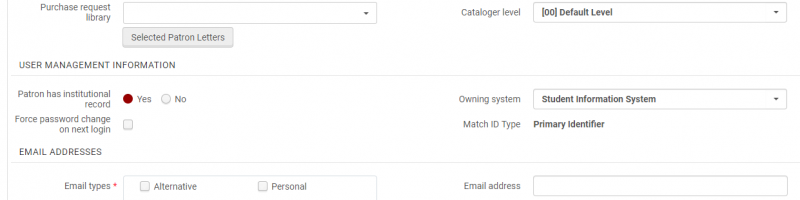
- Many fields may auto-populate, but make sure that all fields marked with a red star
 have been filled out correctly.
These required fields include:- First name
- Last name
- Primary identifier
- User group
- Expiration date
- Purge date
- Email types
- Address types
- Address line 1
- City
- State/Province
- Postal code
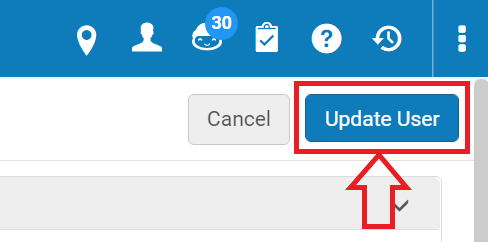
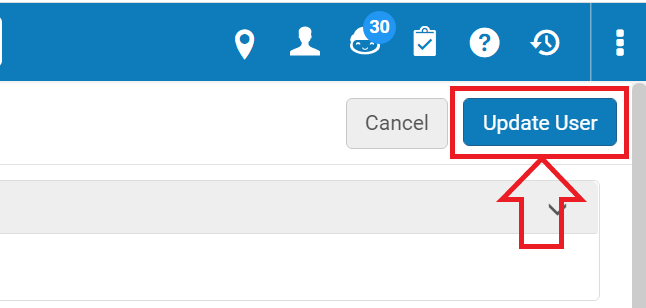
- Click on the "Update User" button.
- Many fields may auto-populate, but make sure that all fields marked with a red star
- Click on the drop-down arrow on the right of the "Institution" box to display the list of options.
- The patron record will automatically open to the Loans tab.
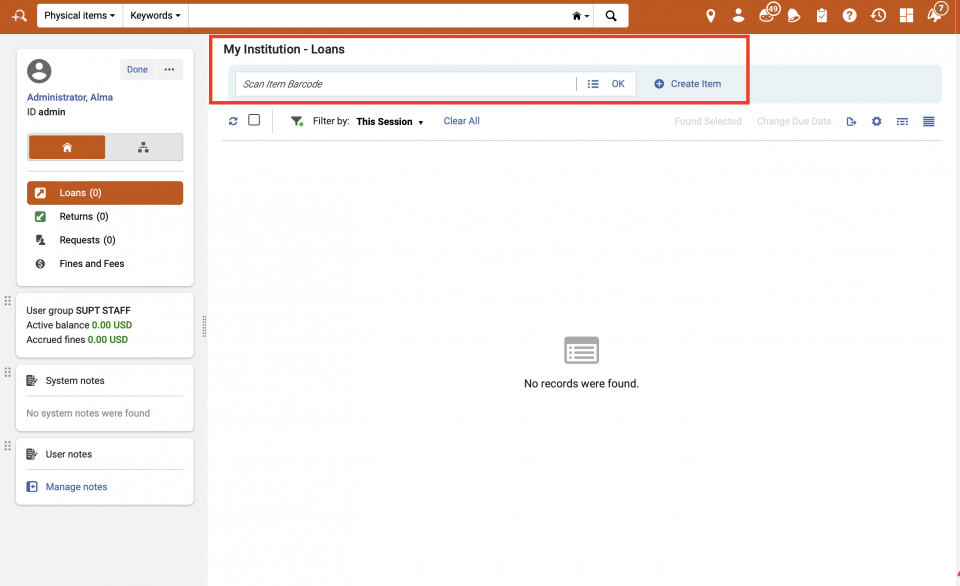
- At this point items can be checked out to the patron by:
- scanning the item's barcode;
- manually entering the item's barcode; or
- looking up the item in the catalog.
- After selecting the item and entering/pressing OK, item is now checked out to the patron.
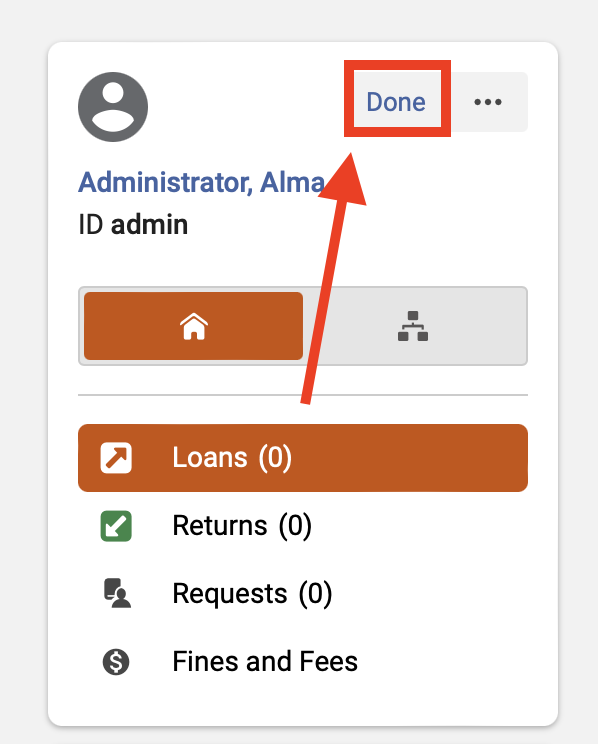
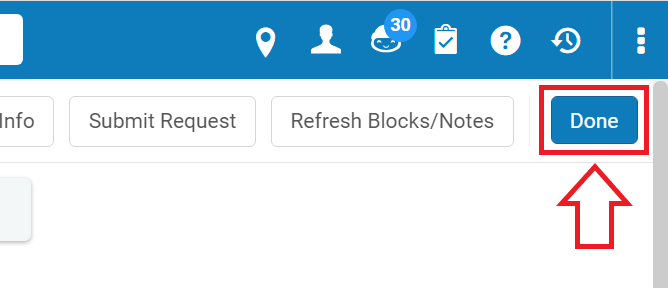
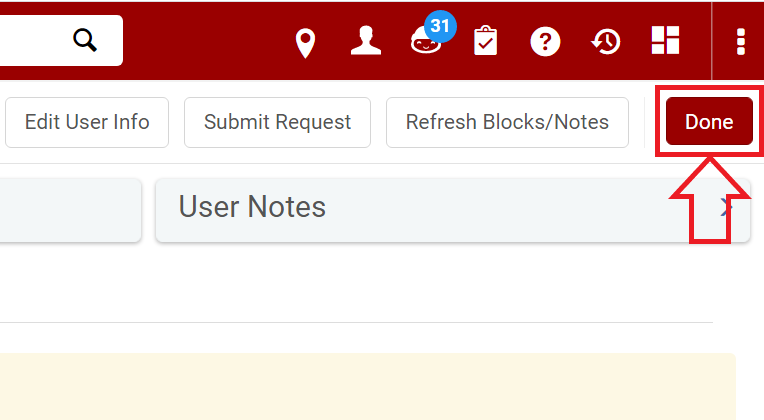
- When you are finished checking items out to the patron, click the "Done" button.
Classic Manage Patron Services UX (pre-February 2025)
- Log into Alma, and select the appropriate Circulation location.
- At the side of the main Alma screen, select "Fulfillment".
- From the resulting menu, under Checkout/Checkin, select "Manage Patron Services".
- The Patron Identification screen will open.
- At this point patron records can be brought up three different ways:
- scanning the patron's identification card barcode;
- looking up the patron by name; or
- looking up the patron by identification number.
- If the patron is a local patron, proceed to step 7.
If the patron is from another I-Share institution, check the "Find user in other institution" box and proceed with the steps outlined below.
- Click on the drop-down arrow on the right of the "Institution" box to display the list of options.
- Select the appropriate institution from the list.
- Enter the patron's name or identification number and select "Find User".
Please note:- When searching for patrons from another institution, the name or ID number must match exactly and cannot apply to more than one account at that institution.
- If the patron has a common name, you will need to enter an ID number instead (Primary ID, Institution ID, or Barcode).
- If the I-Share patron already has a user record saved to your Institution Zone, their record open automatically to the Loans tab and you can proceed to step 7.
If the I-Share patron does not have a user record saved, the Quick User Management screen will open.
- Many fields may auto-populate, but make sure that all fields marked with a red star have been filled out correctly.
These required fields include:- First name
- Last name
- Primary identifier
- User group
- Expiration date
- Purge date
- Email types
- Address types
- Address line 1
- City
- State/Province
- Postal code
- Click on the "Update User" button.
- Many fields may auto-populate, but make sure that all fields marked with a red star
- Click on the drop-down arrow on the right of the "Institution" box to display the list of options.
- The patron record will automatically open to the Loans tab.
- At this point items can be checked out to the patron by:
- scanning the item's barcode;
- manually entering the item's barcode; or
- looking up the item in the catalog.
- After selecting the item and entering/pressing OK, item is now checked out to the patron.
- When you are finished checking items out to the patron, click the "Done" button.
How to look up a patron without an ID card
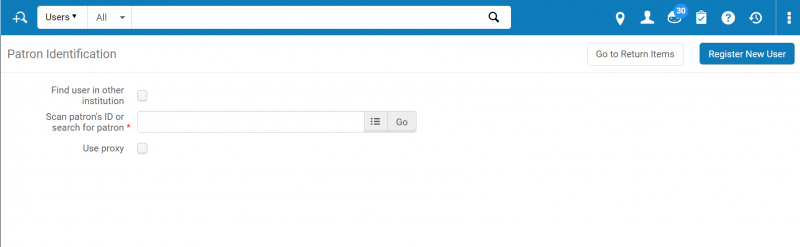
- Navigate to Fulfillment > Manage Patron Services to bring up the Patron Identification screen.
- Begin typing in the patron's name or ID number into the "Scan patron's ID or search for patron" box to bring up a list of patron accounts.
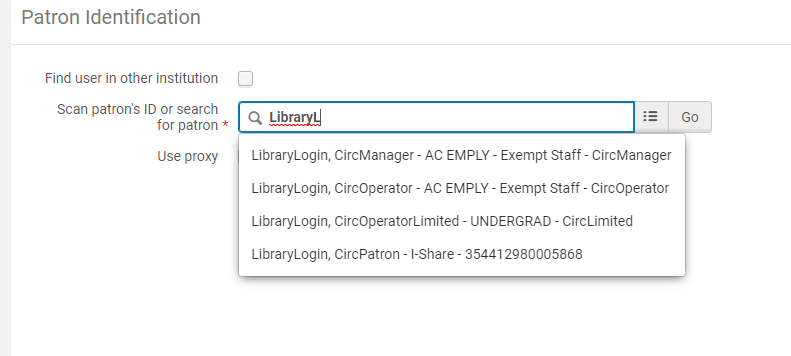
- Alternately, use the "Select from a list" function.
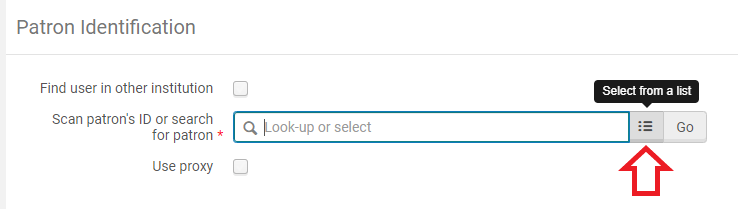
- Clicking on the "Select from a list" button brings up the Find and Manage Users screen.
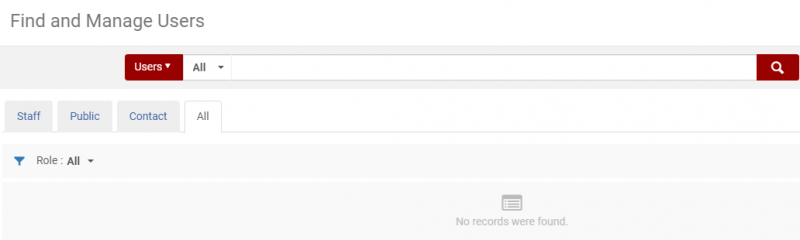
- This screen offers you additional options for searching for patron accounts.
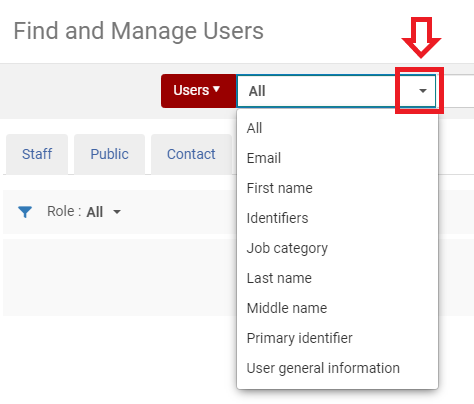
- Clicking on the "Select from a list" button brings up the Find and Manage Users screen.
How to add a patron to the database
- To add a patron to the database, navigate to Fulfillment > Manage Patron Services to bring up the Patron Identification screen.
- Click on the "Register New User" button.
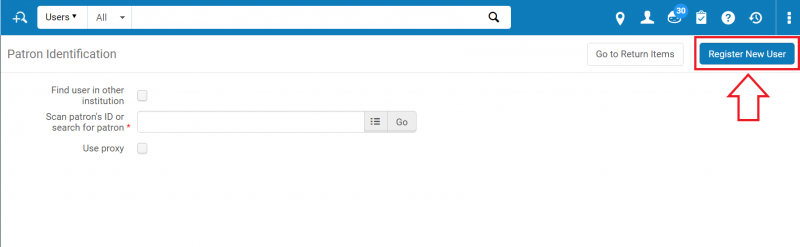
- The Quick User Management Screen will open.
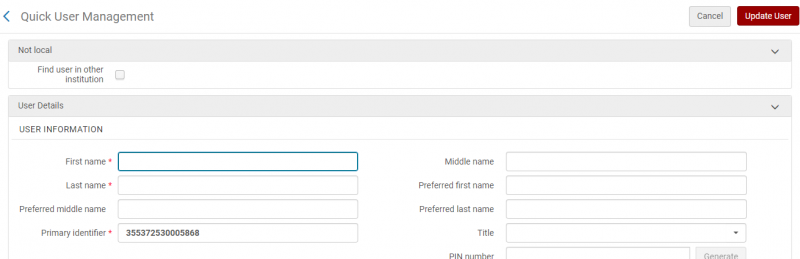
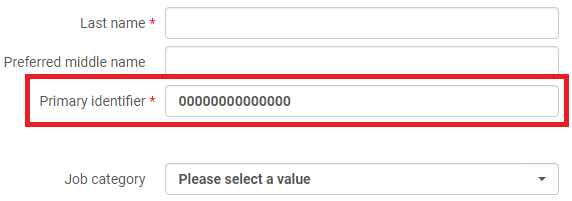
- Fill out all fields marked with a red star:
 . These required fields include
- First name
- Last name
- Primary identifier
- User group
- Expiration date
- Purge date
- Email types
- Email address
- Address types
- Address line 1
- City
- State/Province
- Postal code
- If the patron will not be included in future Student Information System (SIS) uploads, skip to step 6. Examples of this type of patron include alumni, community members, and internal accounts for library staff. If the patron will be included in future SIS uploads (i.e. students, faculty, or staff who have joined the institution since the last upload), continue with step 5.
- Double check that you have entered data into the "Primary identifier" field correctly. This is important because this is the field that the SIS uploads use to match patron data.
- Navigate to the "User Management Information" section.
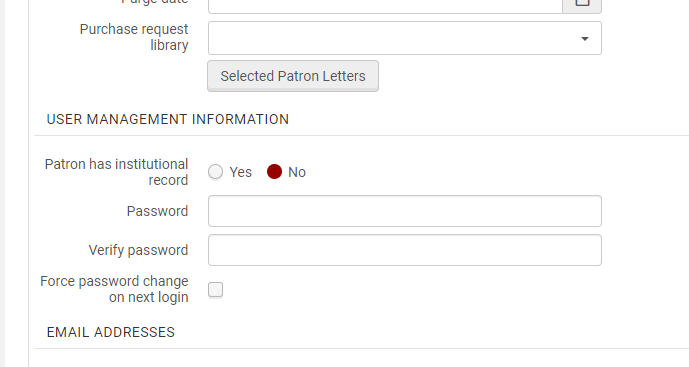
- Change the "Patron has institutional record" from "No" to "Yes".
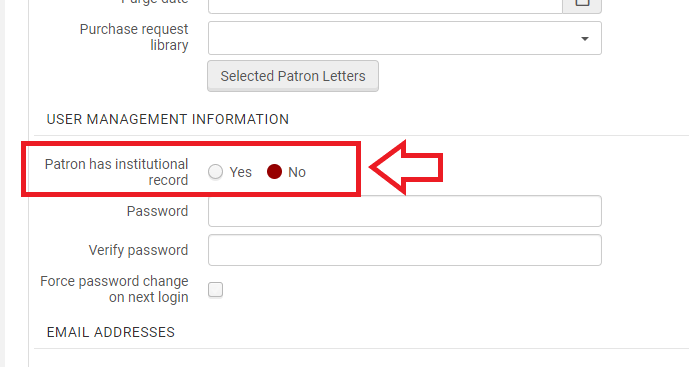
- The "User Management Information" screen will change. You will not need to change anything. Skip to step 7.
- Double check that you have entered data into the "Primary identifier" field correctly. This is important because this is the field that the SIS uploads use to match patron data.
- Patrons who will not be updated by SIS load will need to have a password set for them. The patron may choose a password while you are creating their account, or you can choose a temporary password and check the "Force password change on next login" box. They will be able to use this password and their user ID (also known as the Primary Identifier) to log into Primo VE.
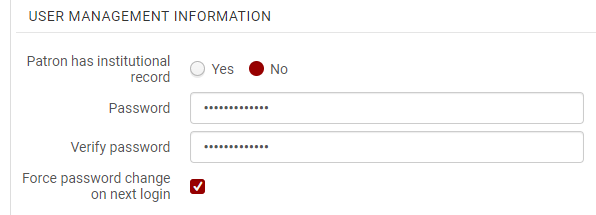
- Click on the "Update User" button.
How to set up a proxy borrower and check out an item by proxy
A webinar is available:
One option described above:
Setting up a Local Circulation patron to be a proxy borrower for another patron:
- Navigate to Fulfillment > Manage Patron Services to bring up the Patron Identification screen.
- Look up the record for the patron you want to make a proxy borrower.
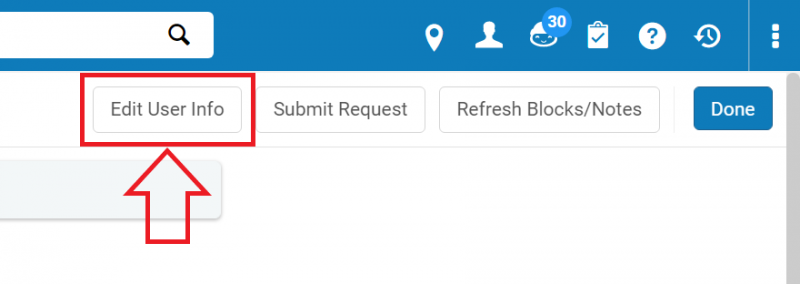
- On the resulting Patron Services screen, click the "Edit User Info" button.
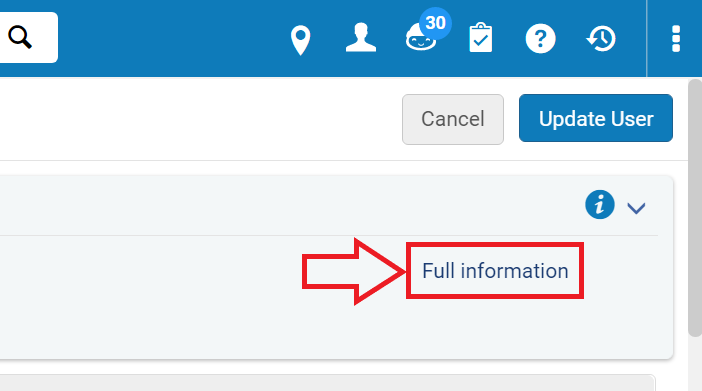
- On the resulting Quick User Management screen, click on "Full information".
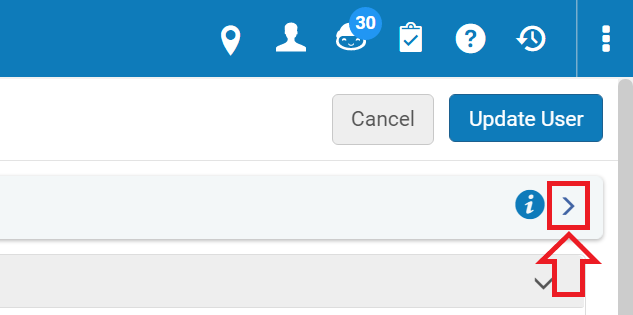
If you do not see "Full Information" on the screen, click on the arrow to the right of the stylized "i" and beneath the "Update User" button.
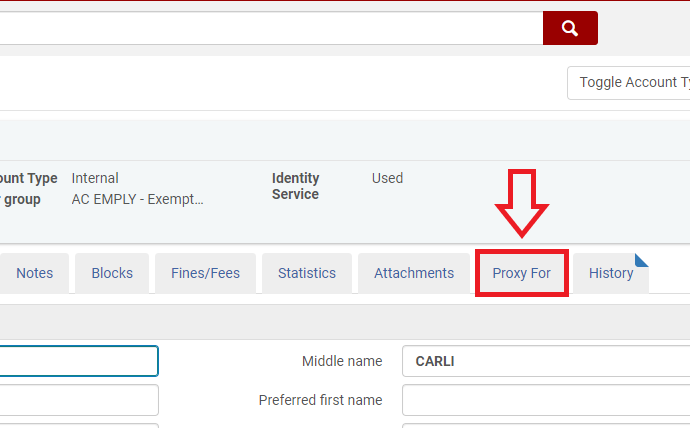
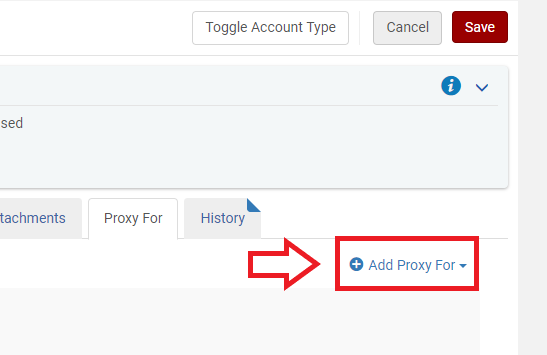
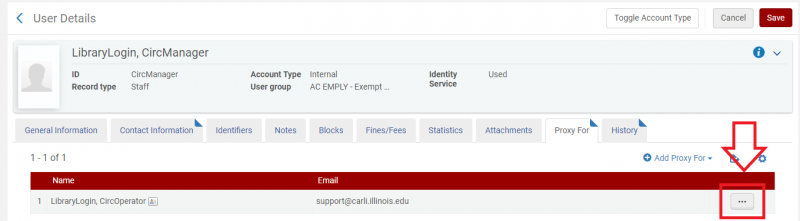
- On the resulting User Details screen, select the "Proxy For" tab.
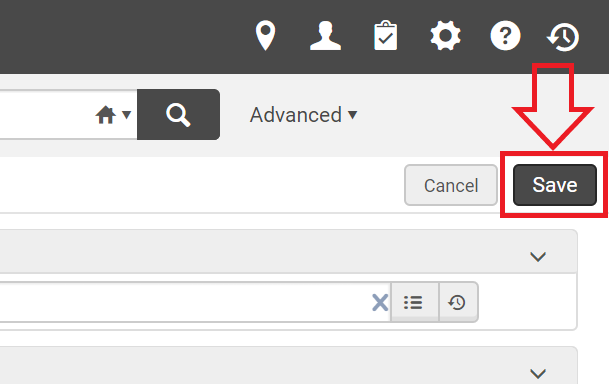
- Click on "Add Proxy For" to bring up the "Proxy for" drop down.
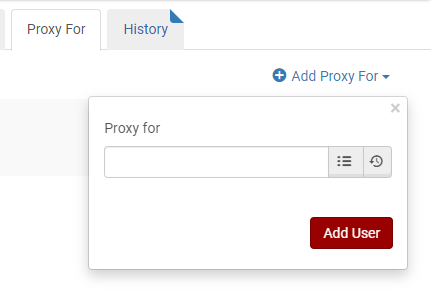
- Look up the patron you would like to be set up with the proxy borrower and click on the "Add User" button.
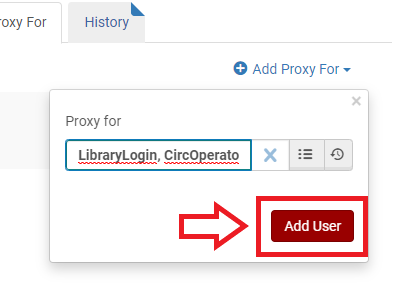
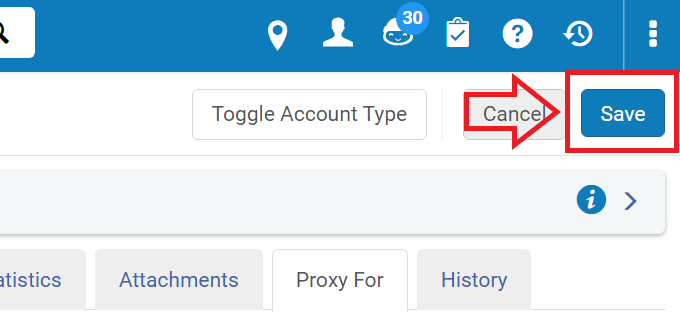
- Click on the "Save" button.
To delete a proxied patron from a user account:
- Navigate to the "Proxy For" tab using step 1-5 of the above section.
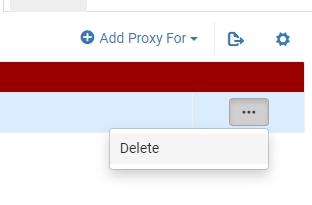
- There will be a list of people the patron is a proxy for. To delete one from the patron's record, click on the ellipsis to open the menu, then click "Delete".
- Click on the "Save" button.
To check out an item to a proxy borrower:
- Navigate to Fulfillment > Manage Patron Services to bring up the Patron Identification screen.
- Check the "Use proxy" box, then look up the patron who will be checking out materials on behalf of someone else.
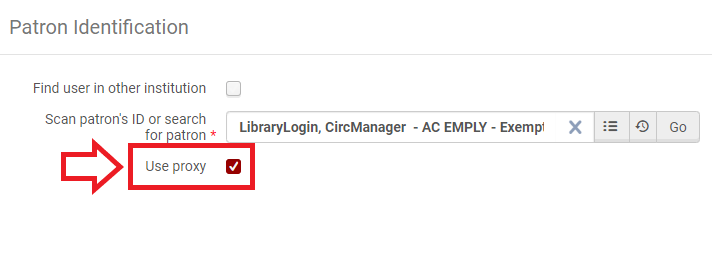
- A "Proxy for" field will appear. To change from one proxied person to another, click on the drop down arrow to show everyone for whom the patron has permission to act as a proxy. Once the correct person is selected, click on "Go".
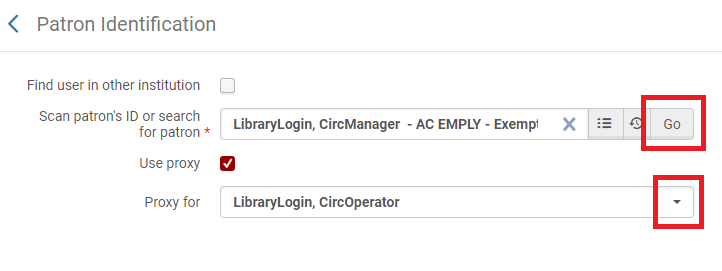
- The Patron Services screen for the proxied patron will appear, with a line showing who is checking out material on their behalf. At this point you may check out materials as usual.
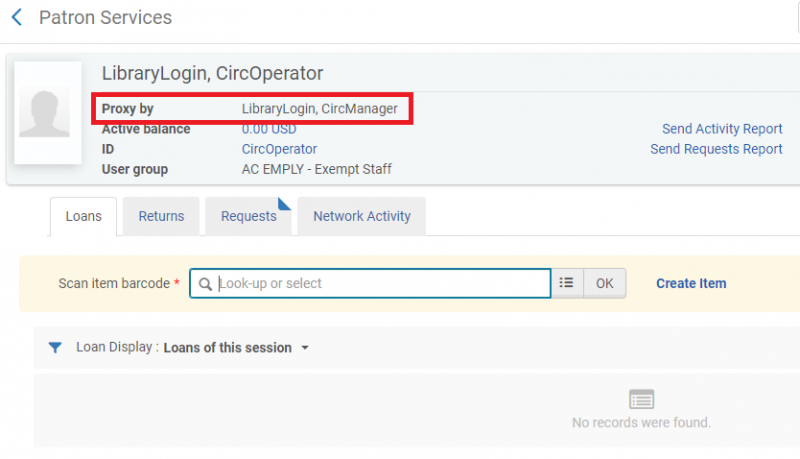
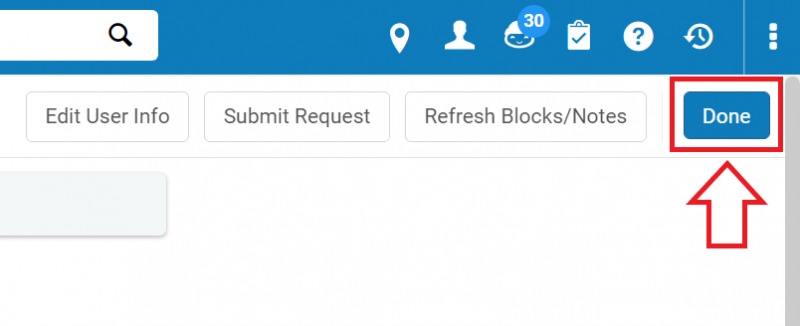
- When you are finished checking out items to the patron, click the "Done" button.
How to renew items
New Manage Patron Services UX (post-February 2025)
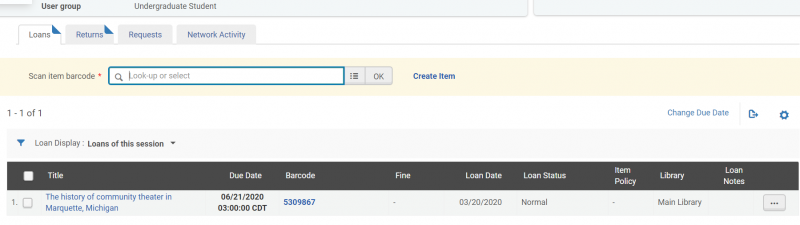
- To renew items for a patron, navigate to Fulfillment > Manage Patron Services to bring up the Patron Identification screen, then look up the patron's record.
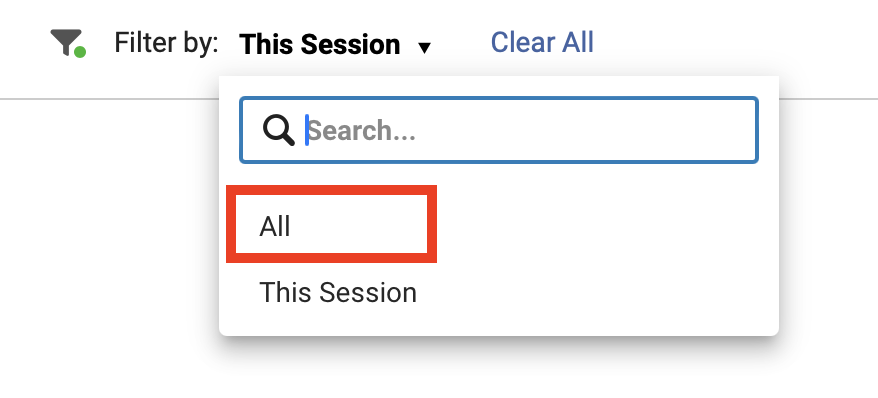
- Confirm that the Patron Services page has the "Loans" tab highlighted, then change "Filter by: This Session" to "Filter by: All" by clicking on the drop down arrow and selecting "All".
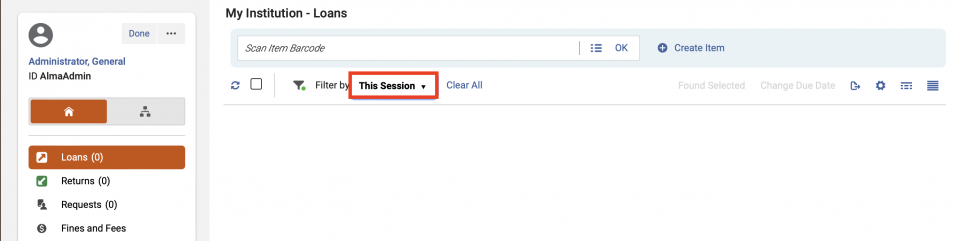
- To renew selected items, click on the boxes on the left of the items you want to renew, then click on the "Renew Selected" button.

- To renew all of the patron's items, either click on the "Renew All" button or select all of the items and then click on the "Renew Selected" button.
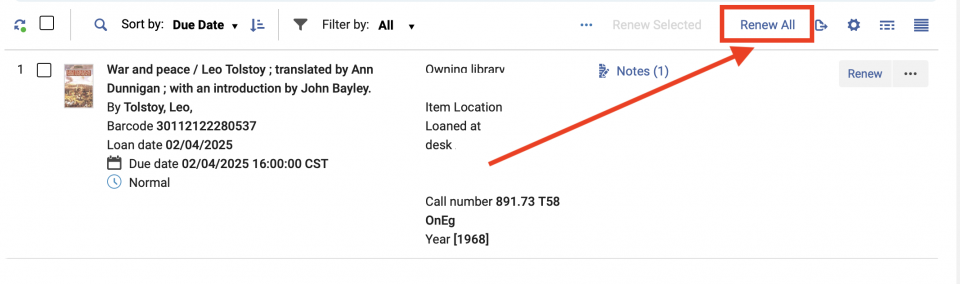
- Items are now renewed. You may either continue to other tasks within the patron record, or click the "Done" button to exit.
Classic Manage Patron Services UX (pre-February 2025)
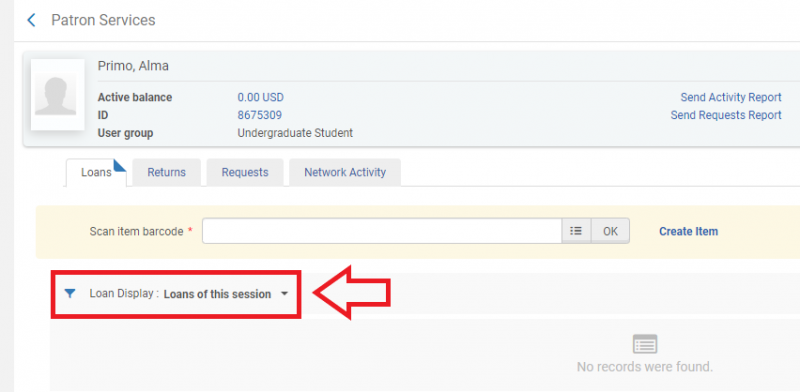
- To renew items for a patron, navigate to Fulfillment > Manage Patron Services to bring up the Patron Identification screen, then look up the patron's record.
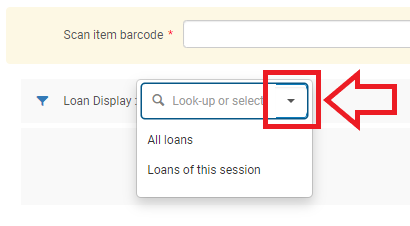
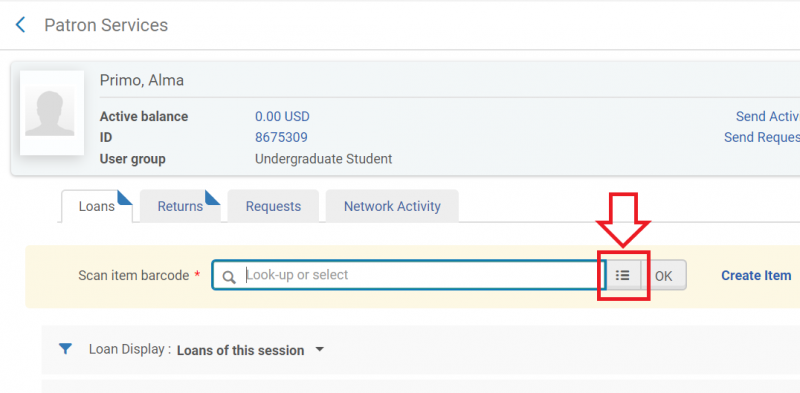
- Confirm that the Patron Services page has the "Loans" tab highlighted, then change "Loan Display: Loans of this session" to "Loan Display: All loans" by clicking on the drop down arrow and selecting "All loans".
- To renew selected items, click on the boxes on the left of the items you want to renew, then click on the "Renew Selected" button.

- To renew all of the patron's items, either click on the "Renew All" button or select all of the items and then click on the "Renew Selected" button.

- Items are now renewed. You may either continue to other tasks within the patron record, or click the "Done" button to exit.
How to check in items
New Manage Patron Services UX (post-February 2025)
There are two workflows for checking in items.
Checking in items for a single patron
- Navigate to Fulfillment > Manage Patron Services to bring up the Patron Identification screen, then look up the patron's record.
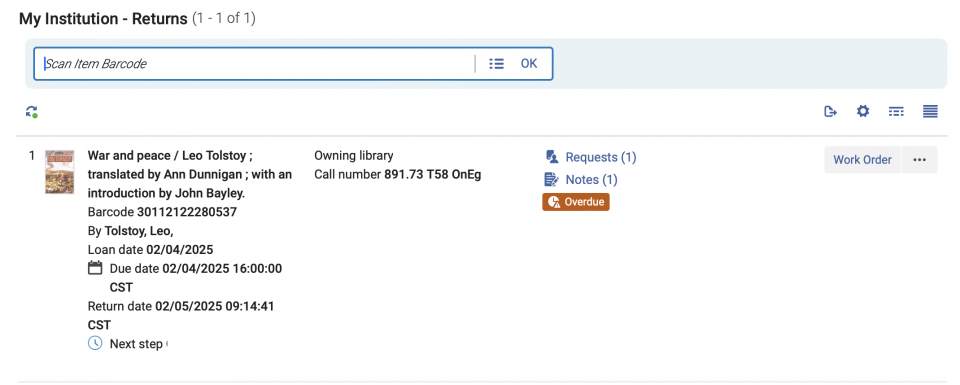
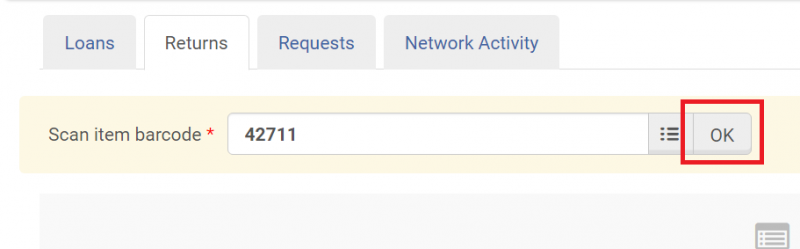
- On the resulting Patron Services screen, select the "Returns" tab.
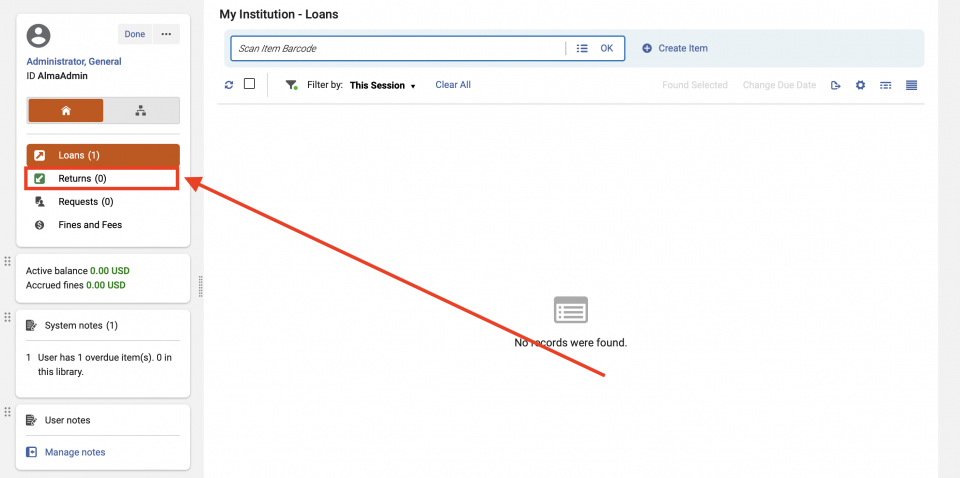
- Scan the item barcode, or enter it manually and click "OK".

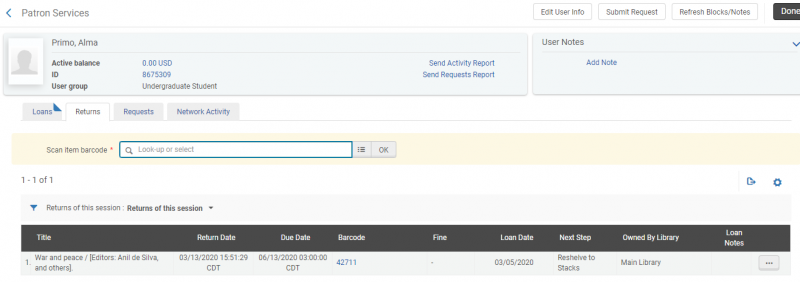
- Successfully checked in items will be listed below "Returns of this session".
- When you have finished checking in items, you may either continue to other tasks within the patron record, or click the "Done" button to exit.
Checking in items for multiple patrons
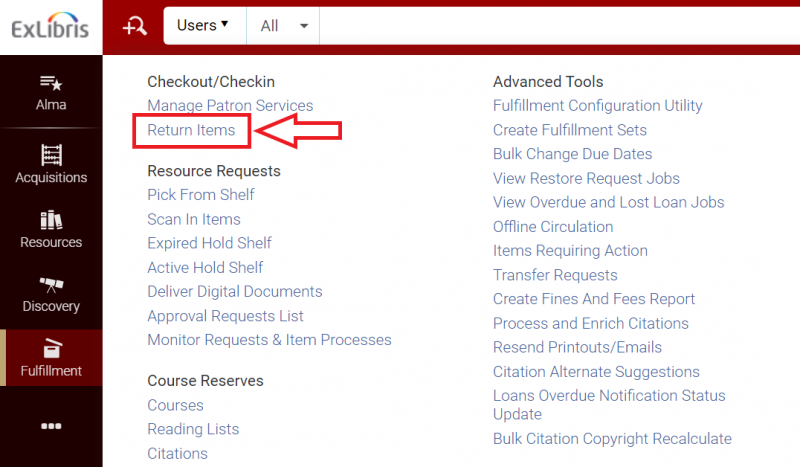
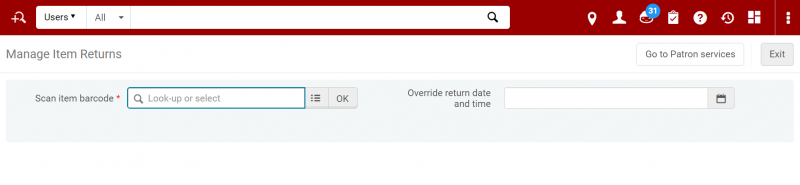
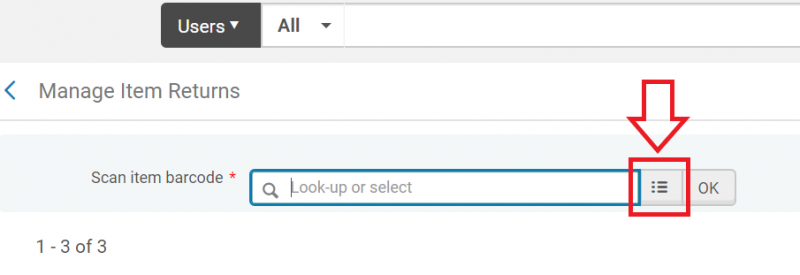
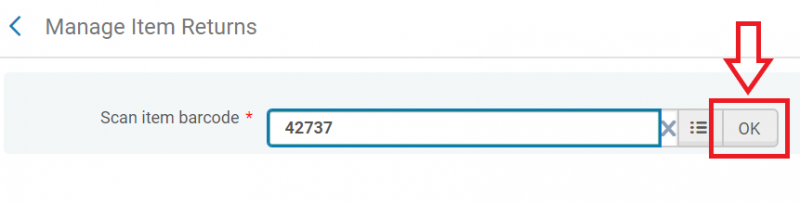
- Navigate to Fulfillment > Return Items.
- The Manage Item Returns screen will open and you can then scan or enter items to be returned.
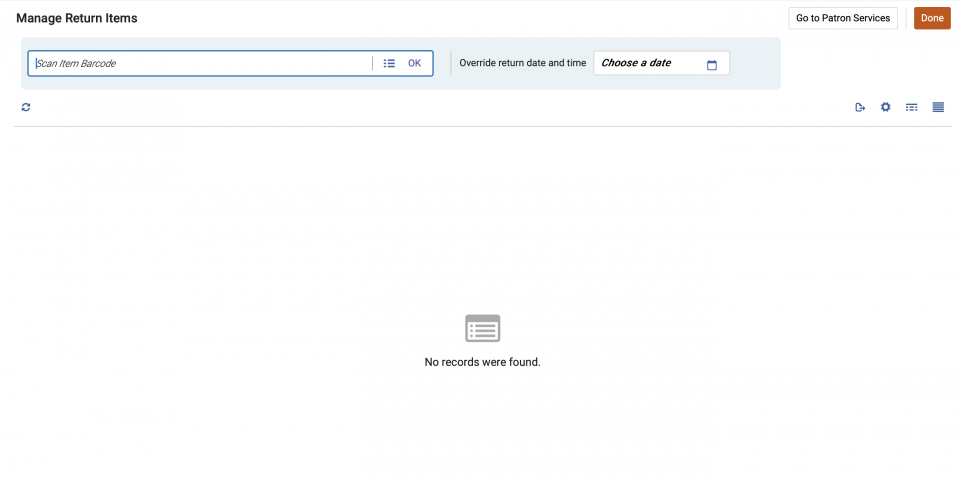
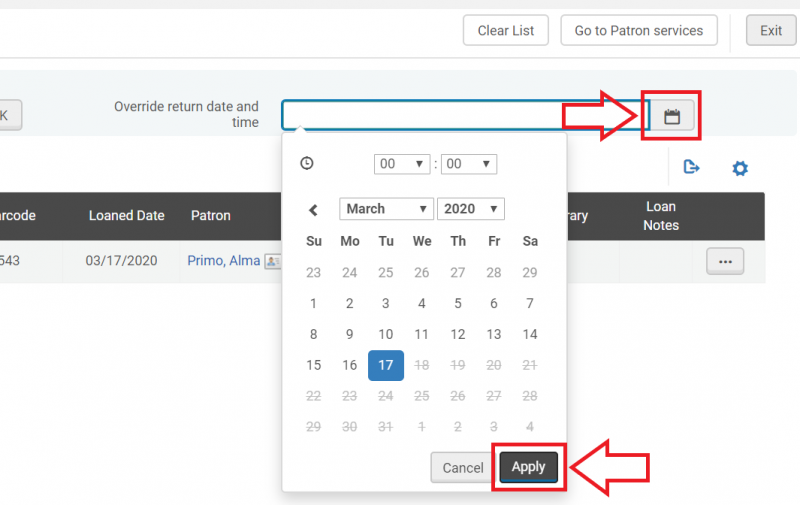
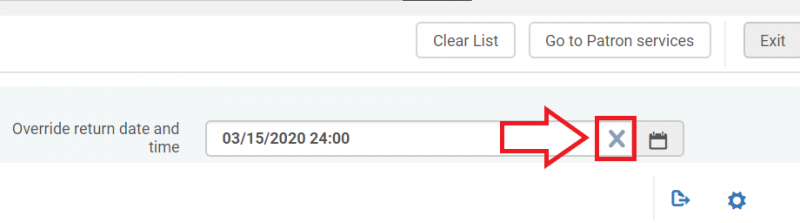
- If you would like to credit items as having been returned at an early date or time, enter the preferred date/time in the "Override return date and time" field or click on the calendar icon, choose a date and/time, and click "Apply".
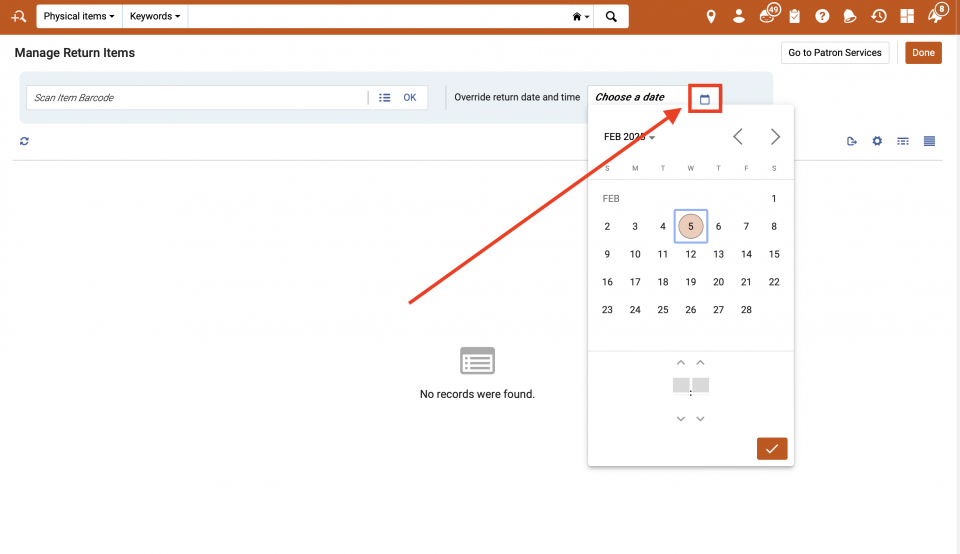
This check in date/time will apply to items being returned until you click on the "X" in the "Override return date and time" field to revert to the current values.

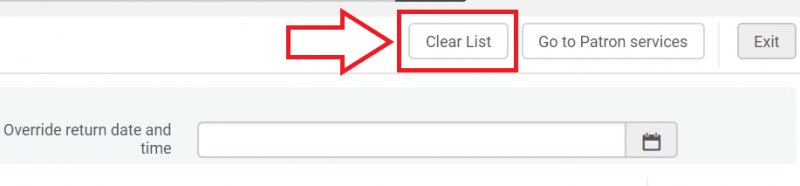
- If your workstation is used by multiple people or is in a location where the screen may be seen if you step away, for the sake of patron privacy you may wish to clear the list of returned items without exiting the check in screen. To do this, click on the "Clear List" button.

- If you would like to credit items as having been returned at an early date or time, enter the preferred date/time in the "Override return date and time" field or click on the calendar icon, choose a date and/time, and click "Apply".
- When you are finished checking in items, you can navigate to a different screen or click on the "Exit" button.
Classic Manage Patron Services UX (pre-February 2025)
There are two workflows for checking in items.
Checking in items for a single patron
- Navigate to Fulfillment > Manage Patron Services to bring up the Patron Identification screen, then look up the patron's record.
- On the resulting Patron Services screen, select the "Returns" tab.

- Scan the item barcode, or enter it manually and click "OK".
- Successfully checked in items will be listed below "Returns of this session".
- When you have finished checking in items, you may either continue to other tasks within the patron record, or click the "Done" button to exit.
Checking in items for multiple patrons
- Navigate to Fulfillment > Return Items.
- The Manage Item Returns screen will open and you can then scan or enter items to be returned.
- If you would like to credit items as having been returned at an early date or time, enter the preferred date/time in the "Override return date and time" field or click on the calendar icon, choose a date and/time, and click "Apply".
This check in date/time will apply to items being returned until you click on the "X" in the "Override return date and time" field to revert to the current values.
- If your workstation is used by multiple people or is in a location where the screen may be seen if you step away, for the sake of patron privacy you may wish to clear the list of returned items without exiting the check in screen. To do this, click on the "Clear List" button.
- If you would like to credit items as having been returned at an early date or time, enter the preferred date/time in the "Override return date and time" field or click on the calendar icon, choose a date and/time, and click "Apply".
- When you are finished checking in items, you can navigate to a different screen or click on the "Exit" button.
How to check an item in or out when the barcode is missing or illegible
New Manage Patron Services UX (post-February 2025)
If you come across a missing or illegible barcode while checking an item in or out, you will have to manually look up the item. The procedure for this is the same in both cases, though the overall screens will look slightly different.
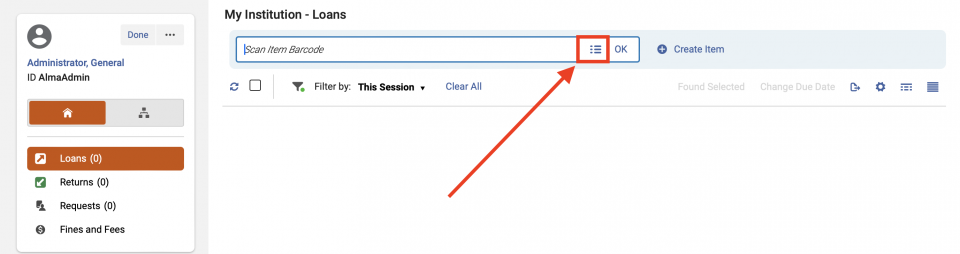
- If the item's barcode is missing or not working, you can manually look up the item with the "Select from a list" button next to the "Scan item barcode" field.
The checking in screen:

The checking out screen:
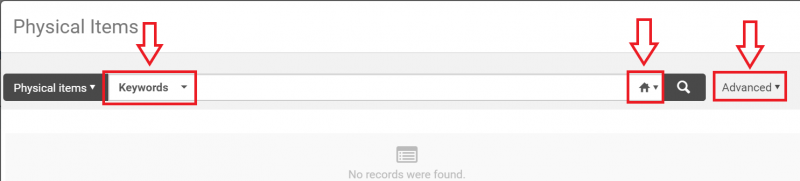
- An additional Physical Items screen will open, allowing you to select from the "Choose search index" (ex. Keywords), "Choose search scope" (ex. institution Zone -- house symbol), and "Advanced" (magnifying glass with plus+ sign) menus.
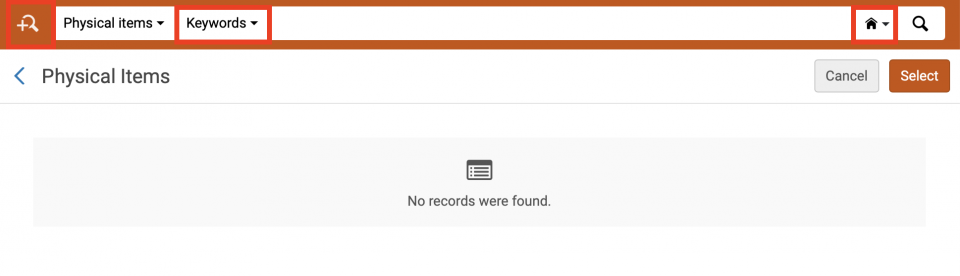
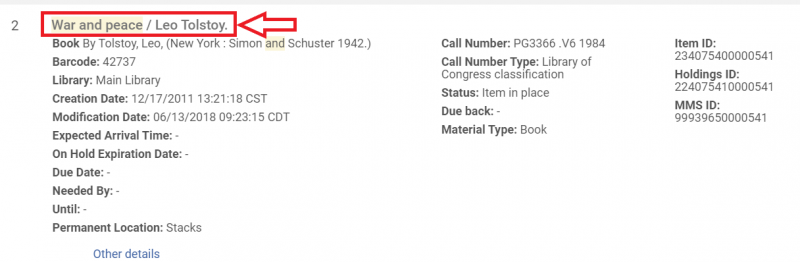
- Locate your correct item record and select it by clicking the circle to the left of the title and then clicking "Select" in the upper-right to populate the "Scan item barcode" field.
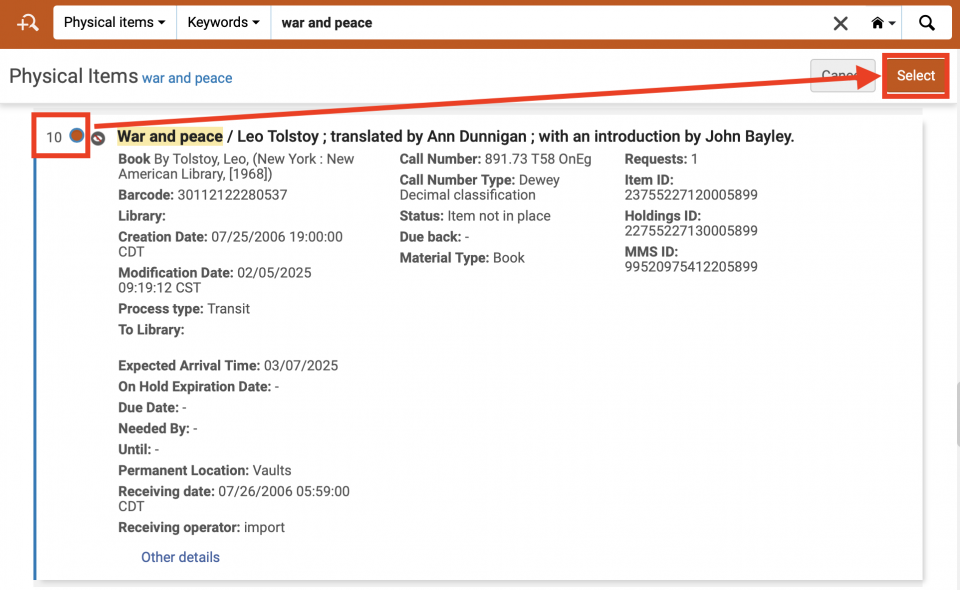
- Click on the "OK" button to check the item in/out.
- You will need to create a work order for the item to route it to the appropriate department for a new barcode. This workflow is described in the next section, "How to create a work order".
Classic Manage Patron Services UX (pre-February 2025)
If you come across a missing or illegible barcode while checking an item in or out, you will have to manually look up the item. The procedure for this is the same in both cases, though the overall screens will look slightly different.
- If the item's barcode is missing or not working, you can manually look up the item with the "Select from a list" button next to the "Scan item barcode" field.
The checking in screen:
The checking out screen:
- An additional Physical Items screen will open, allowing you to select from the "Choose search index", "Choose search scope", and "Advanced" menus.
- Locate your correct item record and click on the Title/Author to populate the "Scan item barcode" field.
- Click on the "OK" button to check the item in/out.
- You will need to create a work order for the item to route it to the appropriate department for a new barcode. This workflow is described in the next section.
How to create a work order
New Manage Patron Services UX (post-February 2025)
Work orders are created when an item needs a new barcode, needs repairs, or otherwise needs attention. There are many ways to create a work order in Alma; here we list three that may be useful while working in the Circulation Department.
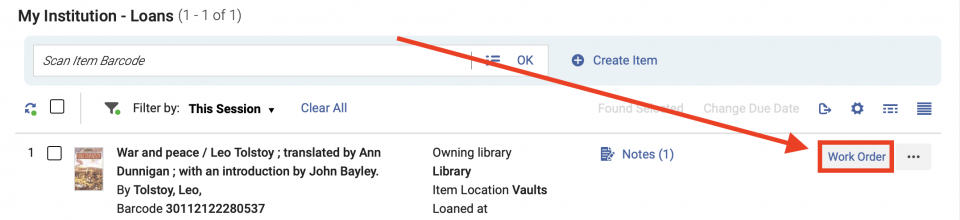
Checking out
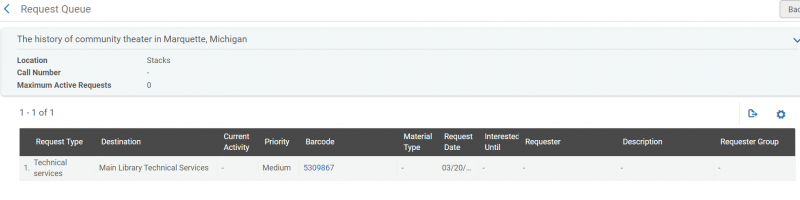
- If while checking out items you find one that needs attention, click the "Work Order" button to the right of the item once the item has been scanned/entered.
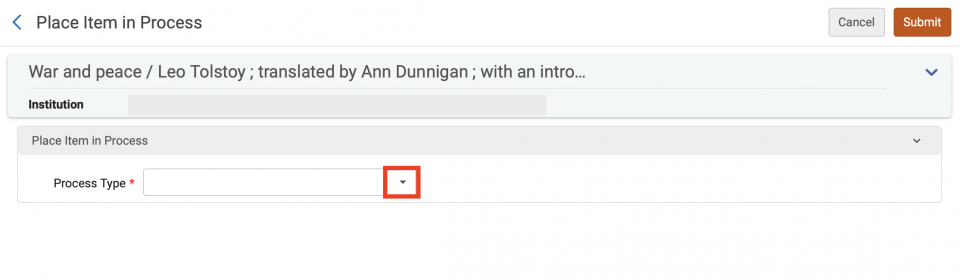
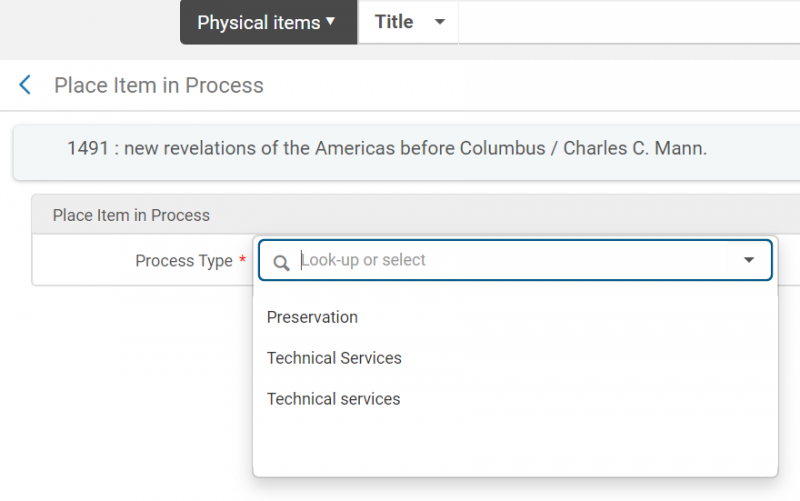
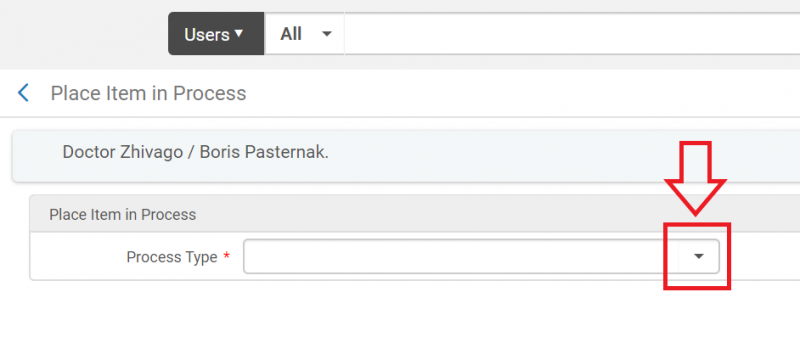
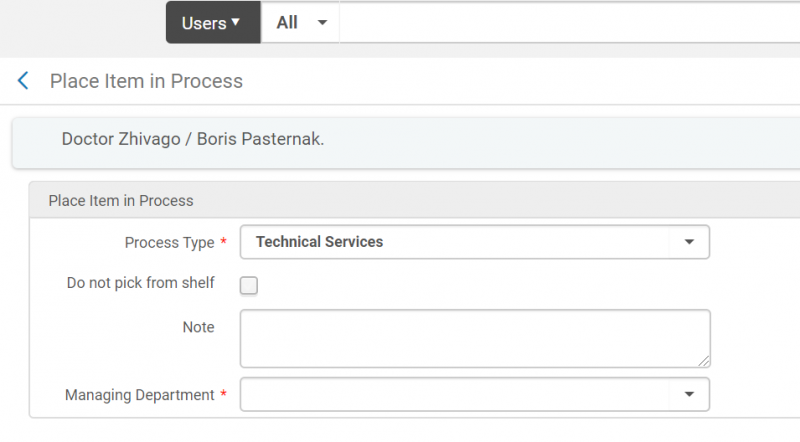
- The Place Item in Process screen will open. In the "Process Type" field, click on the down arrow to open the drop down menu.
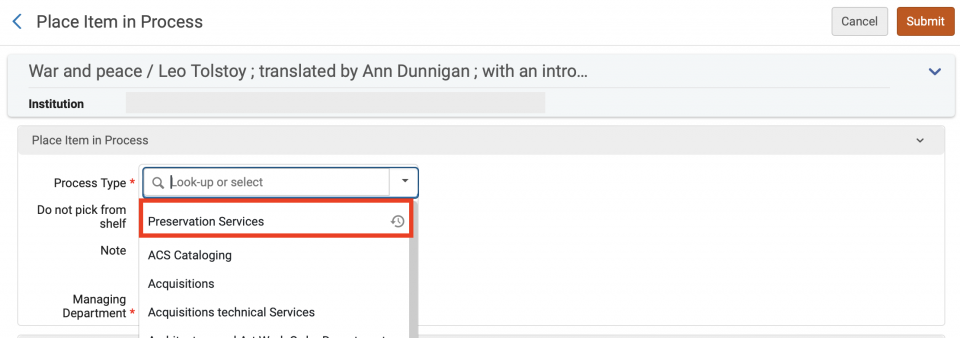
- Select the department to which you want to route the item.
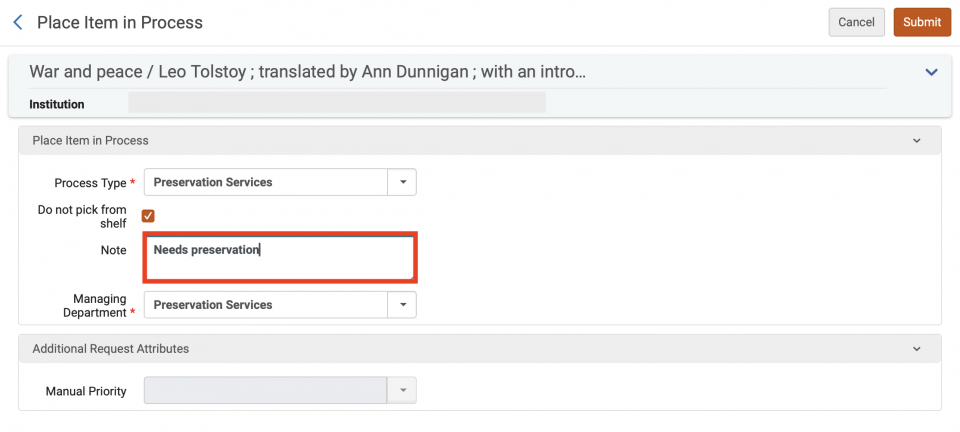
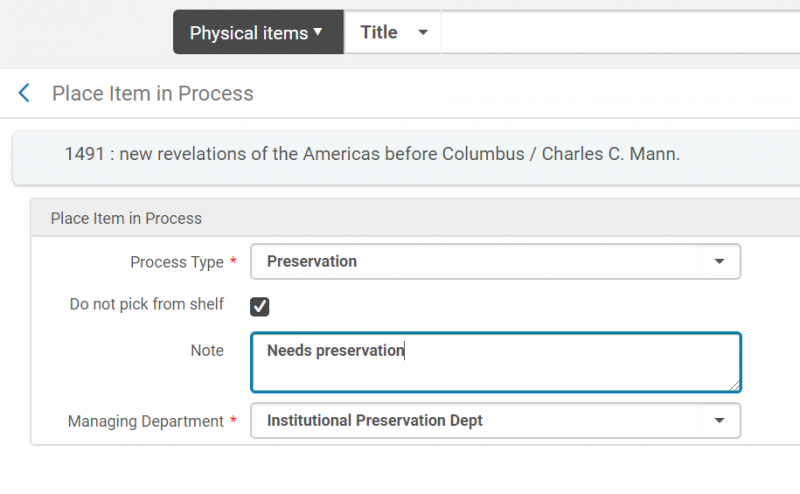
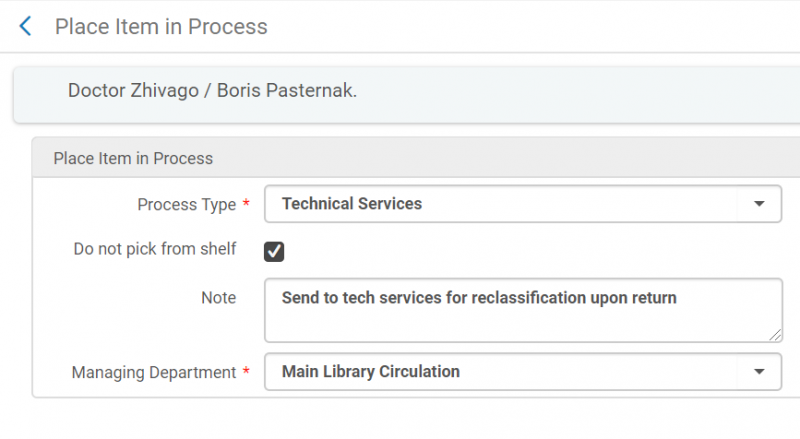
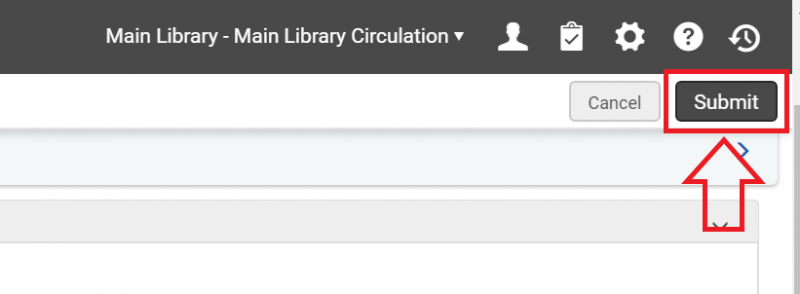
- Since the item is not on the shelf, check the "Do not pick from shelf" box. Make a brief note of what action is to be taken in the "Note" field. Select the Managing Department from the drop down menu.
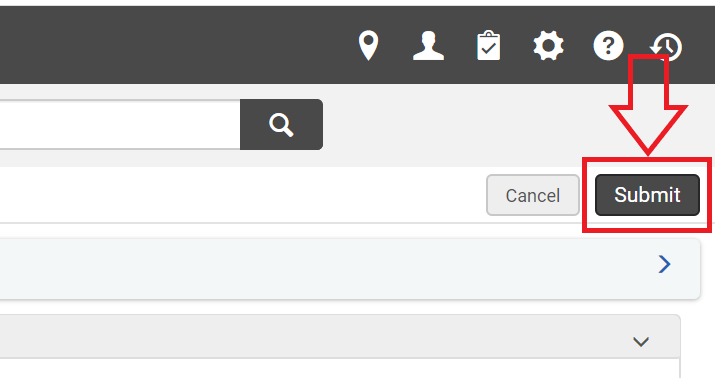
- Click the "Submit" button. The item remains checked out to the patron, but it is now flagged to be routed to a work department when it is returned.

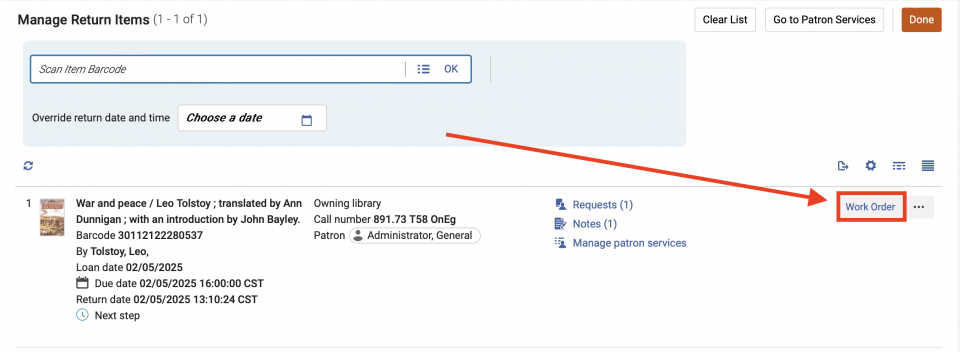
- When the item is returned, a pop up screen will appear telling you where to send the item.

Checking in
- If while checking in items you find one that needs attention, click on the "Work Order" button to the right of the item once the item has been scanned/entered.
- The Place Item in Process screen will open. In the "Process Type" field, click on the down arrow to open the drop down menu.
- Select the department to which you want to route the item.
- If the item is in hand and not on the shelf, check the "Do not pick from shelf" box. Make a brief note of what action is to be taken in the "Note" field. Select the Managing Department from the drop down menu.
- Click the "Submit" button and send the item to the appropriate work department.
Found item
Follow these steps if you find an item that needs to be routed to a work department and you are not checking the item in or out.
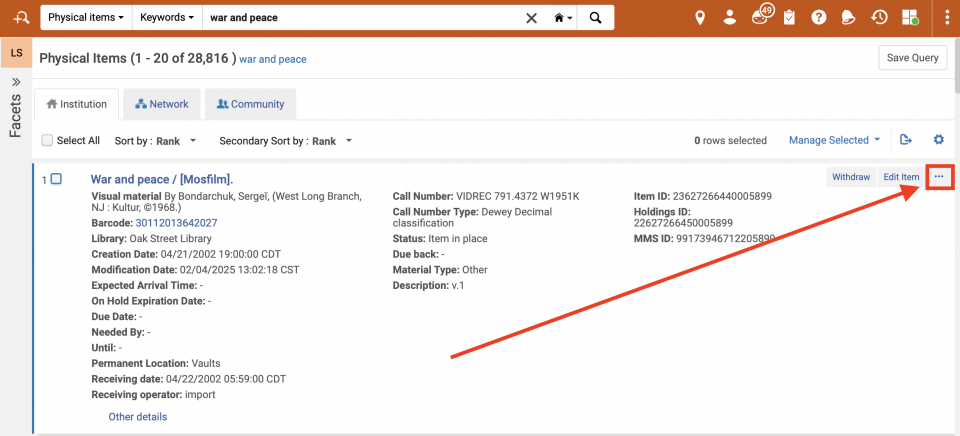
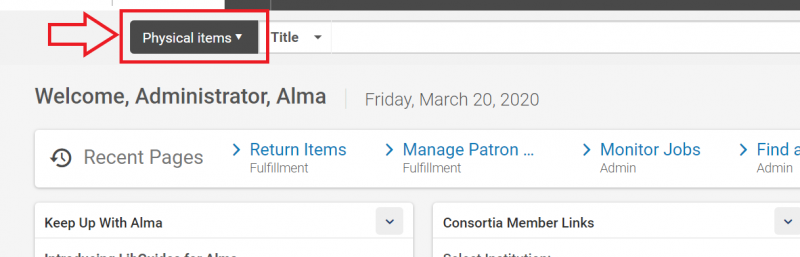
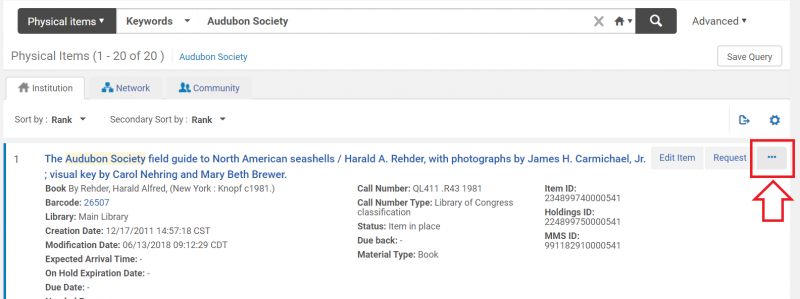
- On the main Alma screen, set the first search parameter to "Physical Items". The other parameters may be set as appropriate for finding the item's record.
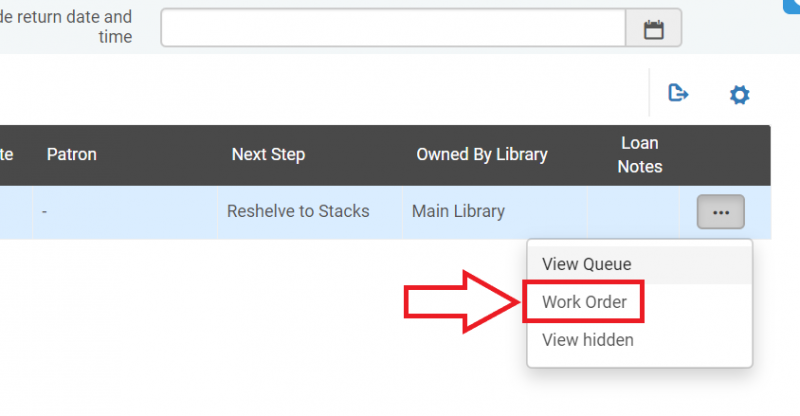
- Locate the item's record, then click on the ellipsis on the right side to bring up the "More actions" menu.
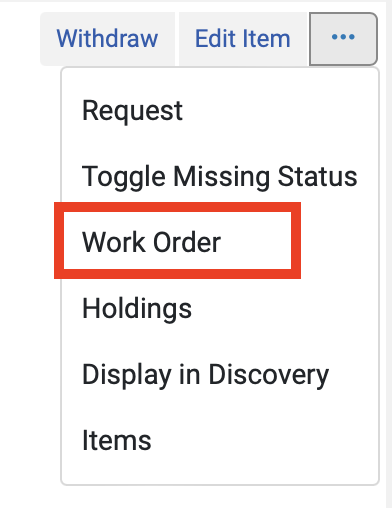
- Select "Work Order".
- The Place Item in Process screen will open. Proceed as outlined in steps 3 - 6 in the above section.
Classic Manage Patron Services UX (pre-February 2025)
Work orders are created when an item needs a new barcode, needs repairs, or otherwise needs attention. There are many ways to create a work order in Alma; here we list three that may be useful while working in the Circulation Department.
Checking out
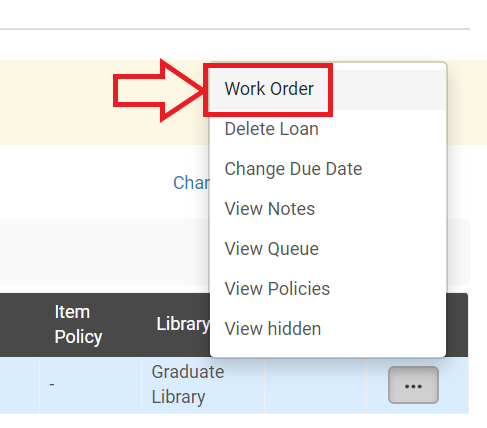
- If while checking out items you find one that needs attention, click on the ellipsis under "Loan Notes" once the item has been scanned/entered.

- Select "Work Order" from the drop down menu.
- The Place Item in Process screen will open. In the "Process Type" field, click on the down arrow to open the drop down menu.

- Select the department to which you want to route the item.
- Since the item is not on the shelf, check the "Do not pick from shelf" box. Make a brief note of what action is to be taken in the "Note" field. Select the Managing Department from the drop down menu.
- Click the "Submit" button. The item remains checked out to the patron, but it is now flagged to be routed to a work department when it is returned.
- When the item is returned, a pop up screen will appear telling you where to send the item.
Checking in
- If while checking in items you find one that needs attention, click on the ellipsis under "Loan Notes" once the item has been scanned/entered.

- Select "Work Order" from the drop down menu.
- The Place Item in Process screen will open. In the "Process Type" field, click on the down arrow to open the drop down menu.
- Select the department to which you want to route the item.
- If the item is in hand and not on the shelf, check the "Do not pick from shelf" box. Make a brief note of what action is to be taken in the "Note" field. Select the Managing Department from the drop down menu.
- Click the "Submit" button and send the item to the appropriate work department.
Found item
Follow these steps if you find an item that needs to be routed to a work department and you are not checking the item in or out.
- On the main Alma screen, set the first search parameter to "Physical Items". The other parameters may be set as appropriate for finding the item's record.
- Locate the item's record, then click on the ellipsis on the right side to bring up the "More actions" menu.
- Select "Work Order".

- The Place Item in Process screen will open. Proceed as outlined in steps 3 - 6 in the above section.

How to create a record for check out
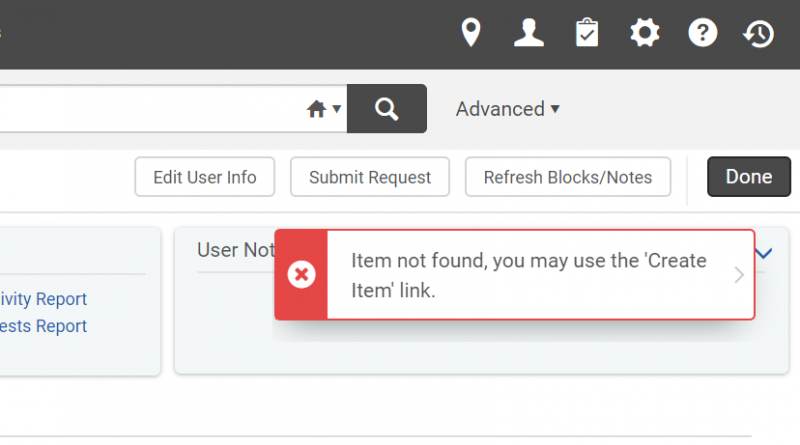
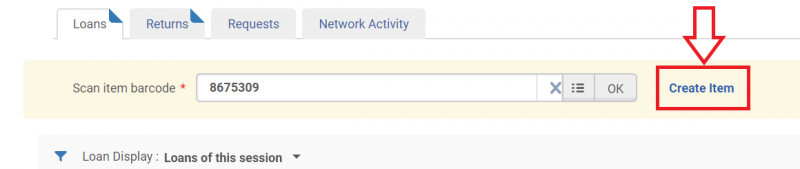
In the event that an item shows an "Item not found" error message during the check out process, follow these steps to create a basic record.
New Manage Patron Services UX (post-February 2025)
For titles that have an existing catalog record
- Click on "Create Item".

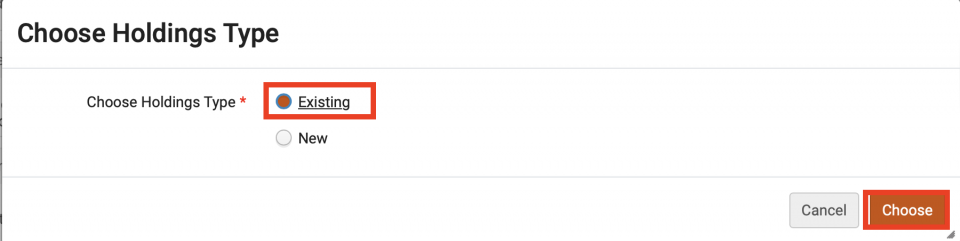
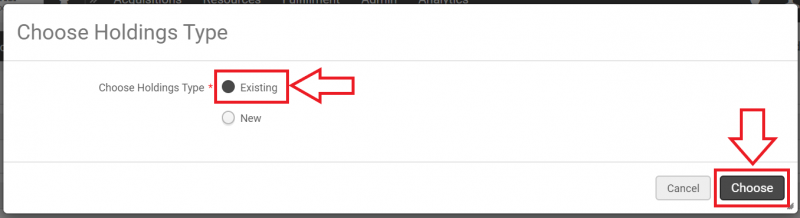
- The Choose Holdings Type screen will open. Select "Existing" and click on the "Choose" button.
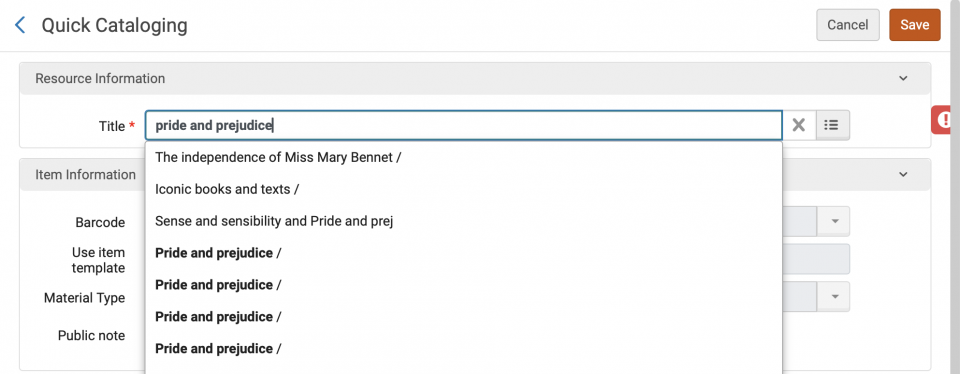
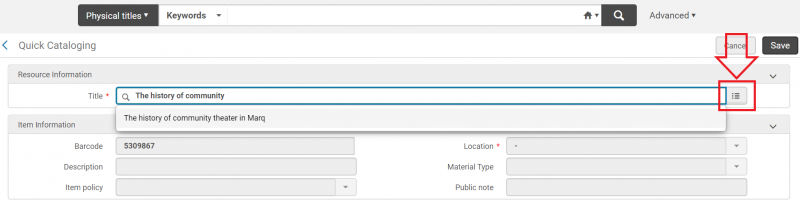
- The Quick Cataloging screen will open. Type in the title of the item you are looking for, or use the "List" option to search.
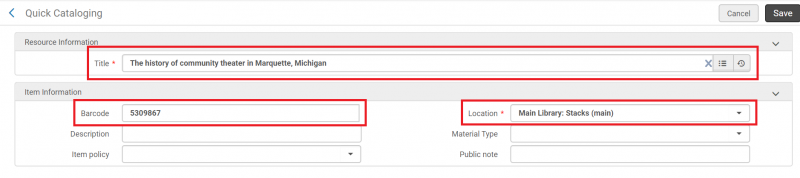
- If you find the correct record, make sure that the Title, Barcode, and Location fields are filled in. If you do not find the correct record, cancel out of the screen and use the "for titles that do not have an existing catalog record" workflow instead.
- Click the "Save" button.

- The item is now checked out to the patron and a work order has been created to route the item to cataloging upon its return.
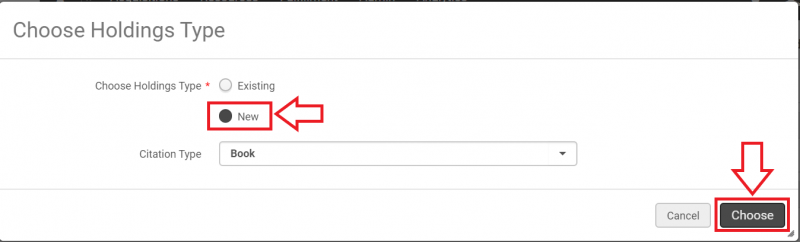
For titles that do not have an existing catalog record
- Click on "Create Item".
- The Choose Holdings Type screen will open. Select "New" and click on the "Choose" button.
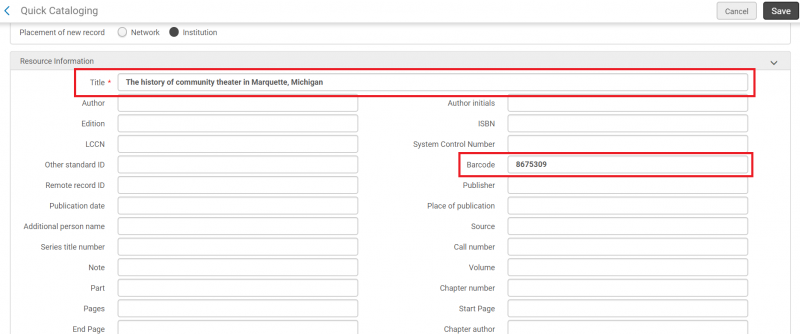
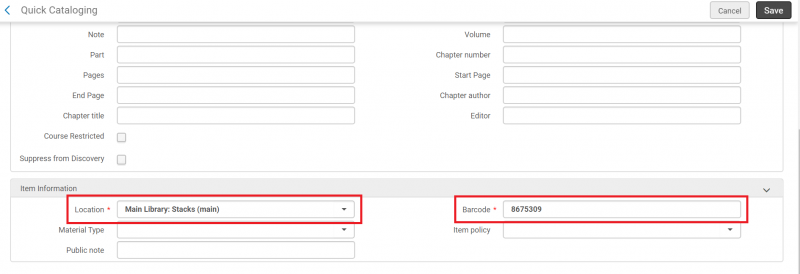
- The Quick Cataloging screen will open. Fill out the required fields of Title, Barcode, and Location. Additional fields are optional.
- Click the "Save" button.

- The item is now checked out to the patron and a work order has been created to route the item to cataloging upon its return.
Classic Manage Patron Services UX (pre-February 2025)
For titles that have an existing catalog record
- Click on "Create Item".
- The Choose Holdings Type screen will open. Select "Existing" and click on the "Choose" button.
- The Quick Cataloging screen will open. Type in the title of the item you are looking for, or use the "List" option to search.
- If you find the correct record, make sure that the Title, Barcode, and Location fields are filled in. If you do not find the correct record, cancel out of the screen and use the "for titles that do not have an existing catalog record" workflow instead.
- Click the "Save" button.
- The item is now checked out to the patron and a work order has been created to route the item to cataloging upon its return.
For titles that do not have an existing catalog record
- Click on "Create Item".
- The Choose Holdings Type screen will open. Select "New" and click on the "Choose" button.
- The Quick Cataloging screen will open. Fill out the required fields of Title, Barcode, and Location. Additional fields are optional.
- Click the "Save" button.
- The item is now checked out to the patron and a work order has been created to route the item to cataloging upon its return.
How to set an item status to "missing"
Note: Item records must have a shelf status of "Item in place" in order to have the Missing status assigned manually.
- Search for the item record using the persistent search box set at the "Physical Items" search.
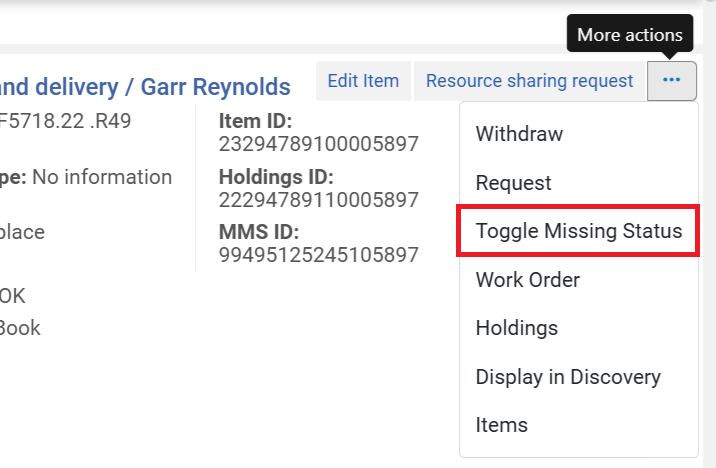
- When you find the correct record, click on the ellipsis on the right side to bring up the "More actions" menu.
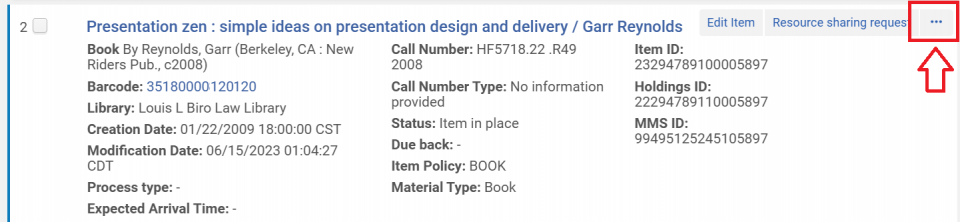
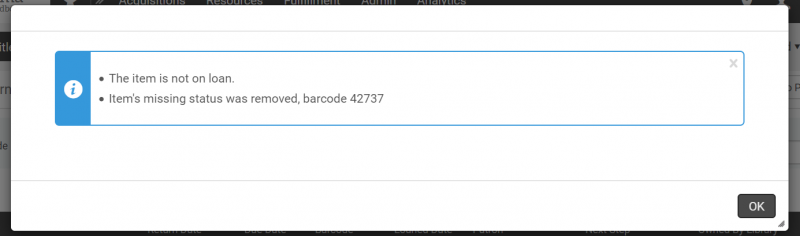
- Select "Toggle Missing Status". The item is now recorded as missing.
If the item is no longer missing you can change the status back again by following the steps above, or by checking the item in.
How to manage patron blocks
Checking items out to a patron that is blocked
If you attempt to check out items to a patron that is blocked, a pop up will appear when you enter their ID/name.
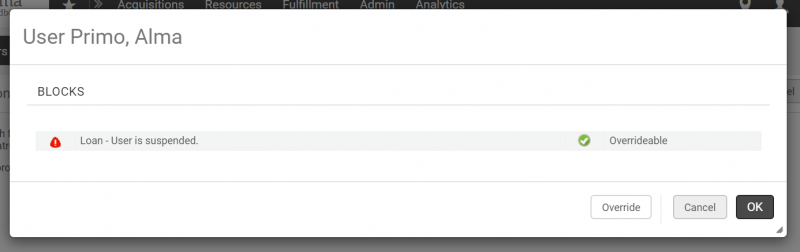
Depending on your permissions, you will have either two or three options.
- Click "Cancel" to exit the screen without further action.

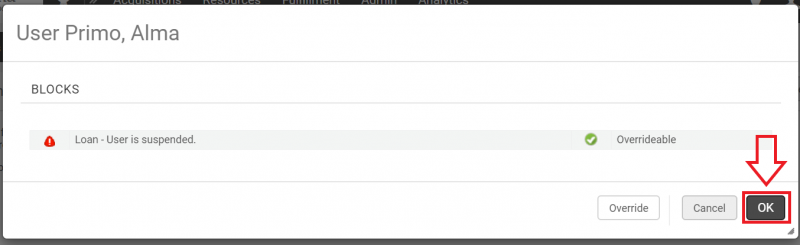
- Click "OK" to view the patron's record.
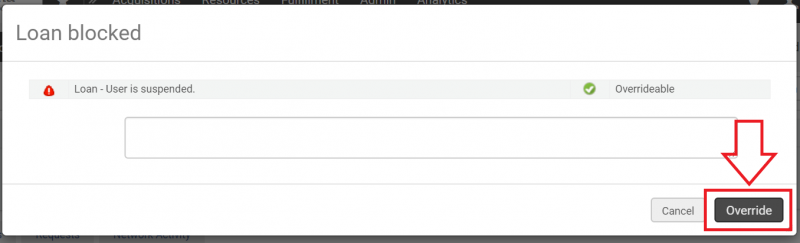
- If you have the appropriate permissions, click "Override" to ignore the block and check out items to the patron as usual.
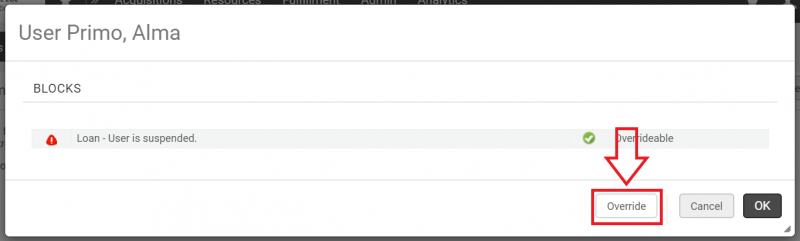
Alternately, while viewing the patron's record you can override the block by attempting to loan an item as usual. A pop up similar to the first will appear. Click "Override".
Applying a patron block
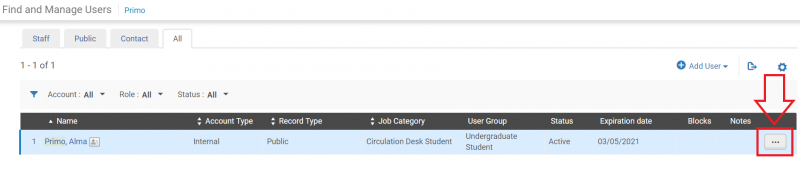
- To apply a patron block, begin by searching for the patron record, outlined in the section "How to look up a patron without an ID card". Then on the Find and Manage Users screen, click on the ellipsis under "Notes".
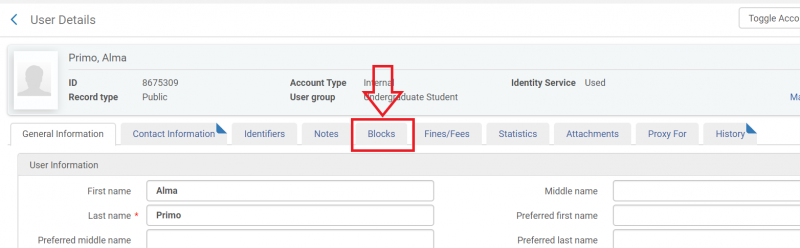
- A drop down menu will open. Click "Edit".

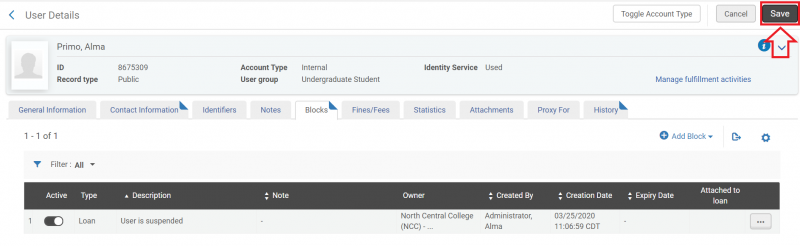
- The User Details screen will open. Click the "Blocks" tab.
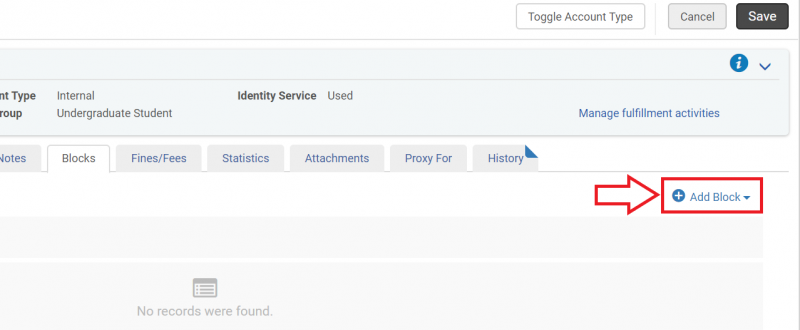
- With the "Blocks" tab selected, click on "Add Block".
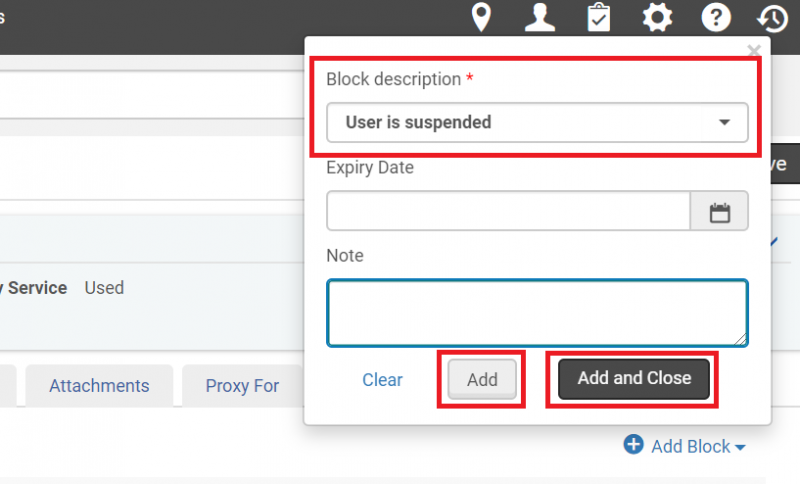
- The "Add Block" pop up will open. The "Block description" field is required; select a value from the drop down menu. If desired, enter information into the "Expiry Date" and "Note" fields. Click "Add and Close" if this is the only block you want to apply to the patron's record. Click "Add" if you would like to apply more than one block.
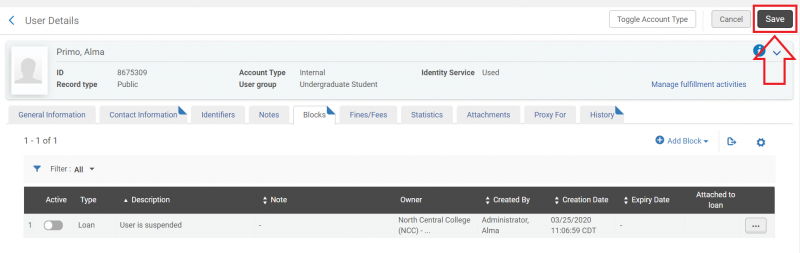
- Click "Save". The patron's record is now blocked.
Removing a patron block
- To remove a patron block, begin by searching for the patron record, outlined in the section "How to look up a patron without an ID card". Then on the Find and Manage Users screen, click on the ellipsis under "Notes".
- A drop down menu will open. Click "Edit".
- The User Details screen will open. Click the "Blocks" tab.
- Patron blocks will be displayed. Under "Active", toggle off any blocks you want to stop applying to the patron's record.
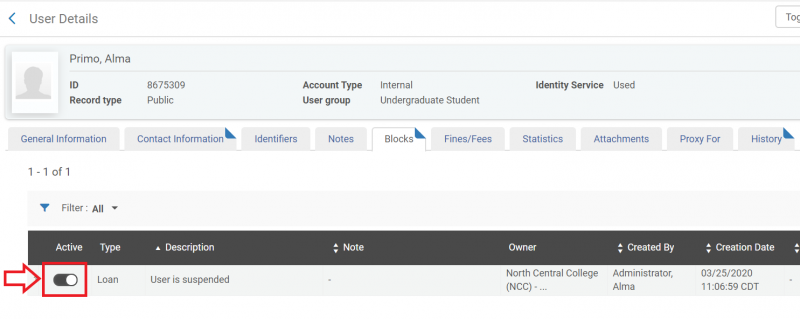
- Click "Save".
How to manage fines and fees
New Manage Patron Services UX (post-February 2025)
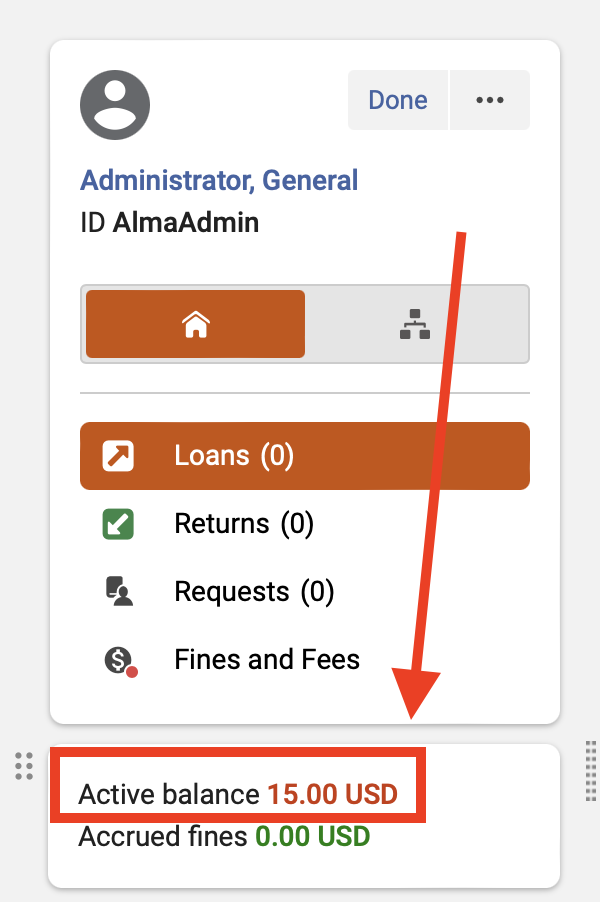
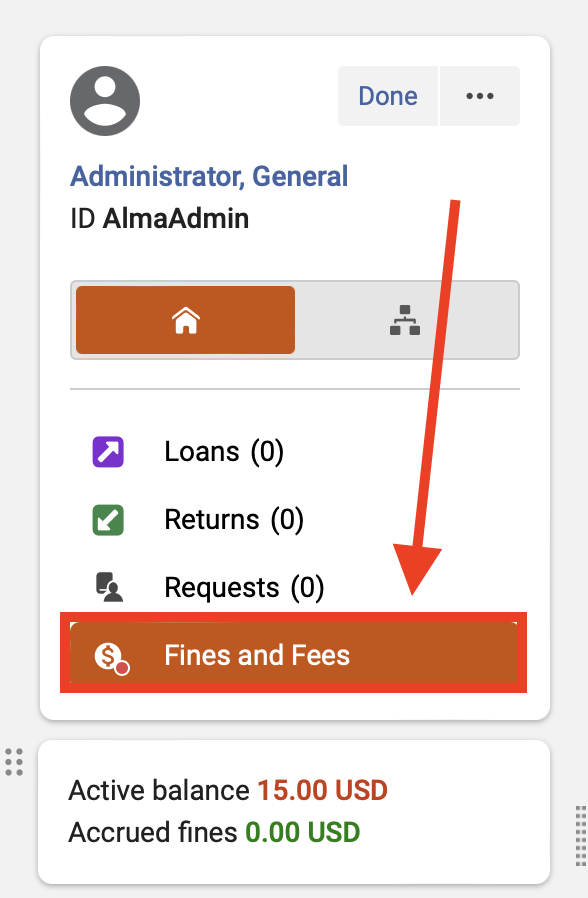
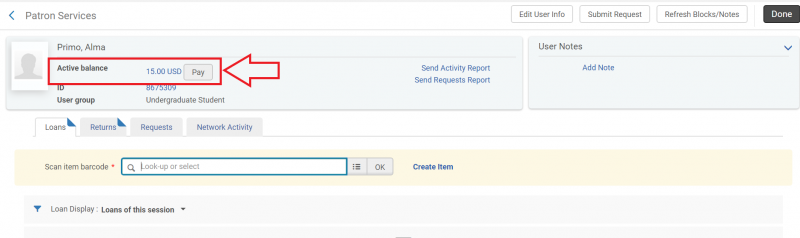
- If a patron has a fine, you can facilitate its payment from the Patron Services screen. Navigate to Fulfillment > Manage Patron Services to bring up the Patron Identification screen, then look up the patron's record as if you were going to check out items to the patron.
- You can see the amount the patron owes in the "Active balance" section under the patron's name.
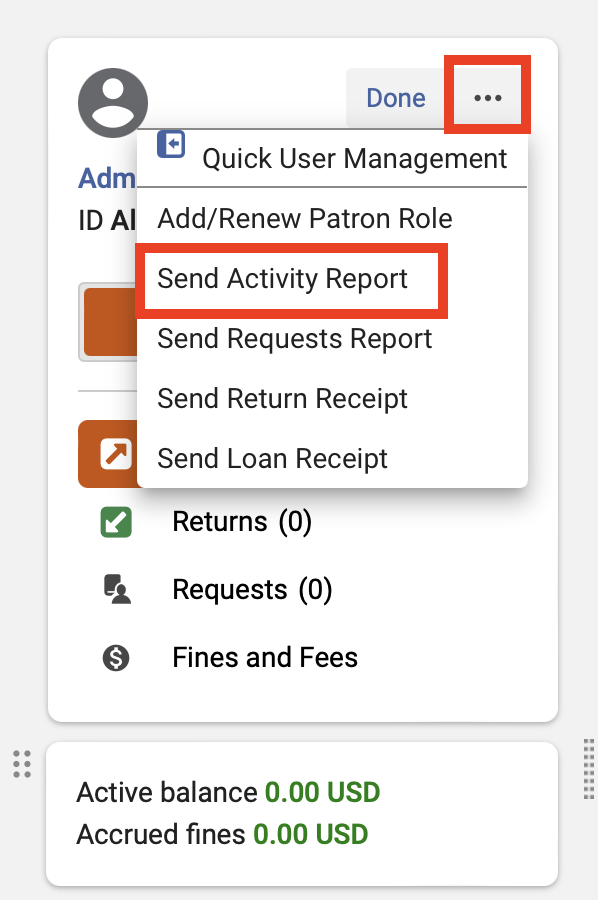
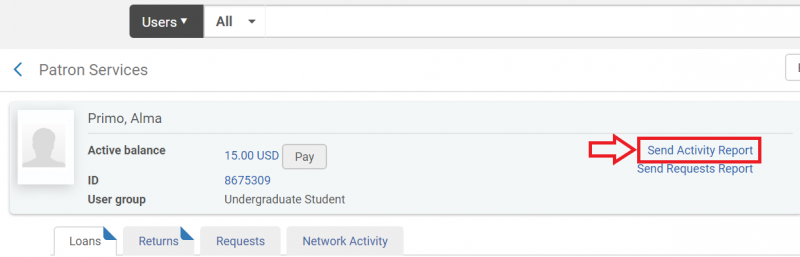
- If the patron would like an email of their circulation activity, including fines and fees, click the ellipses and select "Send Activity Report" from the dropdown menu.
- If they would like to pay at this time, select the "Fines and Fees" tab. Then, click the "Pay" button in the upper right hand corner to pay all selected fines, or click "Pay" to the right of a fine to pay it individually.

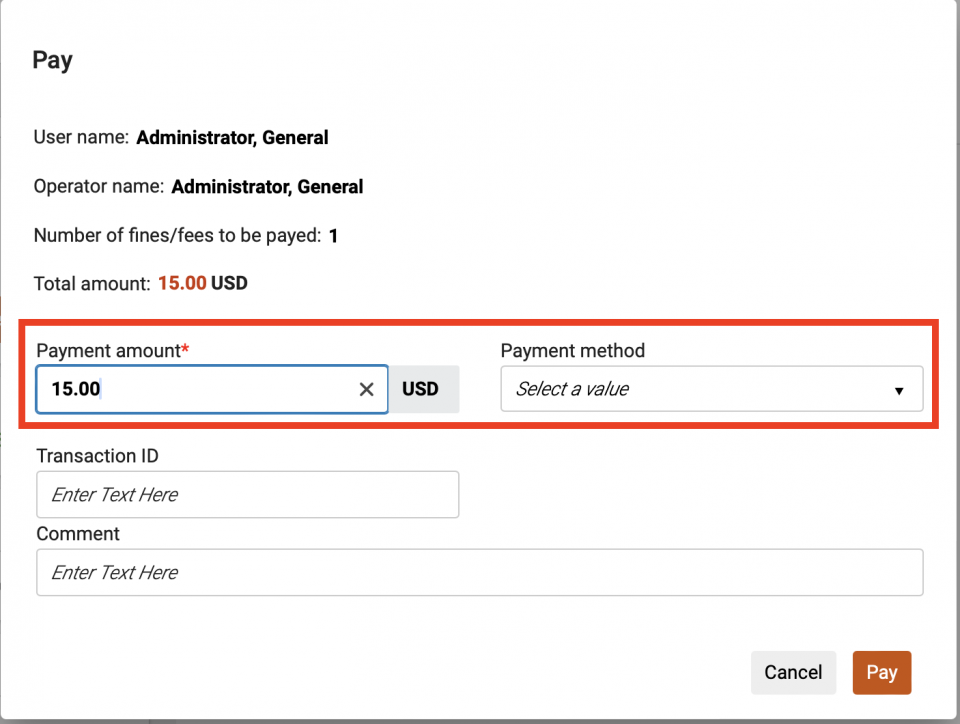
- The Pay screen will open. Select the payment method by clicking on the drop down arrow and choosing from the menu, enter how much the patron wishes to pay at this time in the "Payment amount" field, then click the "Pay" button.
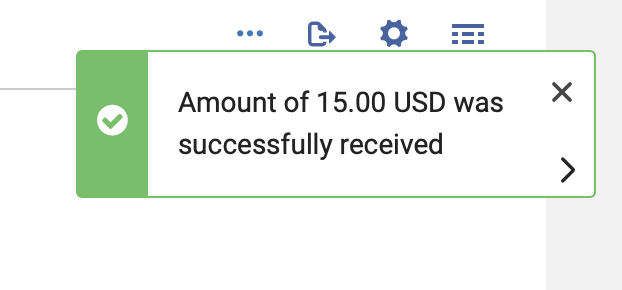
- The fine is now recorded as having been paid. You may continue helping the patron from the Patron Services screen, or click "Done" to exit.
Applying a fine to an account
- To apply a fine to a patron account, or to otherwise manage patron fines, begin by looking up the patron with the fixed search bar.

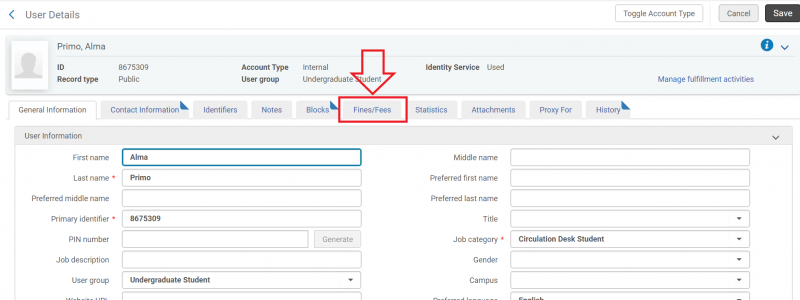
- On the User Details screen, select the "Fines/Fees" tab.
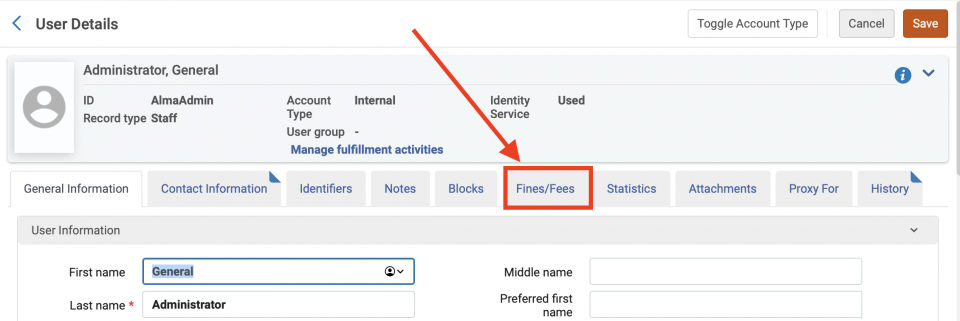
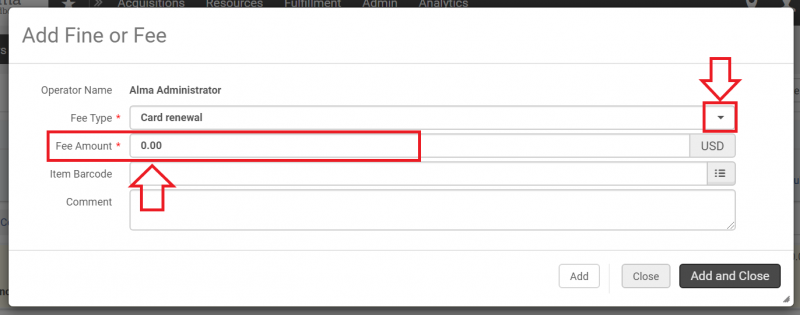
- Click "Add Fine or Fee".
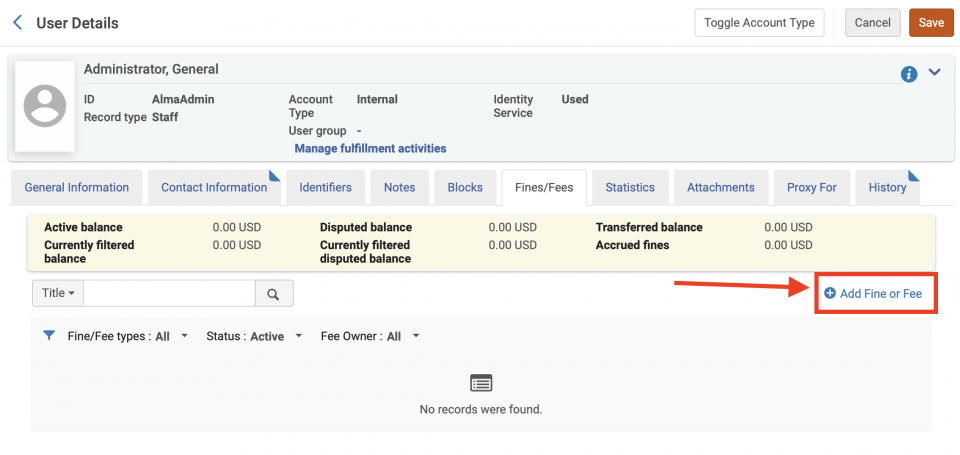
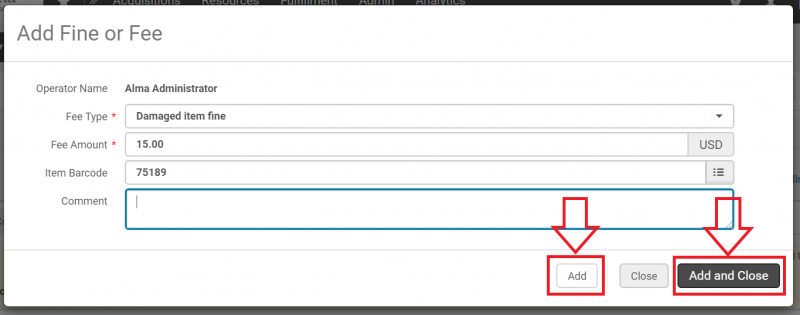
- The "Fee Type" and "Fee Amount" fields are required. Select the fee type from the drop down menu, and enter the fee amount manually. Populate any additional fields as necessary.
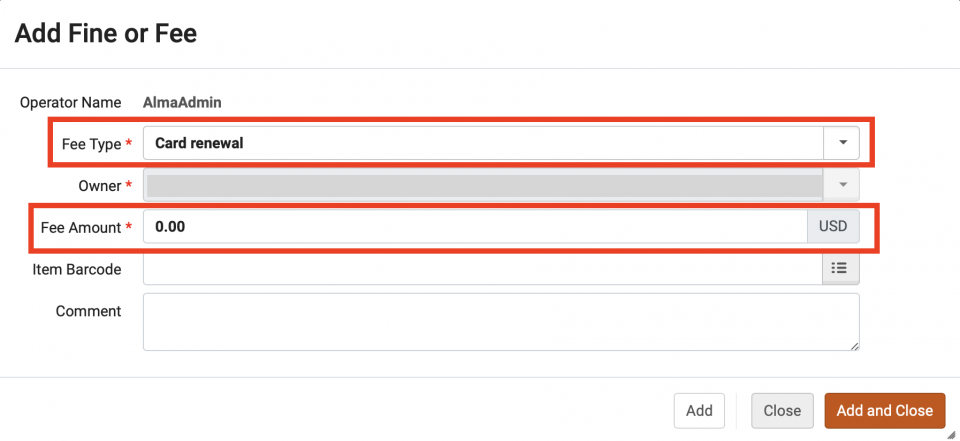
- If you are adding more than one fine/fee, click the "Add" button. If you are finished adding information, click the "Add and Close" button.
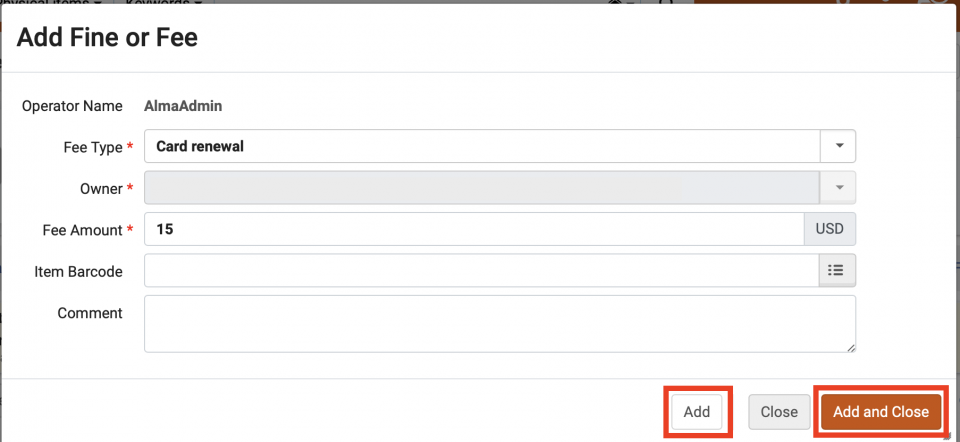
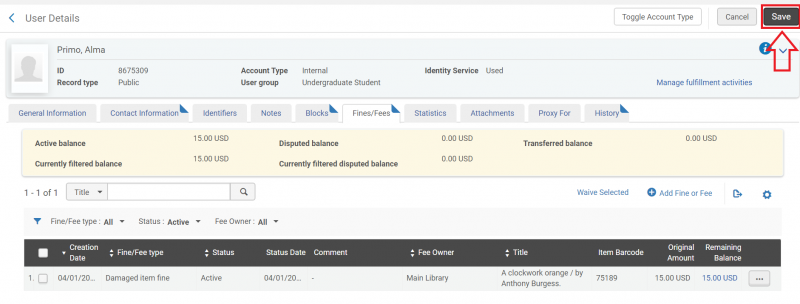
- The Fine/Fee is now charged to the patron. Click the "Save" button.
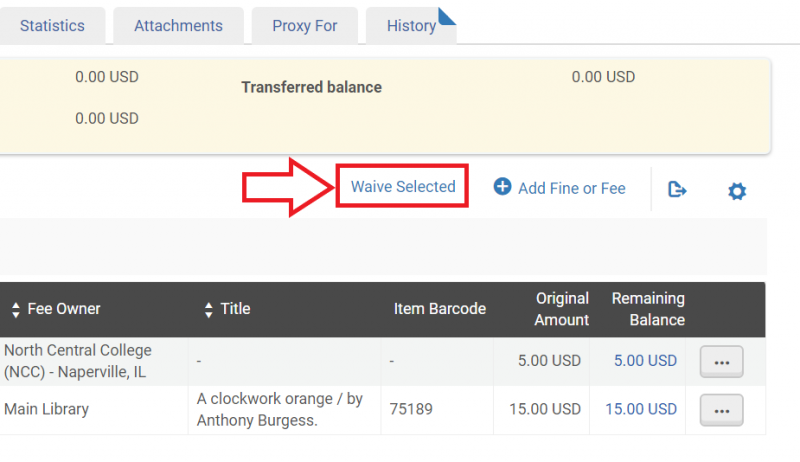
Waiving Fines or Fees
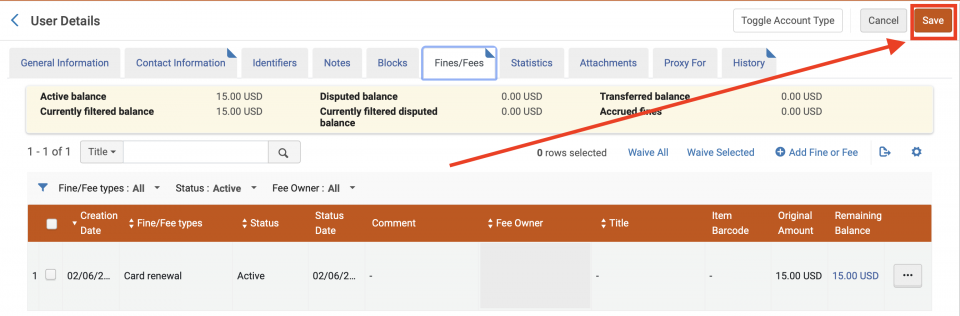
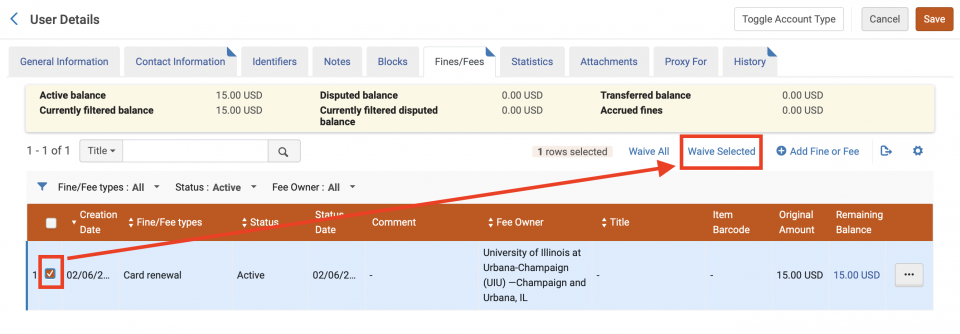
- Certain fines and fees may be waived. To do this, navigate to the Fines/Fees tab in User Details and select the fine/fee you would like to waive. Then, click "Waive Selected."
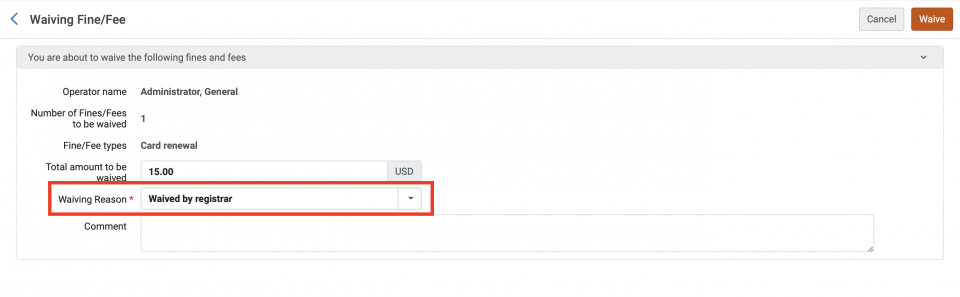
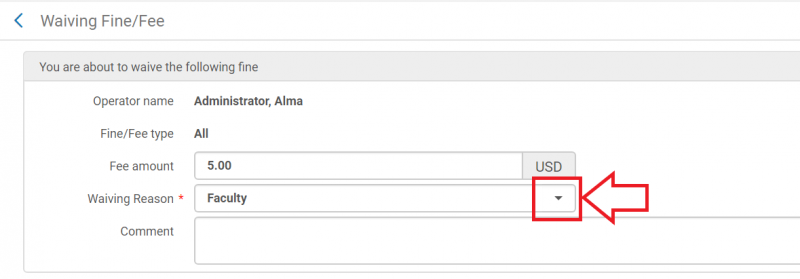
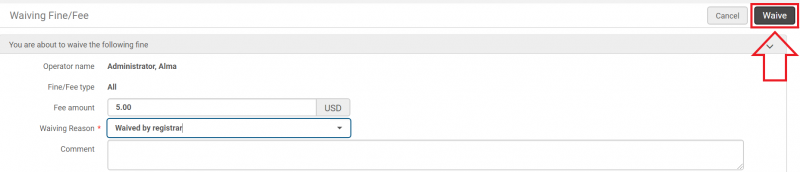
- The Waiving Fine/Fee screen will appear. The "Waiving Reason" field is required. Click the drop down arrow to deploy the option menu and select the appropriate waiving reason. Populate the other fields as needed.
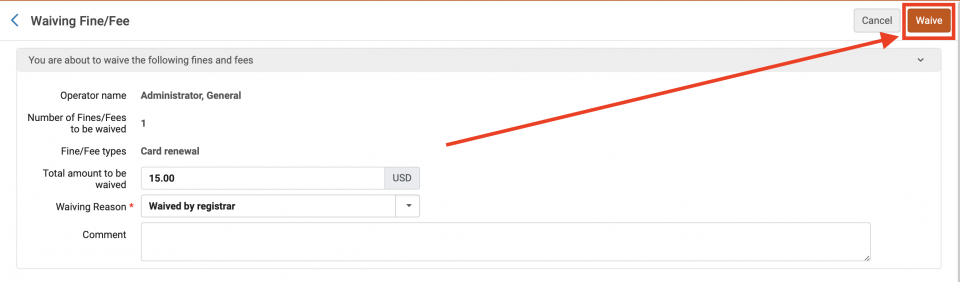
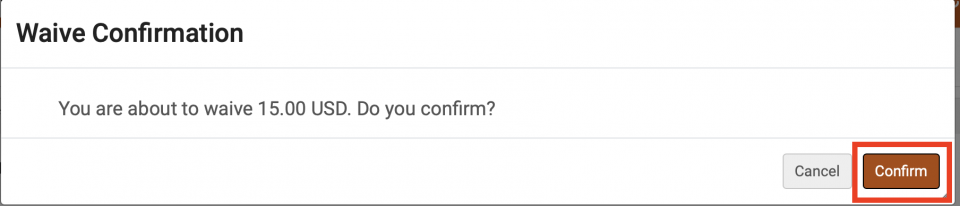
- Click the "Waive" button.
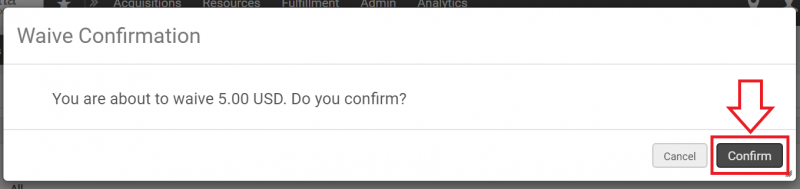
- The Waive Confirmation screen will appear. Review the information. If you would like to proceed, click the "Confirm" button. Otherwise, click the "Cancel" button.
- The fine/fee is now waived. Click the "Save" button.

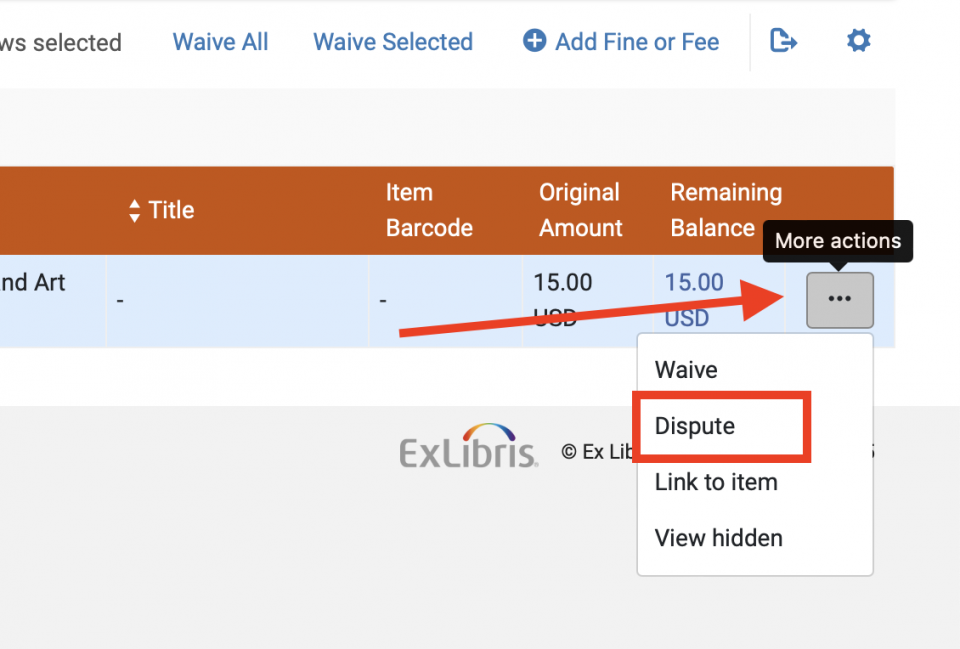
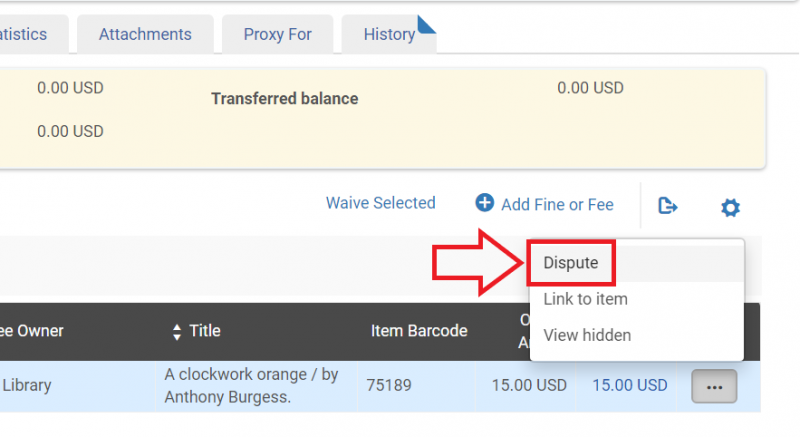
Disputing a fine
- To mark a fine as disputed, navigate to the Fines/Fees tab and click on the "More actions" ellipsis to deploy the drop down menu. Click on "Dispute".
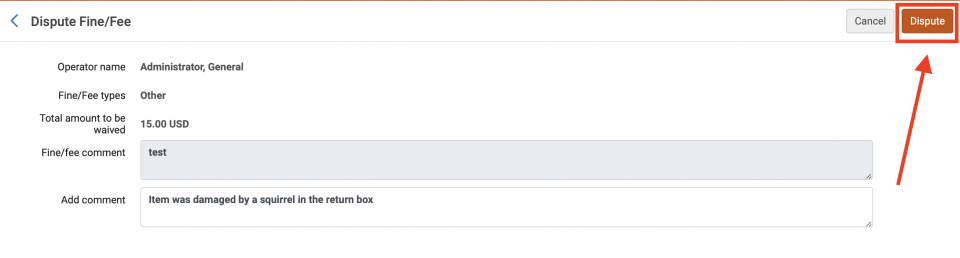
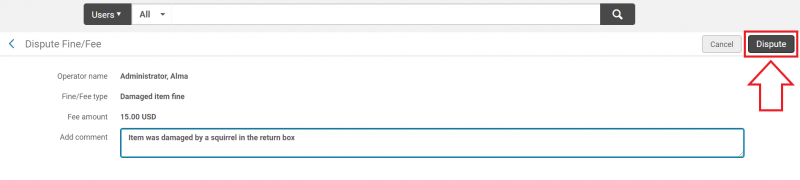
- The Dispute Fine/Fee screen will open. Add a comment to the comment box if appropriate, then click the "Dispute" button.
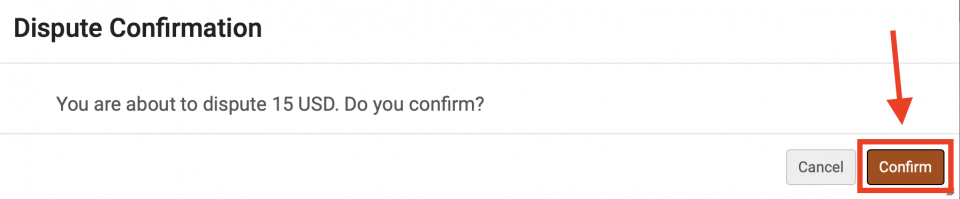
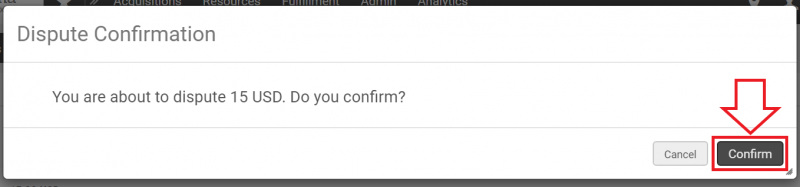
- The Dispute Confirmation screen will appear. Click the "Confirm" button.
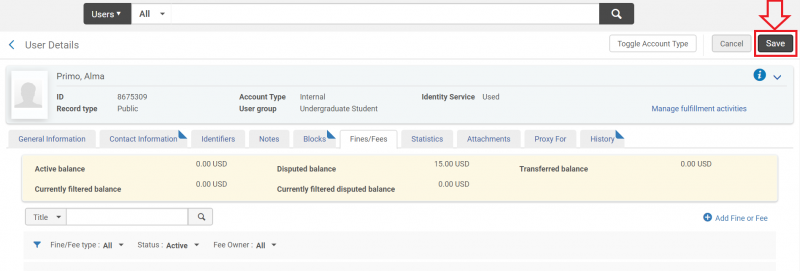
- Click the "Save" button.
- Fines and fees remain in dispute until they are either waived or restored.
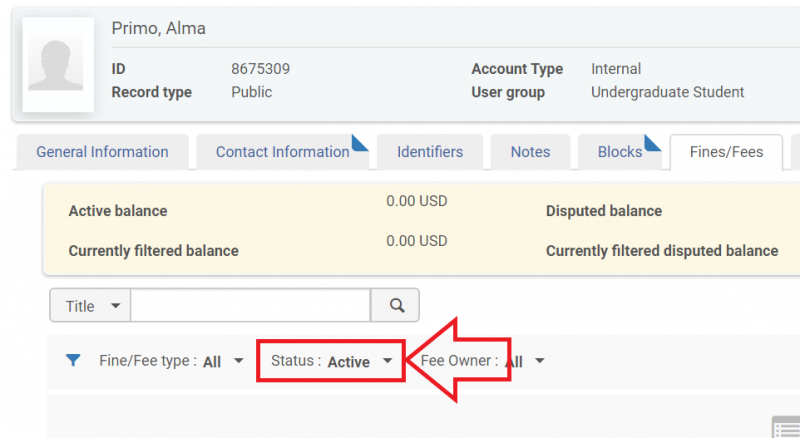
Restoring a disputed fine
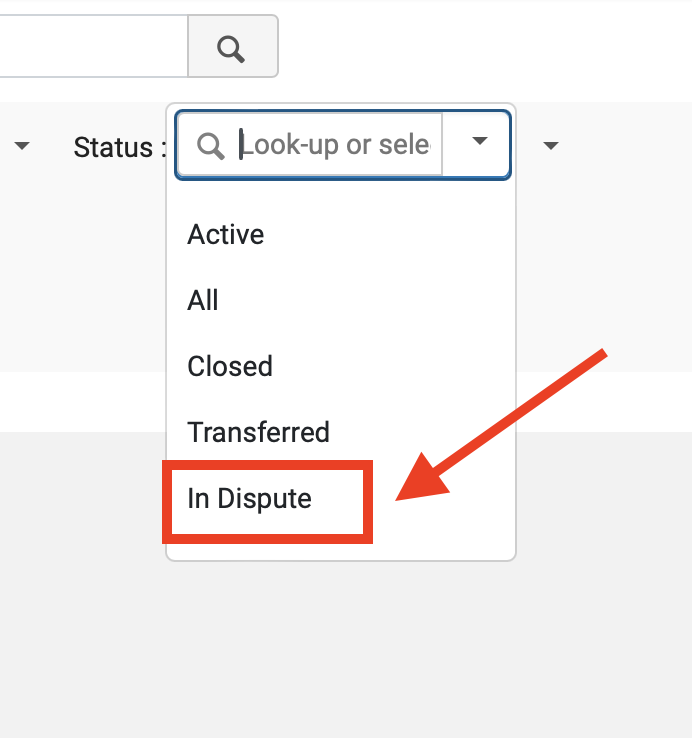
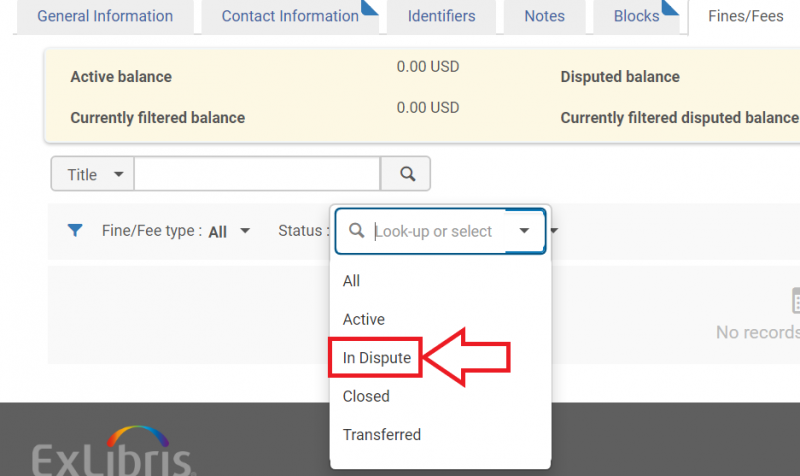
- To restore a disputed fine to active, navigate to the Fines/Fees tab in the User Details screen. Click on the drop down menu arrow for "Status".
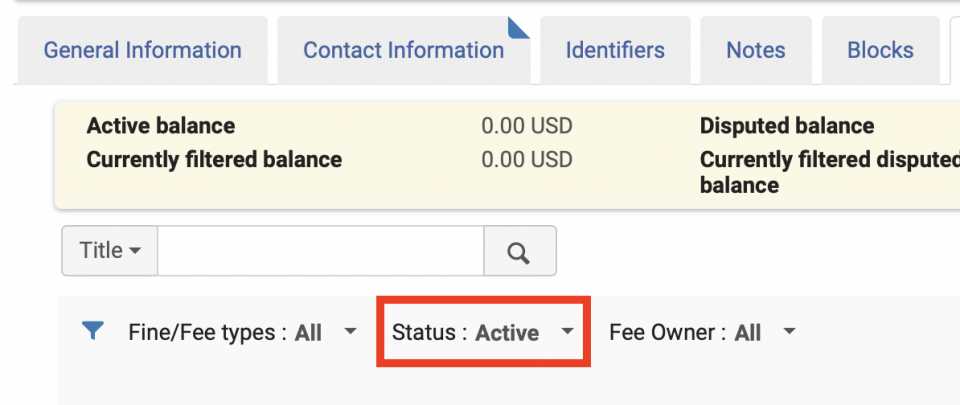
- Select "In Dispute" from the menu.
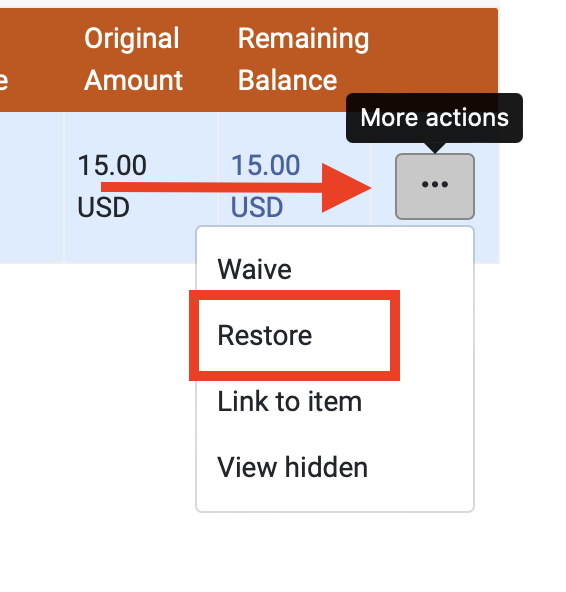
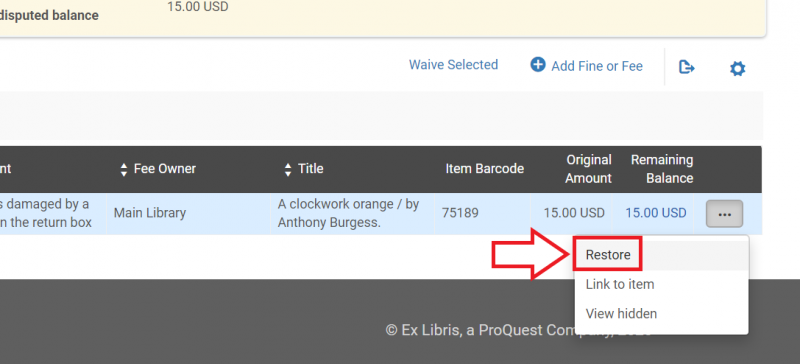
- The list of disputed fines and fees for this account will appear. For the one you wish to restore, click on the ellipsis on the far right, then click "Restore".
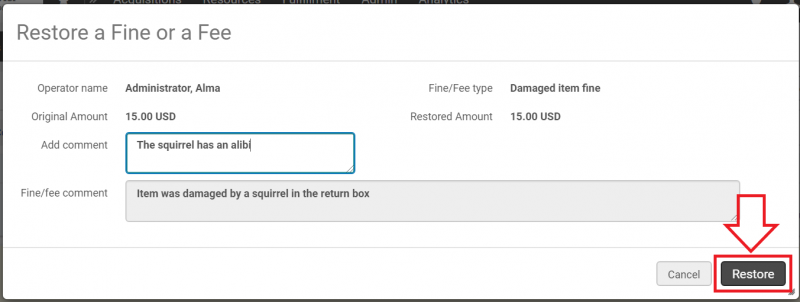
- The Restore a Fine or a Fee screen will appear. Add a comment if appropriate, then click the "Restore" button.
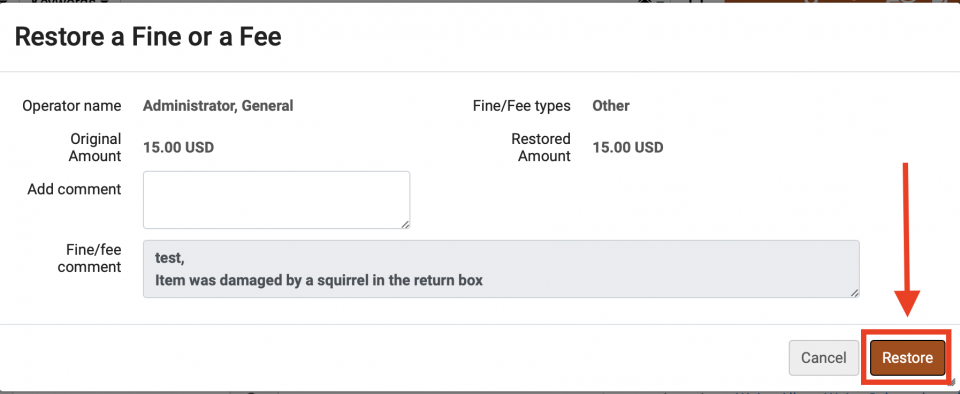
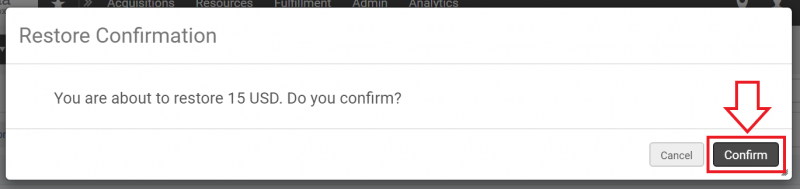
- The Restore Confirmation screen will appear. Click the "Confirm" button.
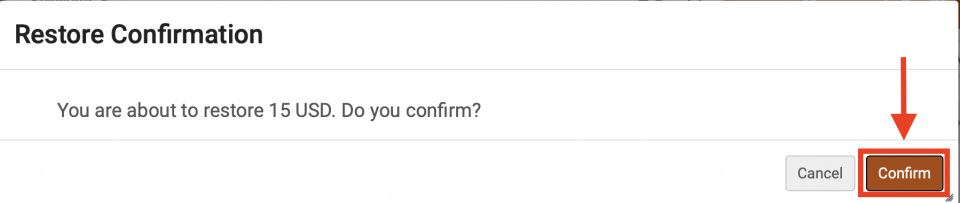
- The fine or fee is now restored. Click the "Save" button.
Additional note
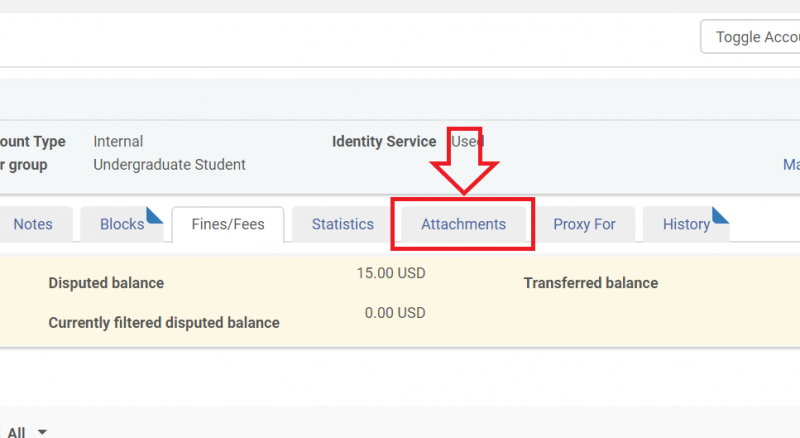
A patron may have questions about notifications about fines and fees. To review what notifications were sent to the patron, click the "Attachments" tab of the User Details screen.
Classic Manage Patron Services UX (pre-February 2025)
Paying a fine
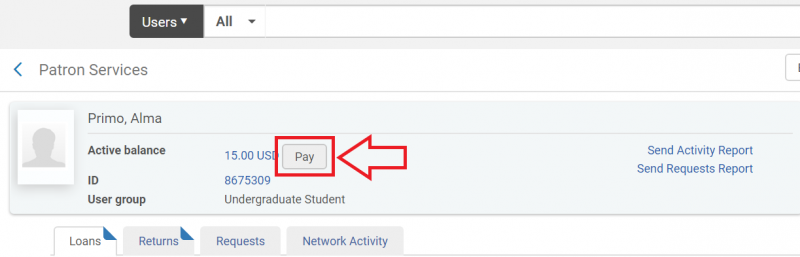
- If a patron has a fine, you can facilitate its payment from the Patron Services screen. Navigate to Fulfillment > Manage Patron Services to bring up the Patron Identification screen, then look up the patron's record as if you were going to check out items to the patron.
- You can see the amount the patron owes in the "Active balance" section under the patron's name.
- If the patron would like an email of their circulation activity, including fines and fees, click "Send Activity Report".
- If they would like to pay at this time, click the "Pay" button.
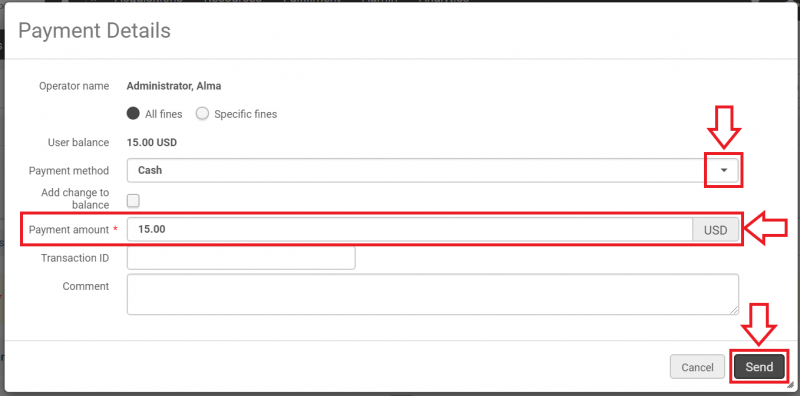
- The Payment Details screen will open. Select the payment method by clicking on the drop down arrow and choosing from the menu, enter how much the patron wishes to pay at this time in the "Payment amount" field, then click the "Send" button.
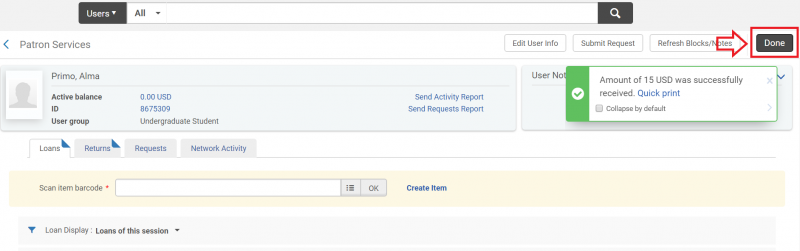
- The fine is now recorded as having been paid. You may continue helping the patron from the Patron Services screen, or click "Done" to exit.
Applying a fine to an account
- To apply a fine to a patron account, or to otherwise manage patron fines, begin by looking up the patron with the fixed search bar.

- On the User Details screen, select the "Fines/Fees" tab.
- Click "Add Fine or Fee".

- The "Fee Type" and "Fee Amount" fields are required. Select the fee type from the drop down menu, and enter the fee amount manually. Populate any additional fields as necessary.
- If you are adding more than one fine/fee, click the "Add" button. If you are finished adding information, click the "Add and Close" button.
- The Fine/Fee is now charged to the patron. Click the "Save" button.
Waiving Fines or Fees
- Certain fines and fees may be waived. To do this, navigate to the Fines/Fees tab in User Details and select the fine/fee you would like to waive.
- Click on "Waive Selected".
- The Waiving Fine/Fee screen will appear. The "Waiving Reason" field is required. Click the drop down arrow to deploy the option menu and select the appropriate waiving reason. Populate the other fields as needed.
- Click the "Waive" button.
- The Waive Confirmation screen will appear. Review the information. If you would like to proceed, click the "Confirm" button. Otherwise, click the "Cancel" button.
- The fine/fee is now waived. Click the "Save" button.

Disputing a fine
- To mark a fine as disputed, navigate to the Fines/Fees tab and click on the "More actions" ellipsis to deploy the drop down menu. Click on "Dispute".
- The Dispute Fine/Fee screen will open. Add a comment to the comment box if appropriate, then click the "Dispute" button.
- The Dispute Confirmation screen will appear. Click the "Confirm" button.
- Click the "Save" button.
- Fines and fees remain in dispute until they are either waived or restored.
Restoring a disputed fine
- To restore a disputed fine to active, navigate to the Fines/Fees tab in the User Details screen. Click on the drop down menu arrow for "Status".
- Select "In Dispute" from the menu.
- The list of disputed fines and fees for this account will appear. For the one you wish to restore, click on the ellipsis on the far right, then click "Restore".
- The Restore a Fine or a Fee screen will appear. Add a comment if appropriate, then click the "Restore" button.
- The Restore Confirmation screen will appear. Click the "Confirm" button.
- The fine or fee is now restored. Click the "Save" button.
Additional note
A patron may have questions about notifications about fines and fees. To review what notifications were sent to the patron, click the "Attachments" tab of the User Details screen.
How to manage patron notes
New Manage Patron Services UX (post-February 2025)
Adding a patron note
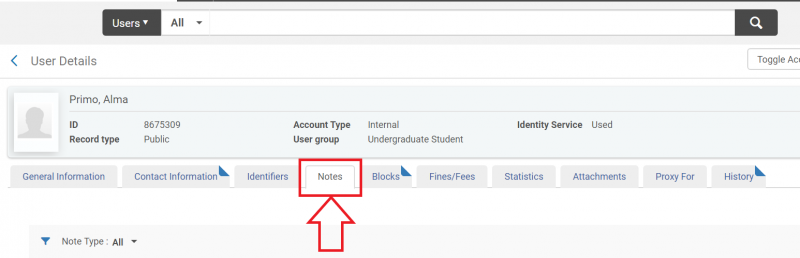
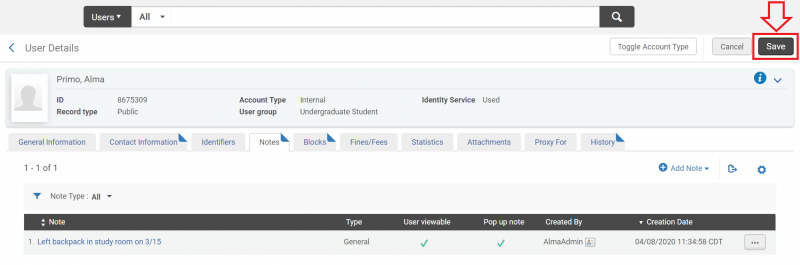
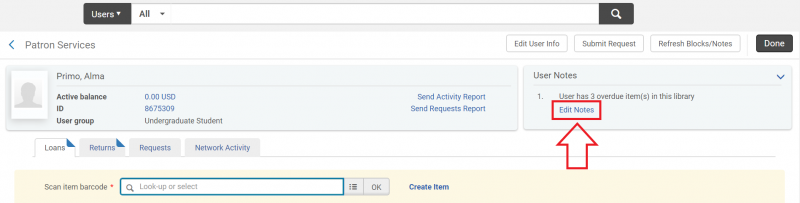
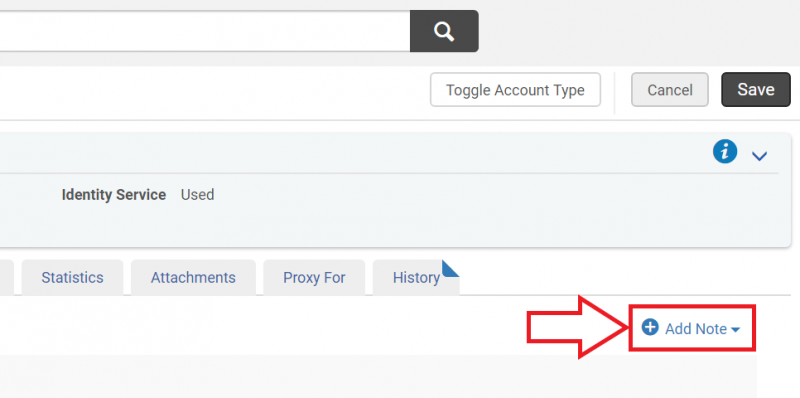
- To add a patron note, click on "Manage Notes" on the Patron Services screen (the check out screen). This will take you to the "Notes" tab on the User Details screen.
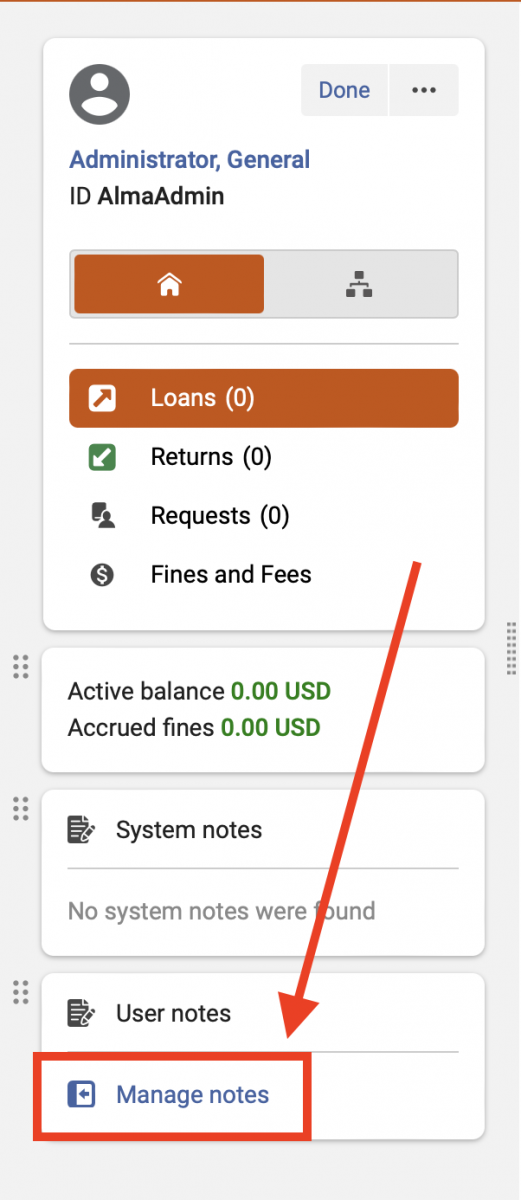
Alternately, you can navigate directly to the User Details screen and click on the "Notes" tab.
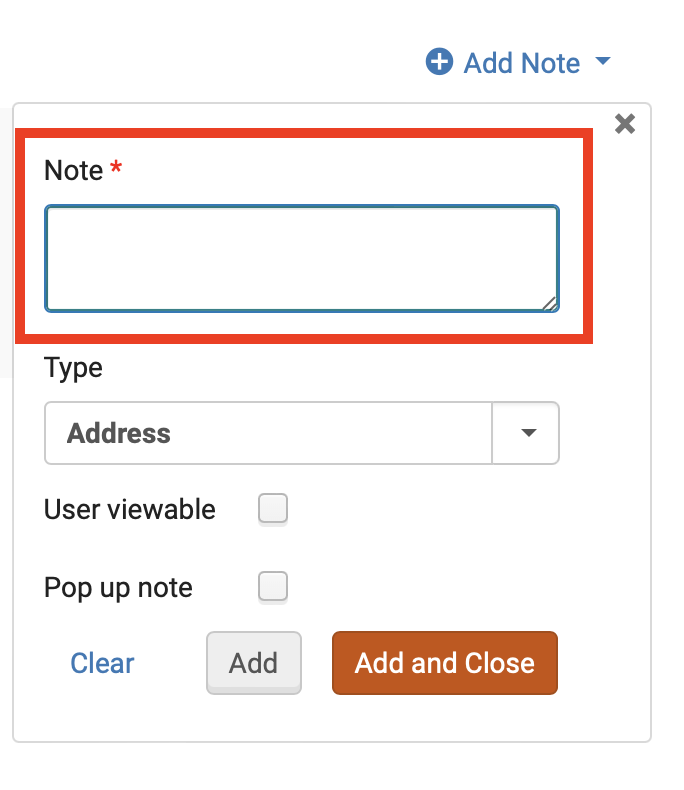
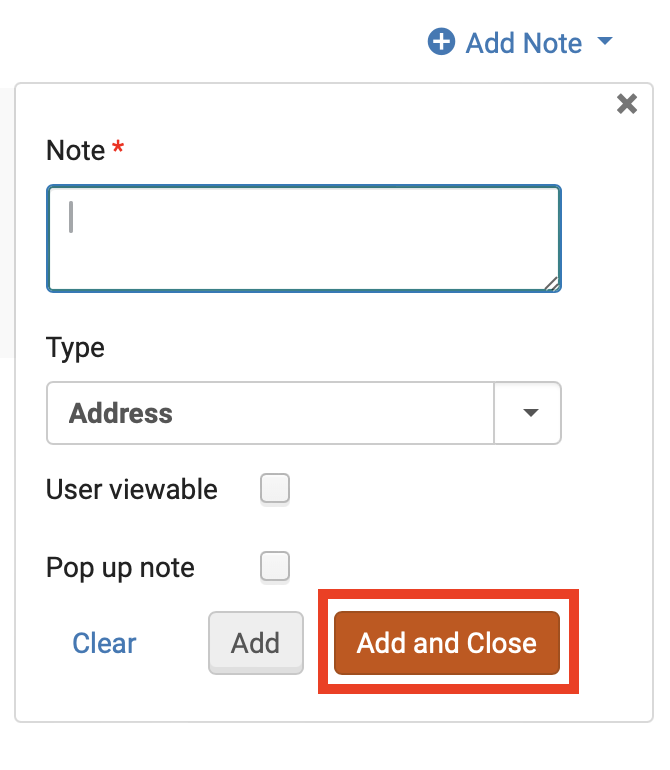
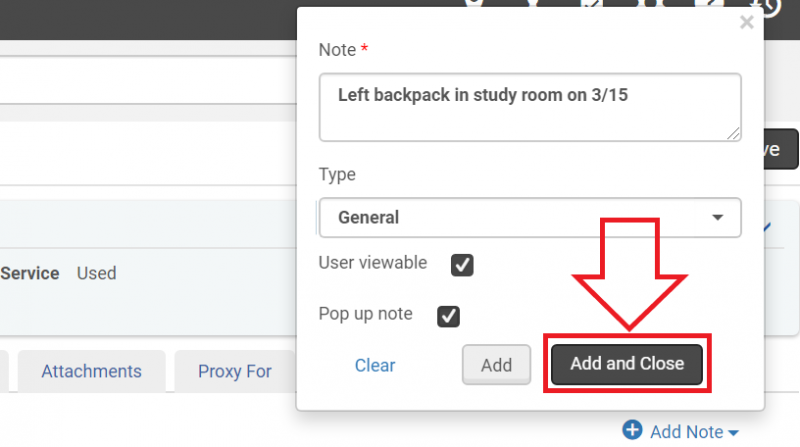
- Click on "Add Note".
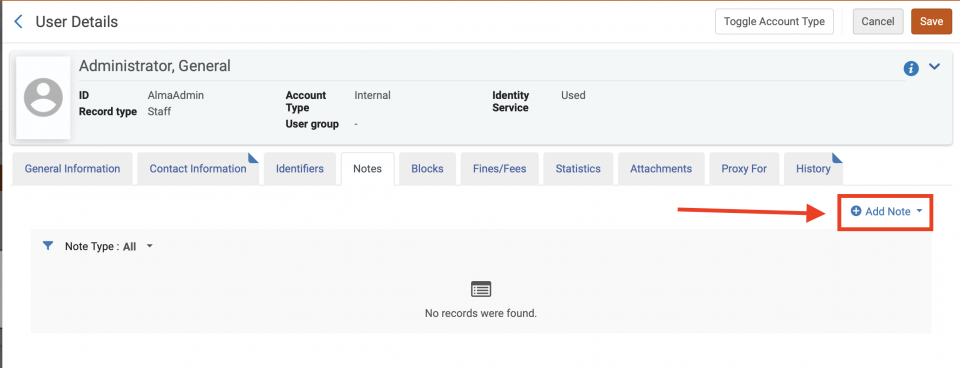
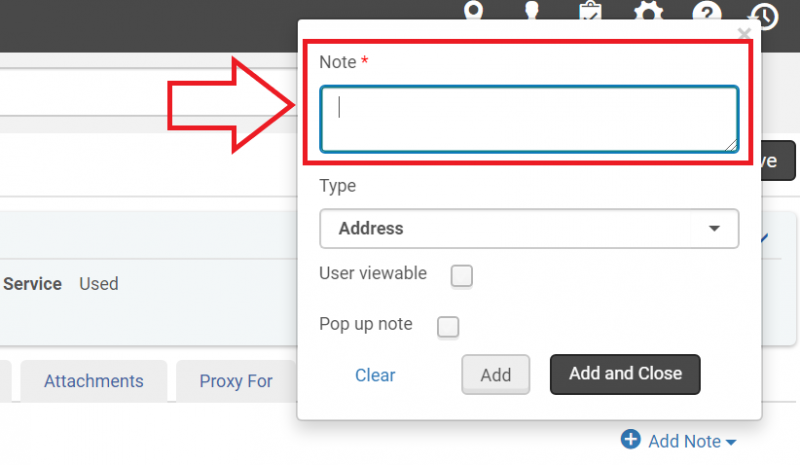
- The "Add Note" drop down will appear. Add the desired note text to the "Note" field.
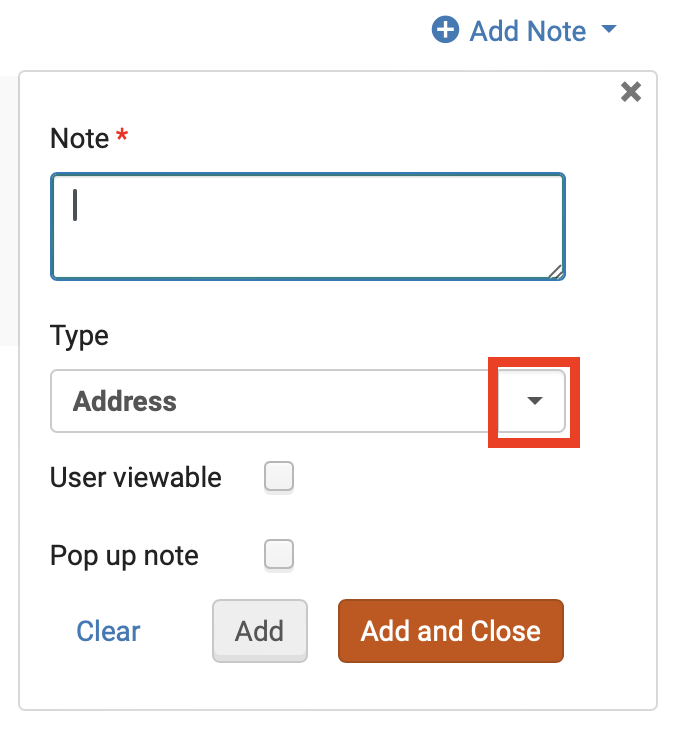
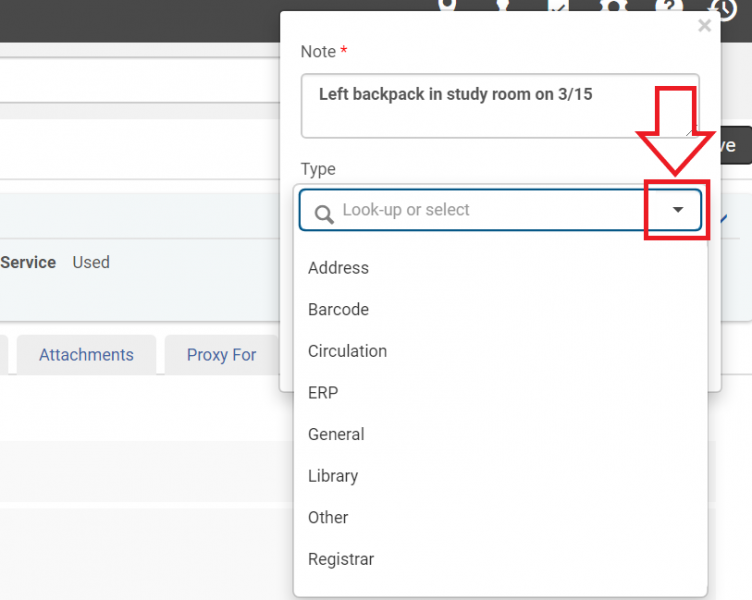
- Click on the drop down arrow for the "Type" field to assign a type to the note.
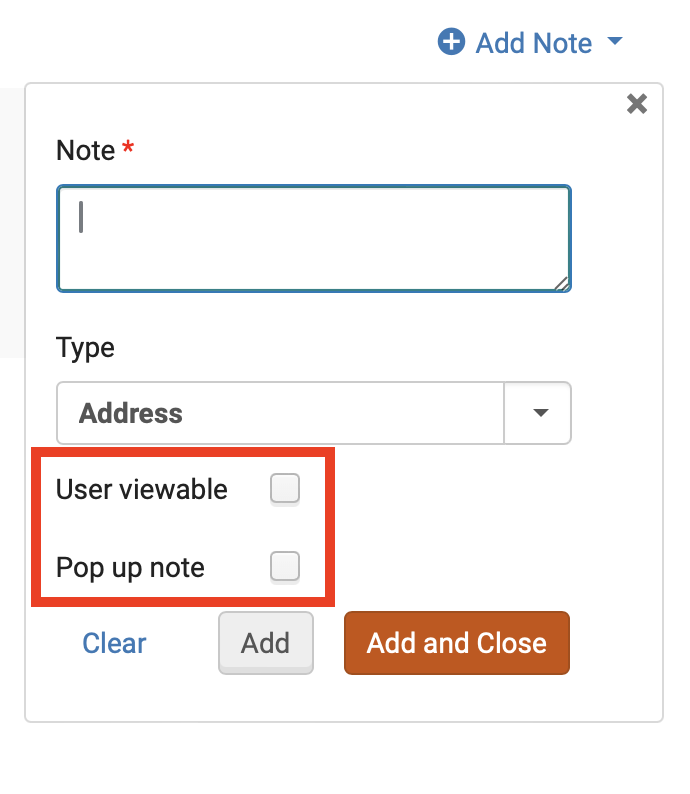
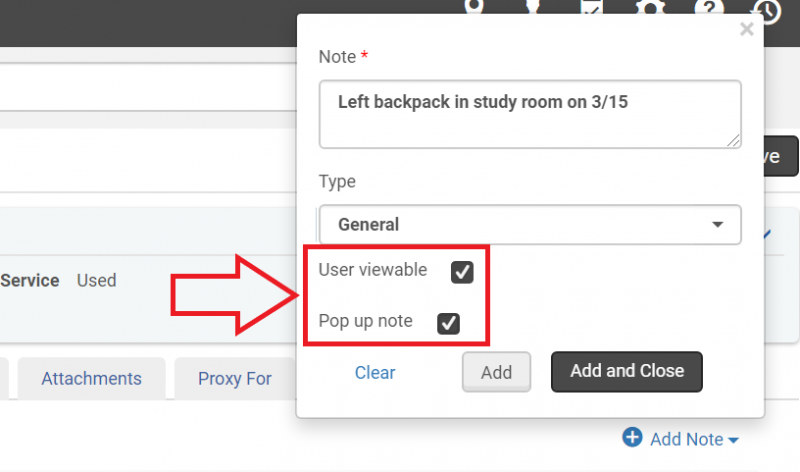
- Click the "User viewable" check box if you would like the note to be viewable by the patron through Primo VE. Click the "Pop up note" check box if you would like a pop up with the note to occur when the patron's account is accessed through Alma.
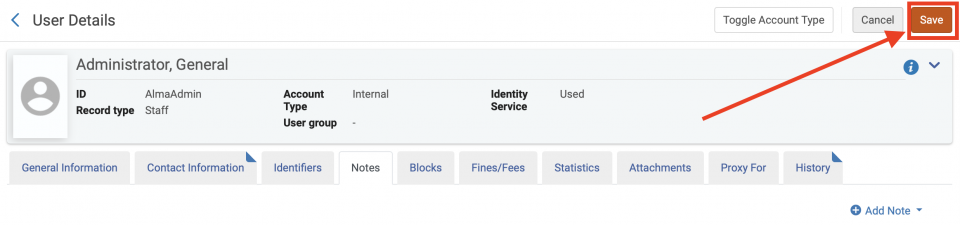
- Click the "Add and Close" button.
- Click the "Save" button.
Editing a note
- To edit a note, navigate to the "Notes" tab on the User Details screen, then click on the ellipsis for the note you wish to manage.
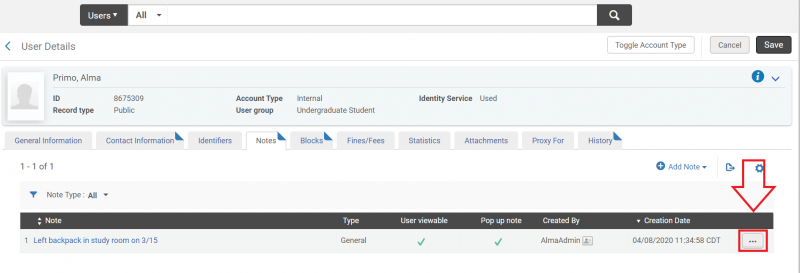
- Select "Edit" from the drop down menu.
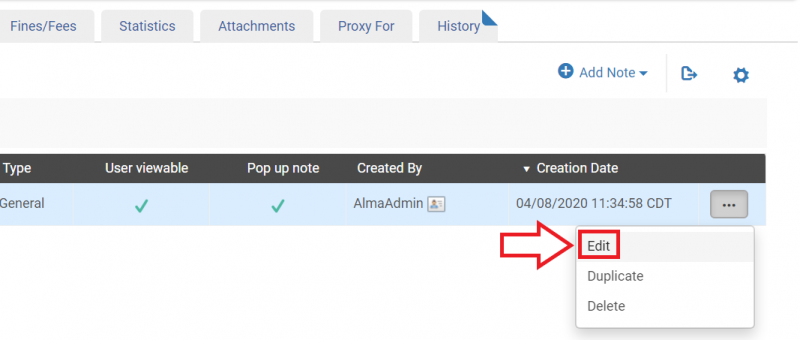
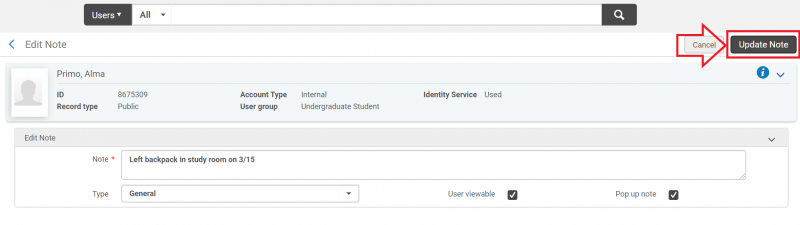
- The Edit Note screen will appear. Make the desired changes to the note, then click the "Update Note" button.
- Click the "Save" button.
Deleting a note
- To delete a note, navigate to the "Notes" tab on the User Details screen, then click on the ellipsis for the note you wish to manage.
- Select "Delete" from the drop down menu.
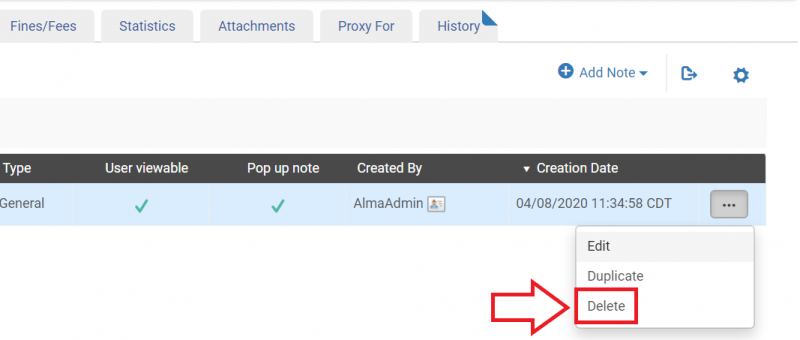
- The note is now deleted. Click the "Save" button.

Notes from the patron's viewpoint
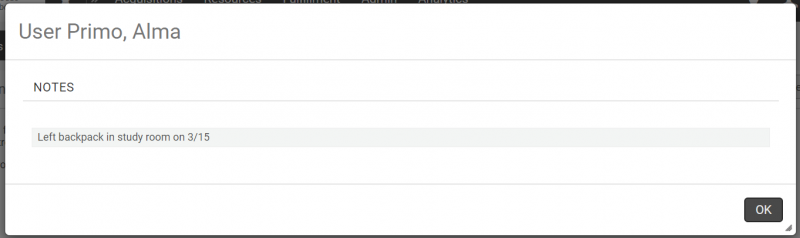
If a note is set to "User Viewable", the patron may see it through Primo VE.
- Once they are logged in, they click on their name in the upper right side of the screen.
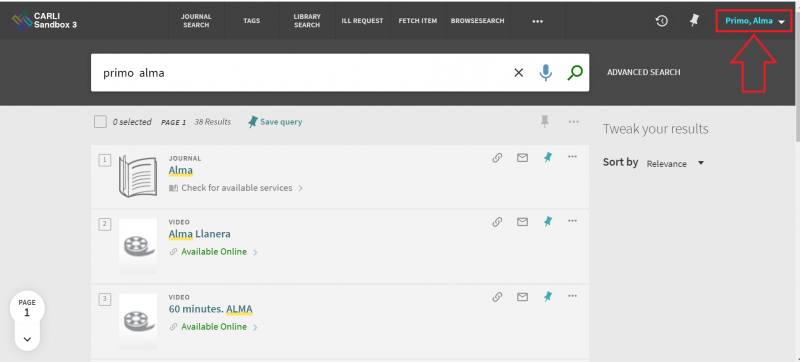
- A drop down menu will appear. Click on "Library Card".
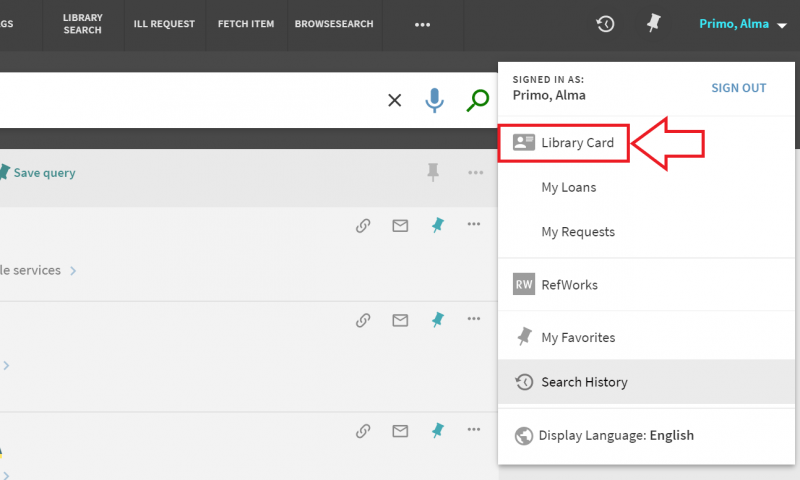
- The My Library Card dashboard will appear. Viewable notes will appear in the "Blocks + messages" section.
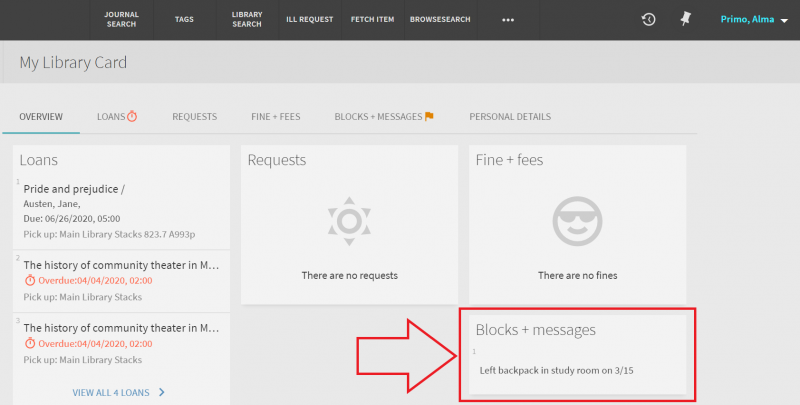
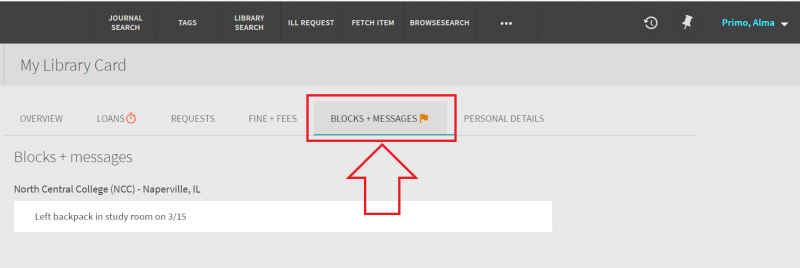
- Alternately, the patron can click on the "Blocks + messages tab" for easier viewing.
Classic Manage Patron Services UX (pre-February 2025)
Adding a patron note
- To add a patron note, click on "Edit Notes" on the Patron Services screen (the check out screen). This will take you to the "Notes" tab on the User Details screen.
Alternately, you can navigate directly to the User Details screen and click on the "Notes" tab.
- Click on "Add Note".
- The "Add Note" drop down will appear. Add the desired note text to the "Note" field.
- Click on the drop down arrow for the "Type" field to assign a type to the note.
- Click the "User viewable" check box if you would like the note to be viewable by the patron through Primo VE. Click the "Pop up note" check box if you would like a pop up with the note to occur when the patron's account is accessed through Alma.
- Click the "Add and Close" button.
- Click the "Save" button.
Editing a note
- To edit a note, navigate to the "Notes" tab on the User Details screen, then click on the ellipsis for the note you wish to manage.
- Select "Edit" from the drop down menu.
- The Edit Note screen will appear. Make the desired changes to the note, then click the "Update Note" button.
- Click the "Save" button.
Deleting a note
- To delete a note, navigate to the "Notes" tab on the User Details screen, then click on the ellipsis for the note you wish to manage.
- Select "Delete" from the drop down menu.
- The note is now deleted. Click the "Save" button.
Notes from the patron's viewpoint
If a note is set to "User Viewable", the patron may see it through Primo VE.
- Once they are logged in, they click on their name in the upper right side of the screen.
- A drop down menu will appear. Click on "Library Card".
- The My Library Card dashboard will appear. Viewable notes will appear in the "Blocks + messages" section.
- Alternately, the patron can click on the "Blocks + messages tab" for easier viewing.
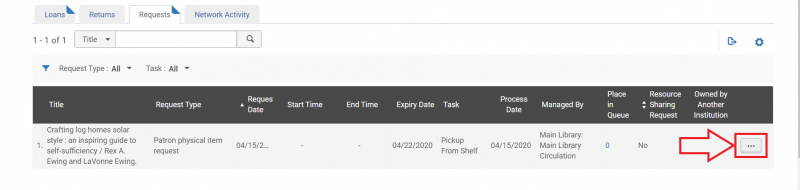
How to manage patron requests
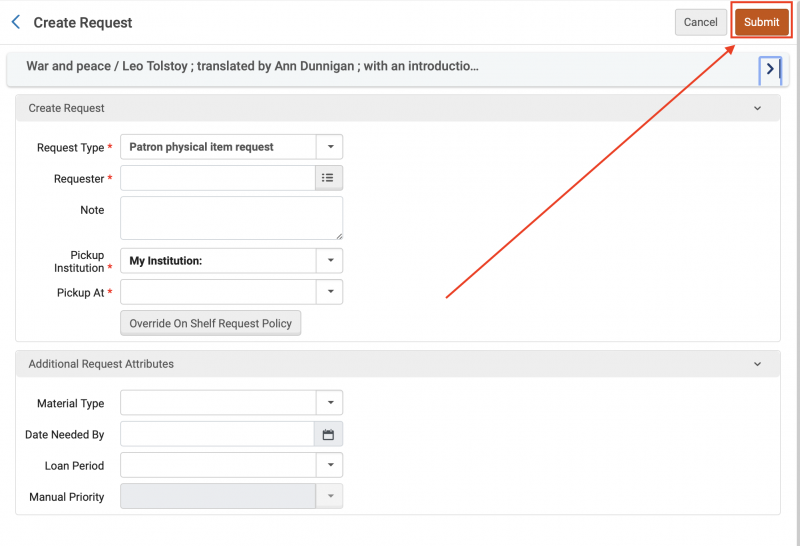
Requesting an item for a patron
- Search for the item using the persistent search bar.

- Once you find the item the patron would like to request, click on the "Request" button.
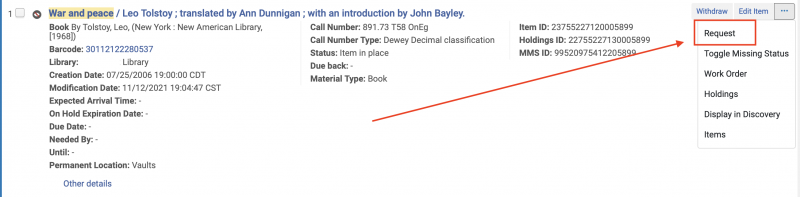
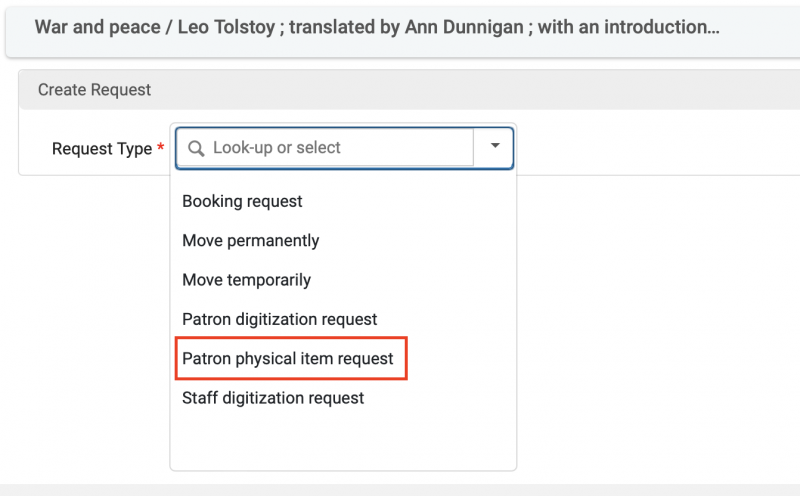
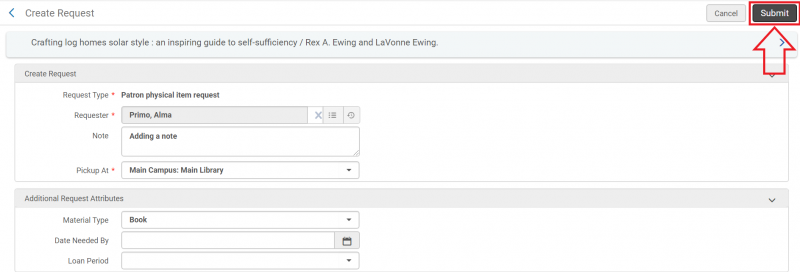
- The Create Request screen will open. Click on the "Request Type" drop down arrow.

- Select "Patron physical item request" from the drop down menu.
- More fields will appear in the Create Request screen. Fill out the "Requester" and "Pickup At" fields, along with any other fields appropriate for the request.
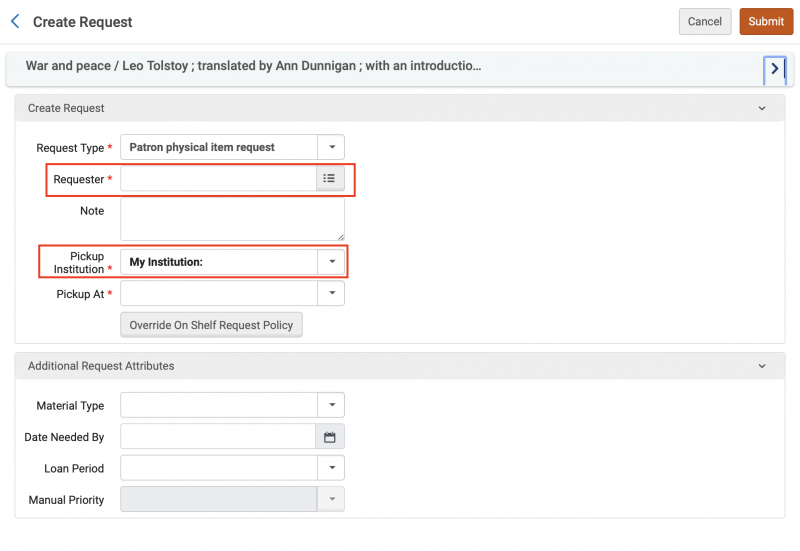
- Click the "Submit" button.
Editing or Canceling patron requests (New Manage Patron Services UX - post-February 2025)
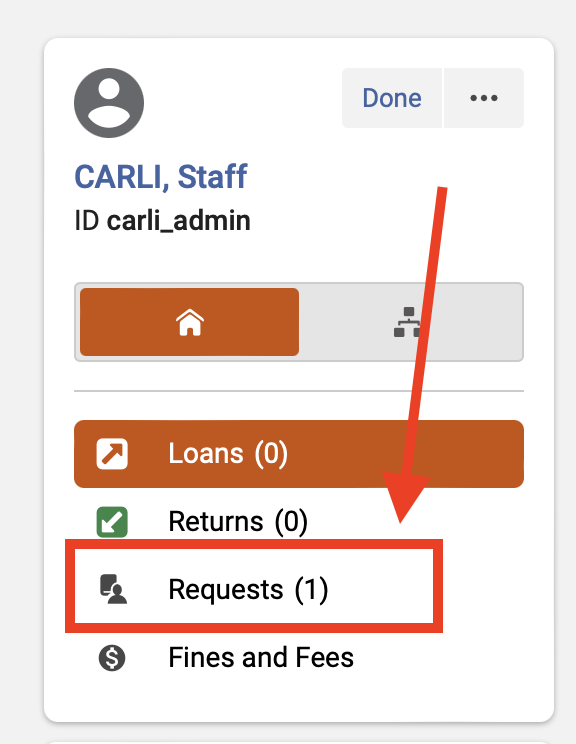
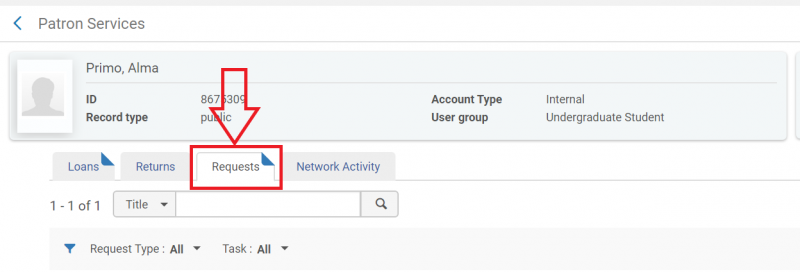
- Navigate to the Patron Services screen as if you were going to check out items to the patron, then click the "Requests" tab.
- To Edit
- Click the "Edit" button to the right of the item request.
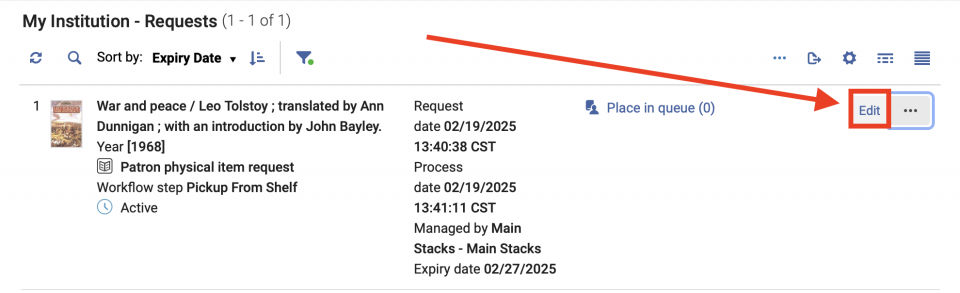
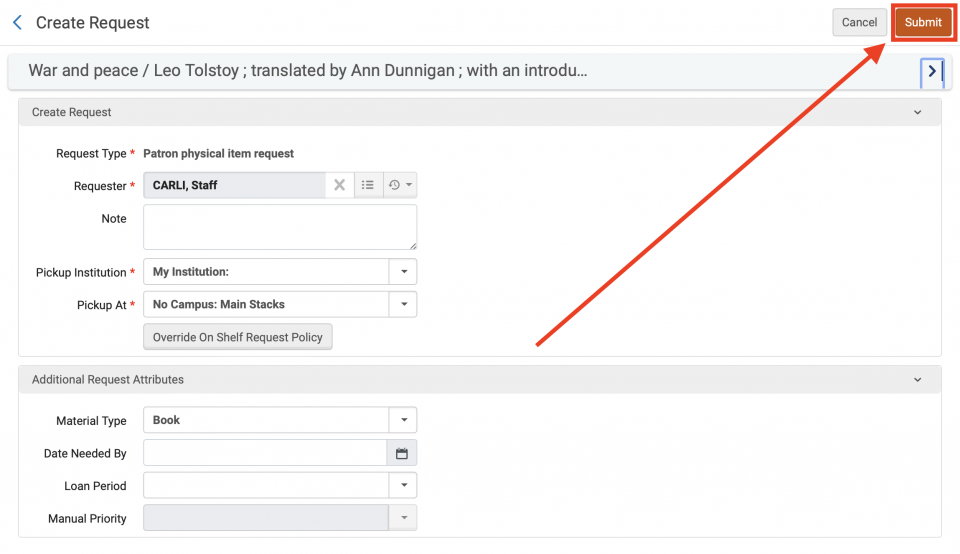
- The Create Request screen will open. Make any necessary changes, then click the "Submit" button.
- Click the "Edit" button to the right of the item request.
- To Cancel
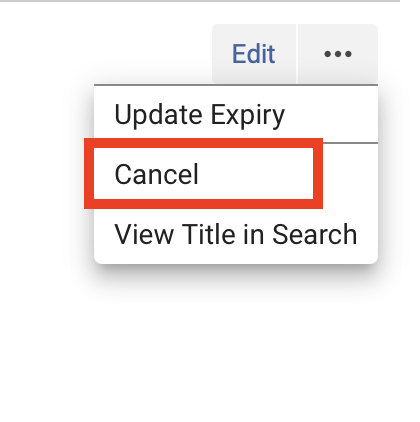
- Click the ellipses to the right of the item request to open the "More Options" dropdown menu.

- In the drop down menu, click "Cancel".
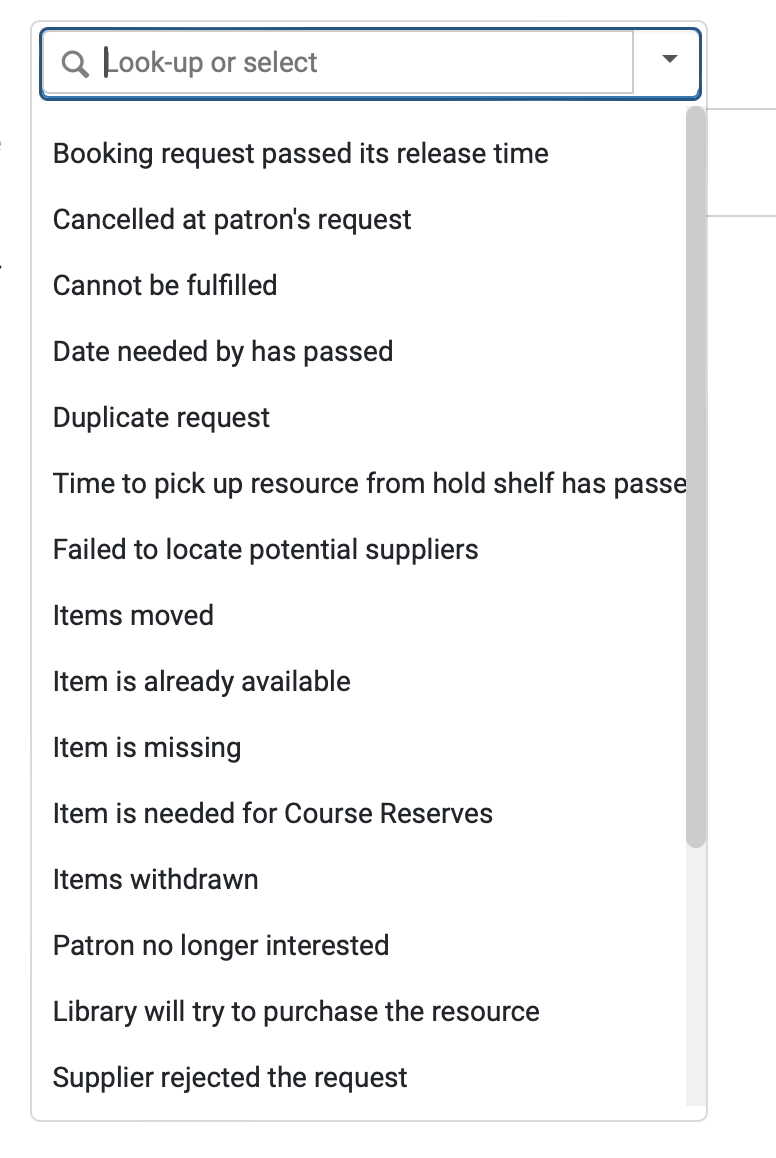
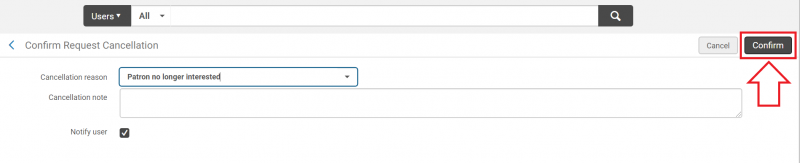
- The Confirm Request Cancellation screen will open. Click on the drop down arrow found in the "Cancellation reason" field to deploy a menu of reasons for cancellation.
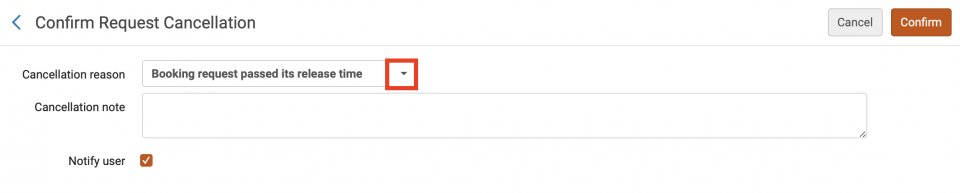
- Select a reason for cancellation from the menu.
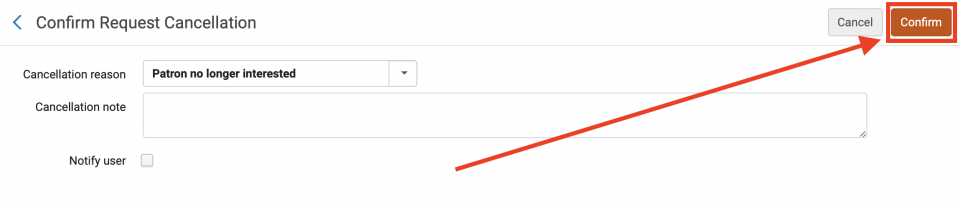
- If desired, add a cancellation note or uncheck the "Notify user" box. Click the "Confirm" button.
- Click the ellipses to the right of the item request to open the "More Options" dropdown menu.
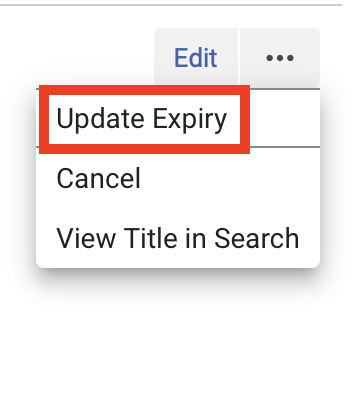
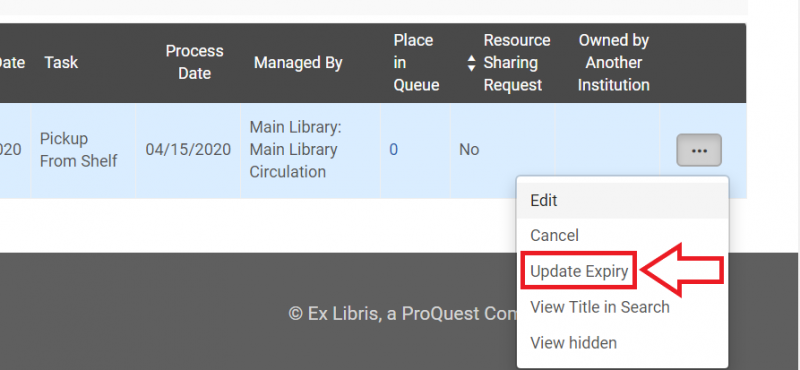
- To Update Expiry
- Click the ellipses to the right of the item request to open the "More Options" dropdown menu.
- In the drop down menu, click "Update Expiry".
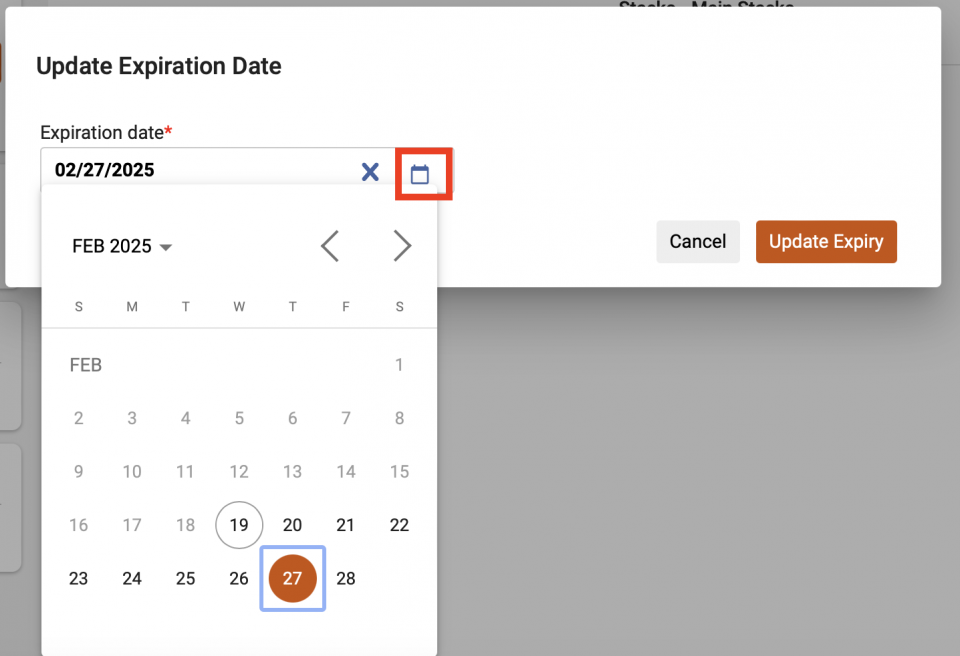
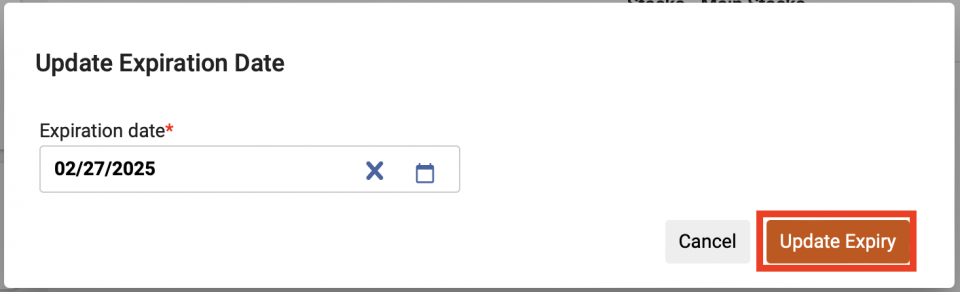
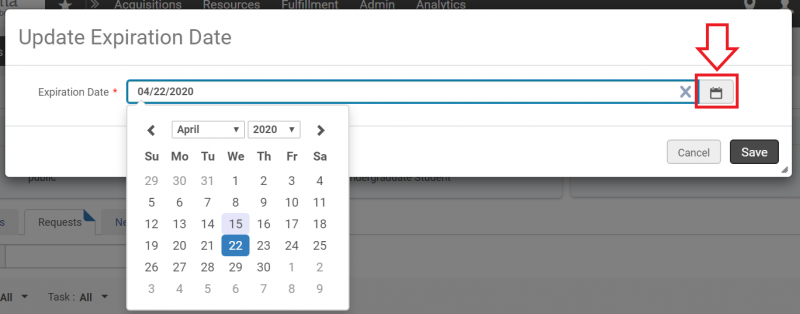
- The Update Expiration Date screen will appear. Enter the new date into the "Expiration Date" field, or click on the calendar button to deploy the calendar drop down for your selection.
- Click the "Save" button.
- Click the ellipses to the right of the item request to open the "More Options" dropdown menu.
- To Edit
Editing or Canceling patron requests (Classic Manage Patron Services UX - Pre-February 2025)
- Navigate to the Patron Services screen as if you were going to check out items to the patron, then click the "Requests" tab.
- For the item request you wish to work with, click the ellipsis. A drop down menu will appear.
- To Edit
- In the drop down menu, click "Edit".
- The Create Request screen will open. Make any necessary changes, then click the "Submit" button.
- In the drop down menu, click "Edit".
- To Cancel
- In the drop down menu, click "Cancel".
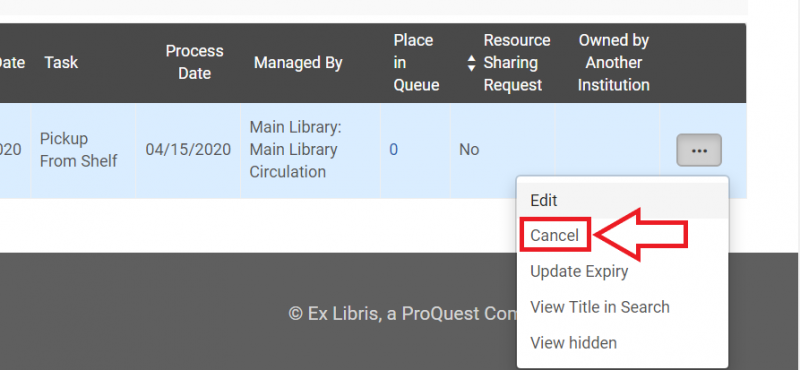
- The Confirm Request Cancellation screen will open. Click on the drop down arrow found in the "Cancellation reason" field to deploy a menu of reasons for cancellation.

- Select a reason for cancellation from the menu.

- If desired, add a cancellation note or uncheck the "Notify user" box. Click the "Confirm" button.
- In the drop down menu, click "Cancel".
- To Update Expiry
- In the drop down menu, click "Update Expiry".
- The Update Expiration Date screen will appear. Enter the new date into the "Expiration Date" field, or click on the calendar button to deploy the calendar drop down for your selection.
- Click the "Save" button.

- In the drop down menu, click "Update Expiry".
- To Edit
How to manage item holds
When to send an item to the hold shelf (New Manage Patron Services UX - post-February 2025)
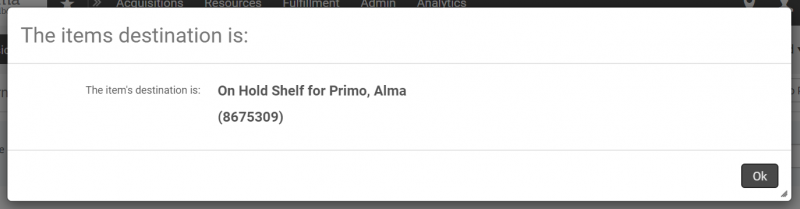
- If an item has a hold on it, during check in a pop-up will appear alerting you that the item has requests and indicating where the item should be sent to (the hold shelf).
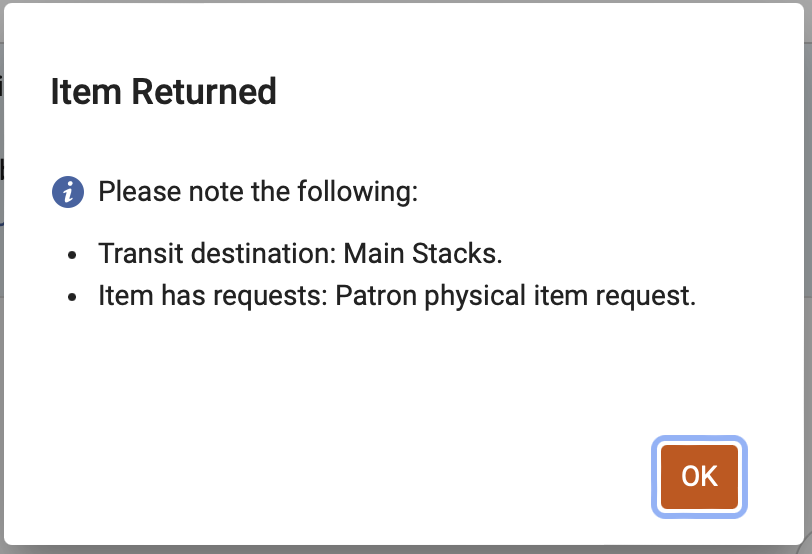
If a returned item has a hold request, a "Requests" button will appear next to the item, as well as a "Next step" indicating where the item should be sent to. For more information on the request, you can click the "Requests" button.

- Place the item on the hold shelf in accordance with your institution's policies.
When to send an item to the hold shelf (Classic Manage Patron Services UX - pre-February 2025)
- If an item has a hold on it, during check in a pop-up will appear alerting you that the item needs to go on the hold shelf.
The hold status will also be displayed on the Manage Item Returns screen.
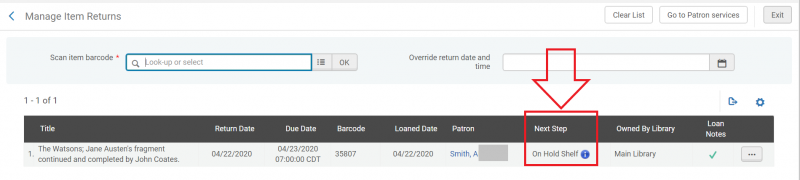
- Place the item on the hold shelf in accordance with your institution's policies.
Managing active holds
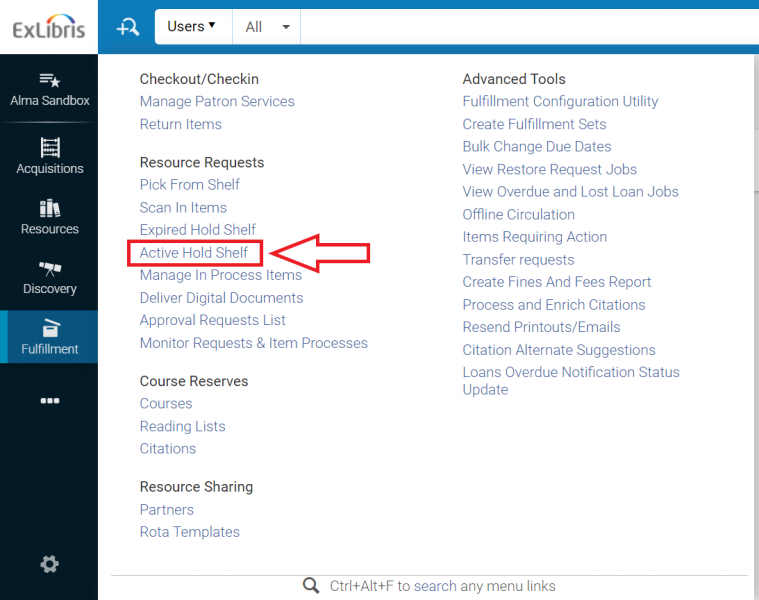
- To view and manage active item holds, select "Active Hold Shelf" from the Fulfillment menu.
- The Active Hold Shelf Items screen will open. Actions you can take from this screen include:
- Sorting the list of items on the hold shelf.
- Click on the drop down arrow included in the "Sort by" field.
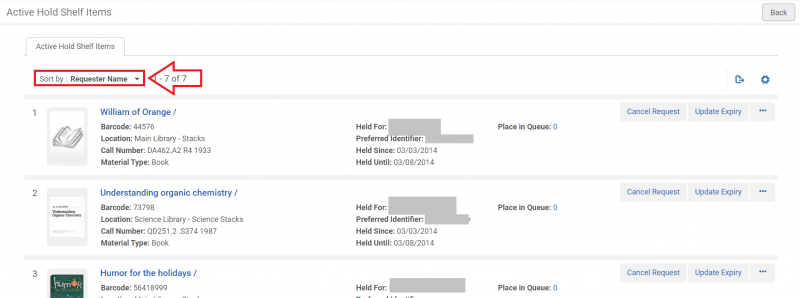
- Select your preferred sort order from the menu.
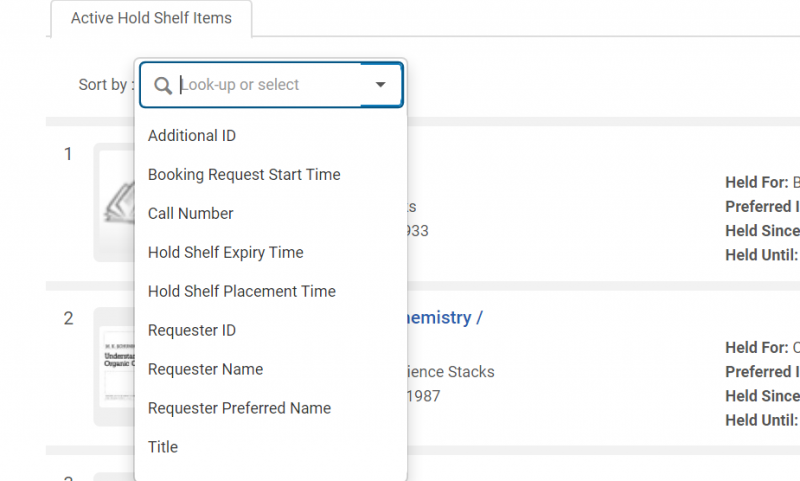
- Click on the drop down arrow included in the "Sort by" field.
- Canceling hold requests.
- To cancel a hold, click on the "Cancel Request" button in the item listing.

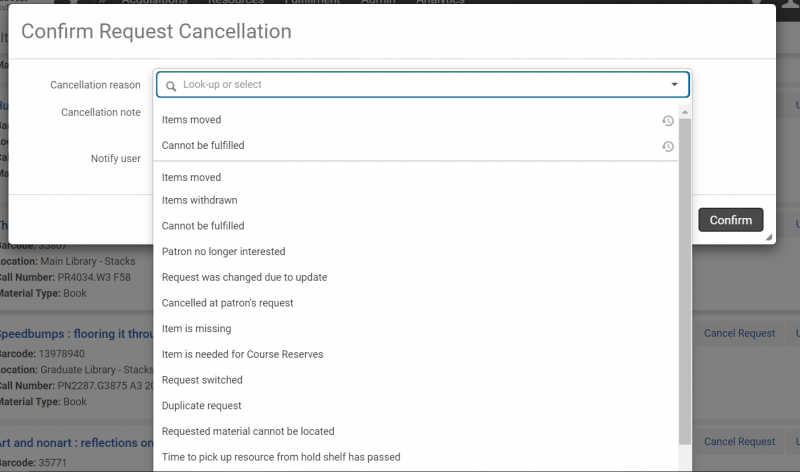
- The Confirm Request Cancellation pop-up will appear. Click the drop down arrow located in the "Cancellation reason" field.
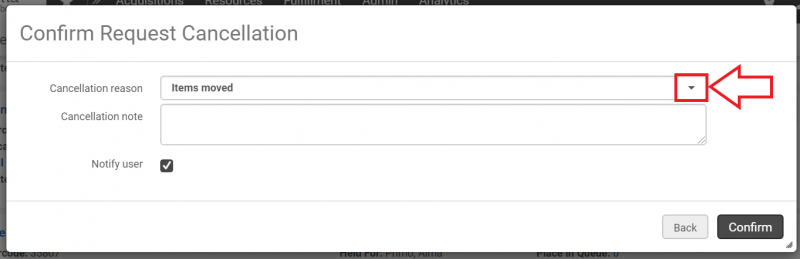
- Select the reason for cancellation from the drop down menu.
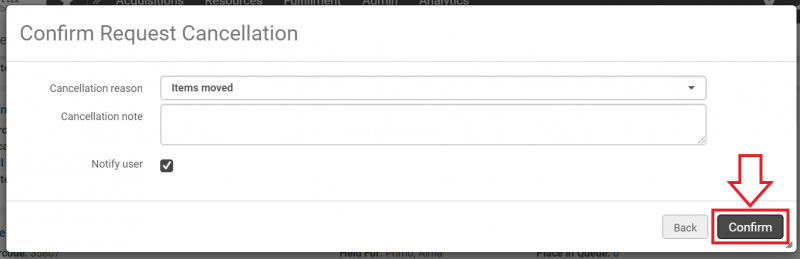
- If appropriate, add a cancellation note or uncheck the "Notify user" box. Click the "Confirm" button.
- To cancel a hold, click on the "Cancel Request" button in the item listing.
- Changing hold expiration dates.
- To change an expiration date, click on the the "Update Expiry" button in the item listing.

- The Update Expiration Date screen will appear. Enter the new date into the "Expiration Date" field, or click on the calendar button to deploy the calendar drop down for your selection.
- Click the "Save" button.
- To change an expiration date, click on the the "Update Expiry" button in the item listing.
- Marking a held item as missing.
- To mark an item on the hold shelf as missing, click on the "More Actions" ellipsis.

- Click on "Mark as Missing".

- A Confirmation Message pop-up screen will appear. Click the "Confirm" button.
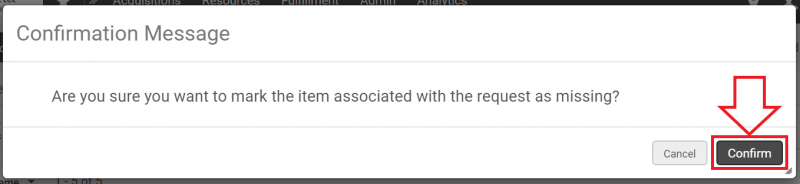
- To mark an item on the hold shelf as missing, click on the "More Actions" ellipsis.
- Sorting the list of items on the hold shelf.
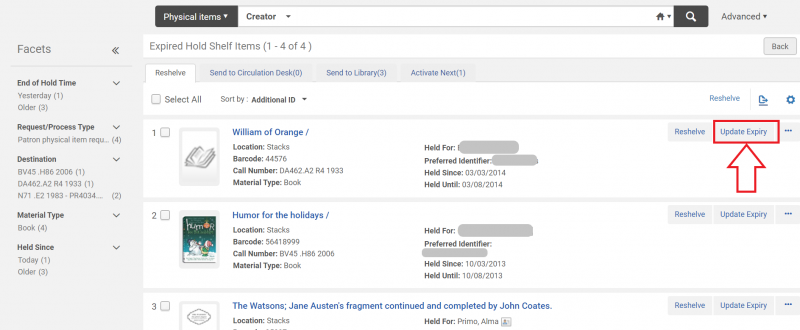
Managing expired holds
- To view and manage expired holds, select "Expired Hold Shelf" from the Fulfillment menu.
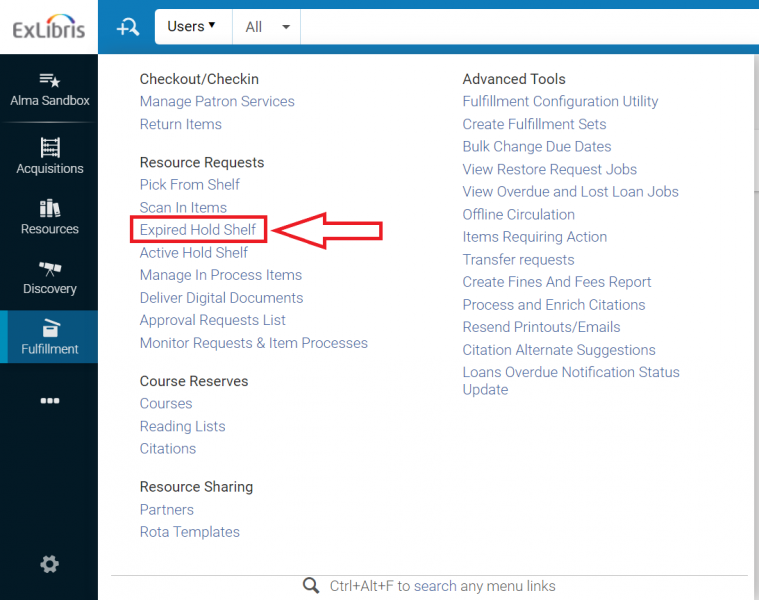
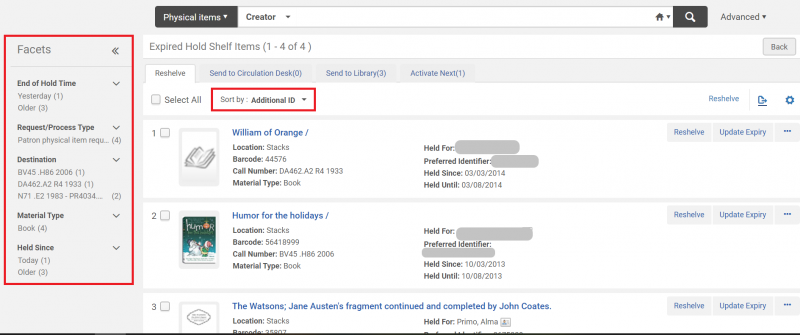
- The Expired Hold Shelf Items screen will open. Actions you can take from this screen include:
- Sorting or filtering items. You can click on options under "Facets" or choose an option from the "Sort by" drop down menu to filter or sort the items that have expired on the hold shelf.
- Sending items to be reshelved. Items that are expired and can be reshelved are found under the "Reshelve" tab. To convert an item's location status in Alma from the hold shelf to in place, there are two methods:
- Clicking the "Reshelve" button for each item you wish to remove from the hold shelf.
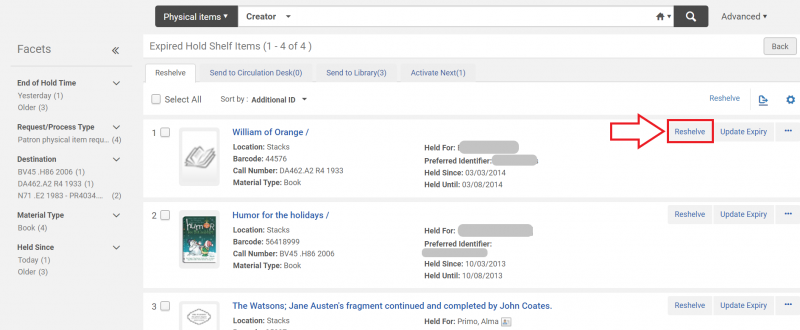
- Clicking the "Select All" box or the individual item selection boxes, and then clicking the "Reshelve" option located above the list of items.

- Clicking the "Reshelve" button for each item you wish to remove from the hold shelf.
- Updating the expiration date. You can extend an item's stay on the hold shelf by clicking the "Update Expiry" button and choosing a date sometime in the future.
- Editing the item hold, marking the item as missing, or viewing the audit trail. These options can be found in the drop down menu deployed by clicking on the ellipsis.

- Forwarding items to another circulation desk or library. If an item has expired on the hold shelf and should be forwarded to another circulation desk or library, it will appear under the "Send to Circulation Desk" or "Send to Library" tabs. This function operates in a manner similar to the Reshelve function, but in this case you will click "Transit" instead of "Reshelve".
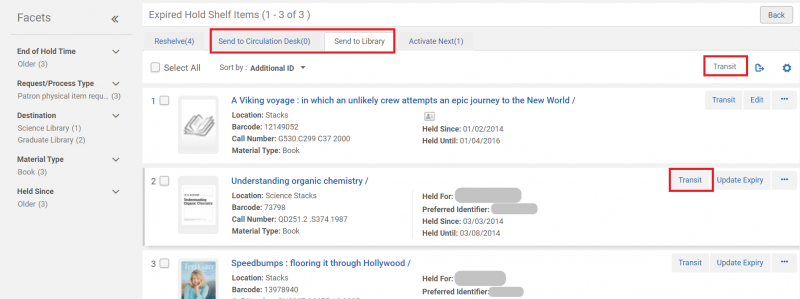
- Activating the next hold on an item. If an item on the hold shelf has other patrons waiting for it to become available, it will appear under the "Activate Next" tab. This function operates in a manner similar to the Reshelve function, but in this case you will click "Activate Next" instead of "Reshelve".

- Sorting or filtering items. You can click on options under "Facets" or choose an option from the "Sort by" drop down menu to filter or sort the items that have expired on the hold shelf.
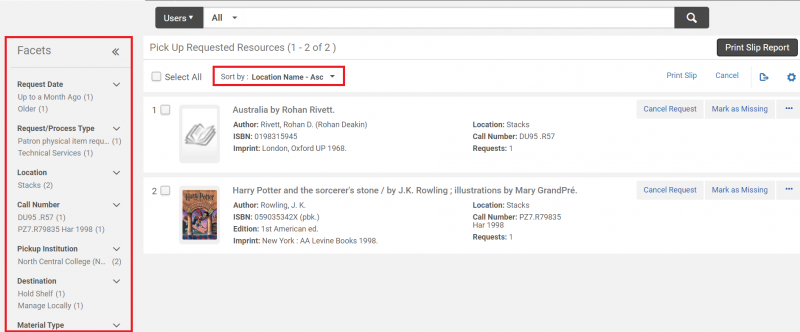
How to manage the pick from shelf list
The pick from shelf list, also known as the pick list, shows you the materials in your library that have been requested by patrons, other departments, or other libraries.
Basic workflow
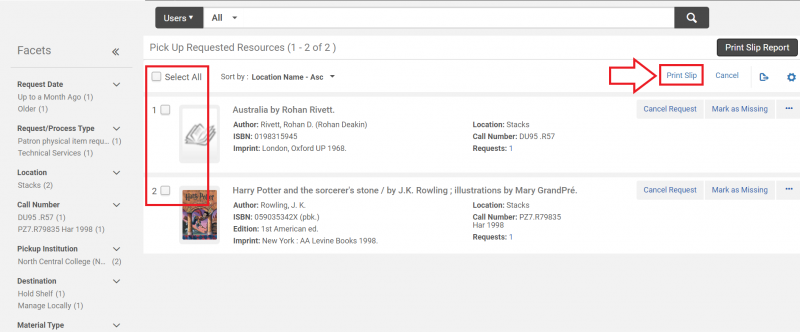
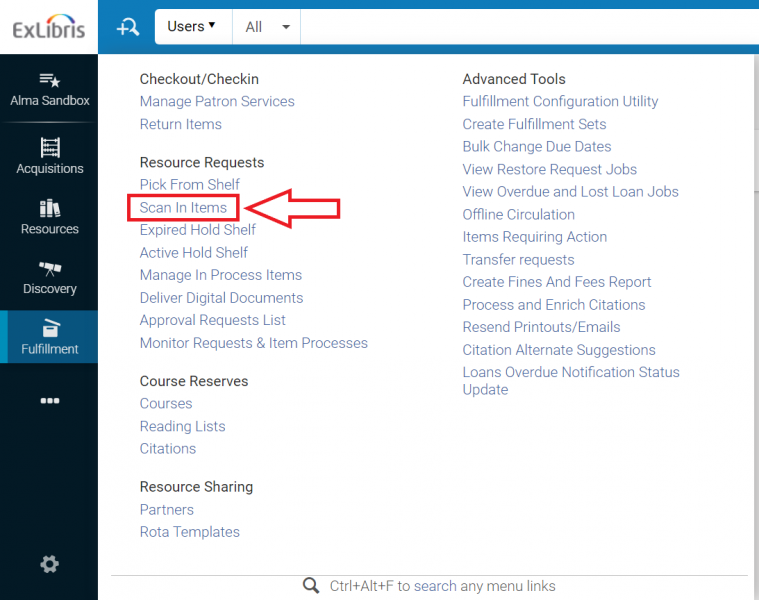
- To view and manage the pick list, select "Pick From Shelf" from the Fulfillment menu.

- The Pick Up Requested Resources screen will appear. You can filter or sort the requested materials using the facets or the "Sort by" menu.
- There are three options for printing the pick list or individual slips:
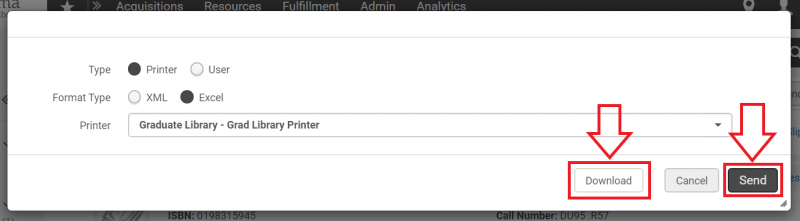
- Click on the "Print Slip Report" button to download or print and Excel or XML file of the pick list.
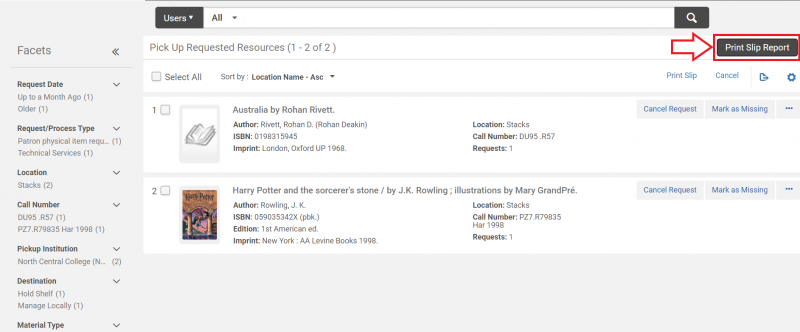
A pop-up will appear. Select the options appropriate to your needs, then click either the "Download" button or the "Send" button.
- Print individual pick slips by selecting the appropriate check boxes and clicking the "Print Slip" button.
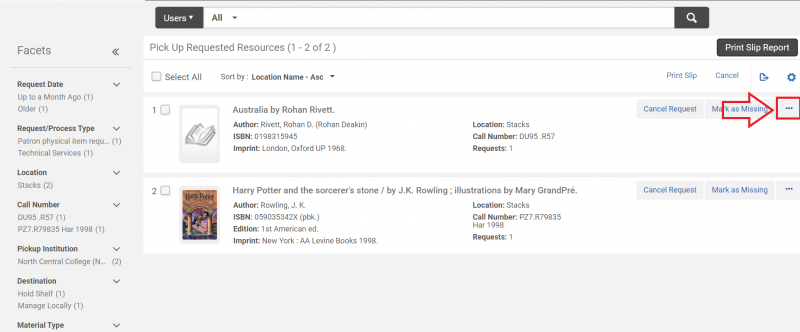
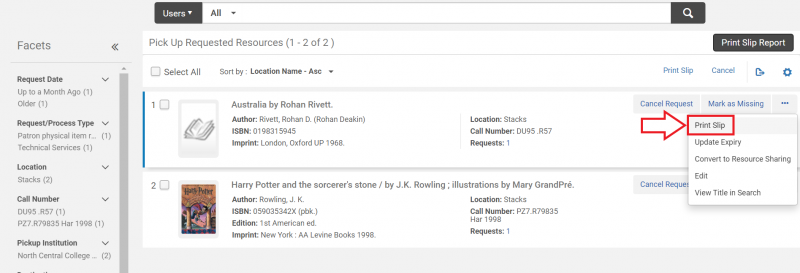
- Print individual pick slips by opening the "More actions" ellipsis menu and selecting "Print Slip" from the options.
- Click on the "Print Slip Report" button to download or print and Excel or XML file of the pick list.
- Use the pick slips or the pick slip report to locate and retrieve the requested items.
- Once you have gathered up the items on the pick list and brought them to your work station, select "Scan In Items" from the Fulfillment menu.

- The Scan In Items screen will open. Enter the picked item barcodes in the "Scan item barcode" field.
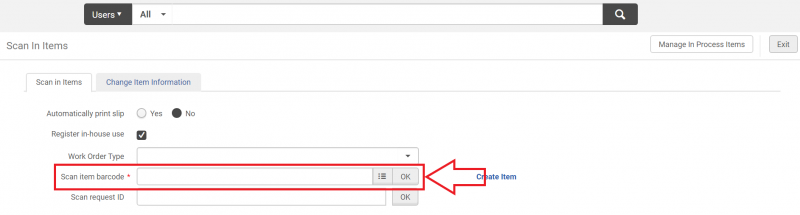
- Destination slips should print for each item as it is scanned in. Item destinations and other details will also appear below the entry fields.
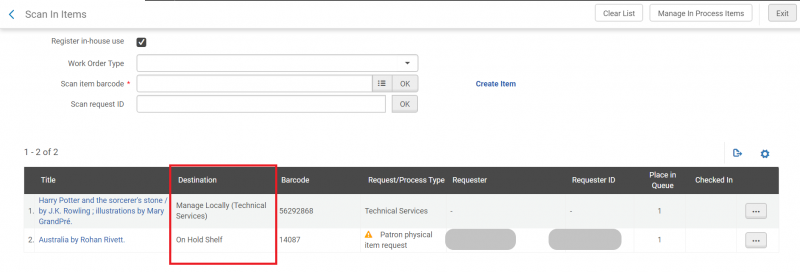
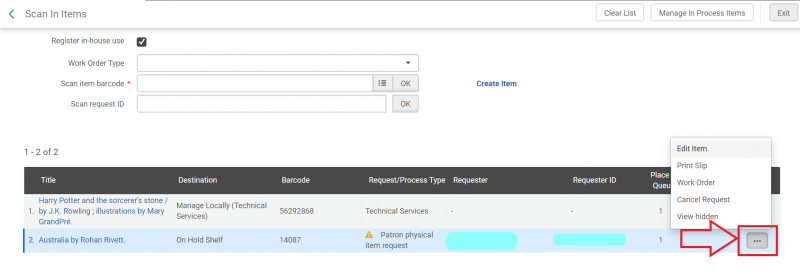
- A pop up menu with additional actions is available by clicking the ellipsis to the right of each item.
How to move an item
Moving an item in Alma allows you to update the record to reflect physical changes to an item's location. As an example, this is the process you should use when relocating an item from one library to another.
Moving an item with the requests workflow
To move items from one location to another using the Request workflow:
- Look up the item or title using the persistent search box.
- Locate the item you wish to move in the list of search results and click on the "Request" button.
- When conducting a "Physical items" search.
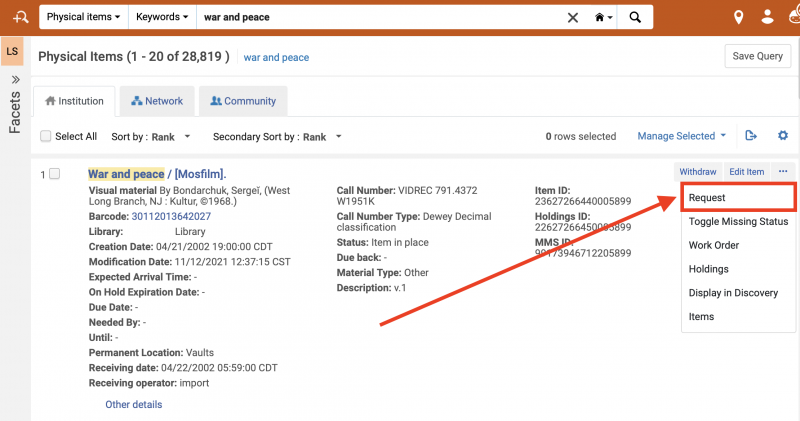
- When conducting a "Physical titles" search.
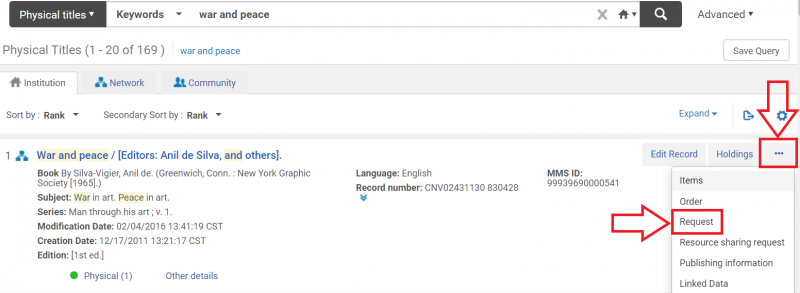
- When conducting a "Physical items" search.
- The Create Request screen will appear. Click on the drop down menu arrow for the "Request Type" field and select "Move permanently" or "Move temporarily".
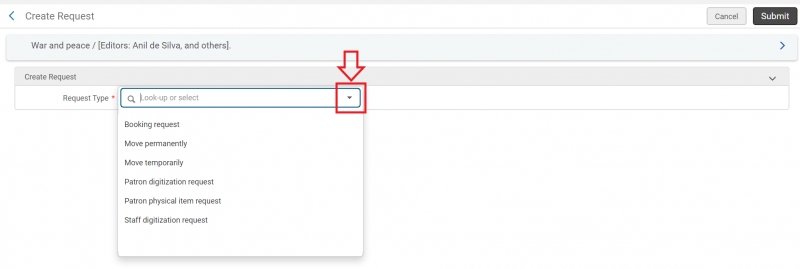
- Once a request type is selected, more options will appear on the screen.
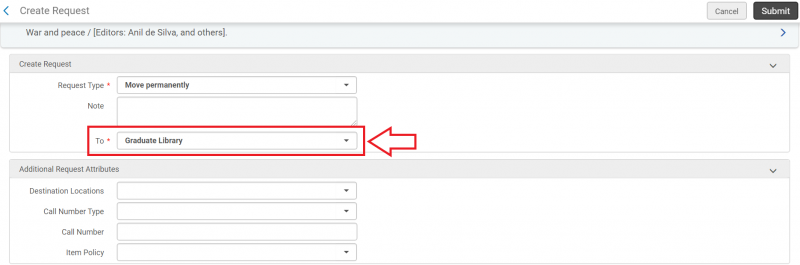
- If you're moving the item permanently, select its destination from the "To" drop down menu. The other fields are optional, but you should enter as much information as you have available in accordance with your institution's policies.
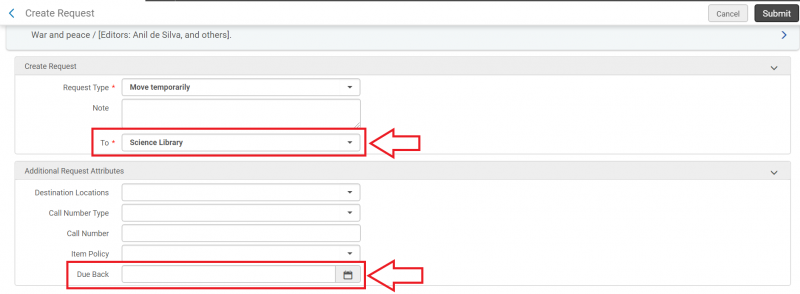
- If you're moving the item temporarily, select its destination from the "To" drop down menu. Apply a "Due Back" date if appropriate. The other fields are optional, but you should enter as much information as you have available in accordance with your institution's policies.
- If you're moving the item permanently, select its destination from the "To" drop down menu. The other fields are optional, but you should enter as much information as you have available in accordance with your institution's policies.
- Click the "Submit" button.
- If the item is currently available, the request will appear on the Pick from Shelf list. If the item is checked out, circulation staff will be notified of the request when it is checked back in.
Moving an item without requests
To move an item from one location to another without using the Requests workflow:
- Select "Scan in items" from the Fulfillment menu.
- The "Scan in items" screen will appear. Select the "Change item information" tab.
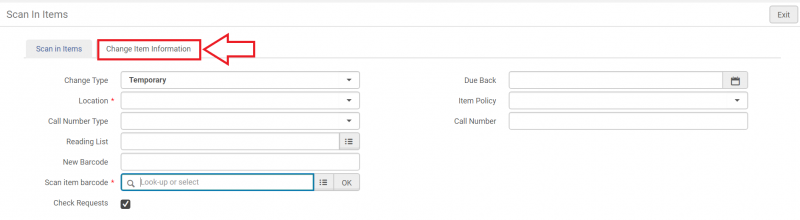
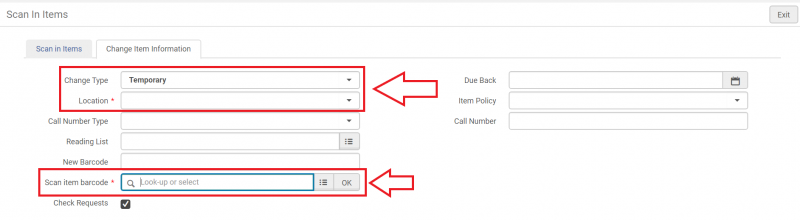
- Select the change type and location from the drop down menus, then scan or type in the item's barcode. This updates the item's location and no further action is needed in Alma.
How to add a Fulfillment Note in Alma
A fulfillment note is a popup that occurs before the item is charged or returned from the patron record. When staff select "Cancel" it cancels the action charge or return action. In Alma, the fulfillment note is the closest thing to Voyager's "Charge note", "Discharge note", or the Circulation Review item status alert.
Adding or Editing a Fulfillment Note
- Perform a "Physical Items" search for the item you wish to edit.
- Locate the item in the search results and either select the barcode link to open the item editor, or select the "Edit item" option.
- On the Notes tab, locate the "Fulfillment Note" field under the "Functional Notes" section.
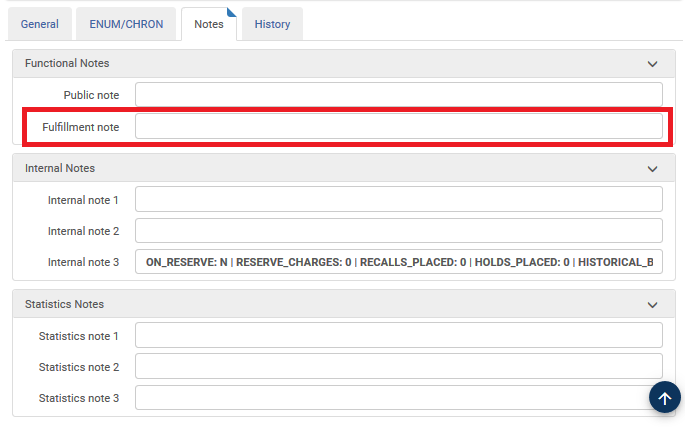
- Enter the details for the pop-up note as the text for Fulfillment Note.
- Save the item record.
How to count browse usage (in-house loans)
Alma has a browse count feature, though in Alma-speak a browse is an "in-house loan".
Alma gives you two ways to record in-house loans:
- Fulfillment menu > Checkout/Checkin > Return Items. If you scan an item barcode, and the item was not charged to a patron at the time, Alma will automatically create an in-house loan transaction.
- Fulfillment menu > Resource Requests > Scan In Items. When you have students pick up items on tables and scan them, you can use Scan In Items with the Register in-house use box checked, and Alma will record an in-house loan transaction for each item scanned.
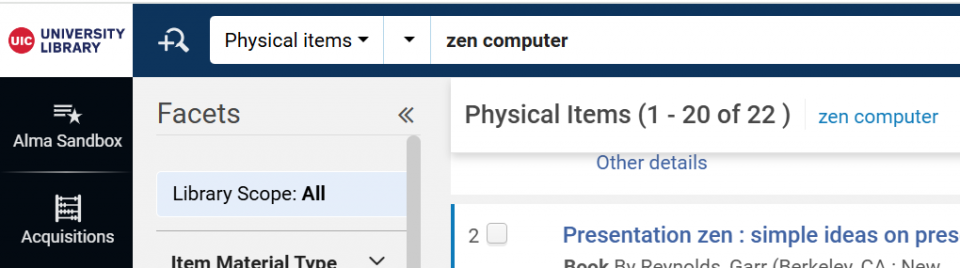
You can see the number of in-house uses for an item by performing a physical items search. Then on the results screen, click the Other Details link to expand the record and view the usage data.
You can also report on in-house loans in Alma Analytics in the Fulfillment Subject Area.