CARLI Recommendation for Alma Email Configurations for I-Share Libraries
revised 1/14/2025
CARLI Recommendation for Alma Email Configurations for I-Share Libraries
Goal: I-Share libraries want to use a real, institutional email address in addressFrom field in Alma Letters
Why? Because setting an addressFrom (e.g., circdesk@institution.edu) allows patrons to easily reply to email notifications. The default value in Alma Letters out of the box (Your.Department@organization.com) or other similar dummy addresses doesn’t allow for this, nor does the actual sending address of the email notification from Ex Libris servers (alma@exlibrisgroup.com).
To accomplish this, I-Share libraries should customize the addressFrom field in all active Alma Letters. Instructions can be found on CARLI’s webpage Alma: Editing Letter Content.
However, since Alma email is sent from Ex Libris mail servers, setting only the addressFrom field in Alma Letters will cause emails to be “misaligned” (e.g., fromAddress of circdesk@institution.edu will not match the EnvelopeFrom address of alma@exlibrisgroup.com). Misaligned emails can result in emails that get bounced, delayed, and/or marked as spam.
How can we remedy this?
Below are two options. CARLI believes that Option 2 may be preferable by some institutions, as Ex Libris's email servers would be responsible for sending out the Alma emails on your institution's behalf, but we offer option 1 as an alternative where your campus mail relay would be responsible for sending out all of the Alma emails. The two options are mutually exclusive as you can only have one Mail Handling integration in Alma.
It is important to note that if you are considering option 1 and use a Microsoft-based (campus) mail relay at your institution, you will not be able to use option 1 after September 2025 because option 1 uses "SMTP AUTH" for authentication. Microsoft previously announced that they are removing support for Basic authentication with Client Submission (SMTP AUTH) in September 2025.
Option 1) Configure Alma to send email using your institution’s (campus) mail relay server instead of using the Ex Libris mail server
You will need the General System Administrator role in Alma to configure this. Consult with your campus/institutional IT staff to get the details about the mail relay server for this configuration.
This is accomplished by creating a Mail Handling integration in Alma Configuration for your local mail relay server:
- Go to Alma Configuration > General > External Systems > Integration Profiles
- On the “Integration Profile List” page, select Add Integration Profile. Alma allows you to define only one mail handling integration profile.
- Enter a unique Code and Name for the profile.
- In the Integration Type field, select Mail Handling.
- Click Next.
- The second page of the wizard appears. The Active checkbox is selected by default.
- Select the Send using institution mail relay radio button. Several additional fields appear below.
- Enter the Institution domain name. After you do this, the domain name appears to the right of the SMTP EnvelopeFrom address field as @<domain name>. The domain name can contain up to 63 lower case alphanumeric characters, dashes -, and periods followed by a period and a two-to-six-character lower case alphabetic top-level domain.
- Enter the Institution SMTP mail relaying host name. Obtain this from your email administrator. Use the format <mail server>.<domain>.<domain extension>, e.g. smtp.yourinstitution.edu The host name can contain lower case alphanumeric characters as well as any of the characters - ! # $ % & ' * + / = ? ^ _ ` { | } or ~ and a period.
- For SMTP EnvelopeFrom address field, the Custom SMTP EnvelopeFrom address radio button is selected by default. Do not change it as the other option listed (Use the ‘From address’ header) is not operational.
- Enter a username for the EnvelopeFrom email address in the unlabeled field immediately below the Custom SMTP EnvelopeFrom address radio button. This sets EnvelopeFrom to <username>@<domain name>. The username can contain lower case alphanumeric characters as well as any of the characters - ! # $ % & ' * + / = ? ^ _ ` { | } or ~ and a period.
- If your institution’s mail relay requires a User Name and Password to accept email from Ex Libris, enter the User name and Password. These can be any ASCII characters. If a User Name and Password are not required, leave these two fields blank.
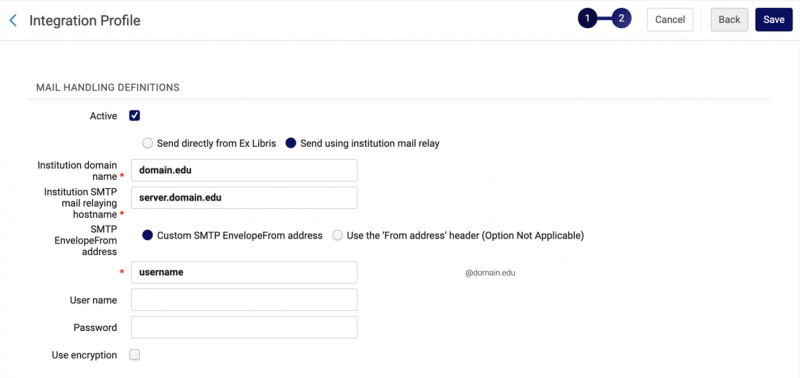
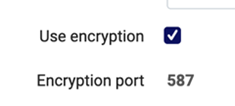
- If the mail relay supports encryption, check the box for Use encryption, and the encryption port is set to 587 for you. If the mail relay does not support encryption, leave the box unchecked.
- Note: The Save and Test button found on the email integration profile window (as shown below) is not able to test all of the Alma email letters within your institution's Alma instance and is not able to fully indicate whether Alma email functionality is configured properly for your institution. For more assistance on testing of your institution's Alma email configuration, please contact CARLI support.

Option 2) Let Alma send an email, but make some additional configuration settings to help prevent email from bouncing or getting marked as spam
- Your campus/institutional Domain Administrator will need to perform the step of creating (or updating) an SPF record to include Ex Libris’s email server addresses. An SPF record identifies the mail servers and domains that are allowed to send email on behalf of your domain. Receiving servers check your SPF record to verify that incoming messages that appear to be from your organization are sent from servers allowed by you. To do this, add an “SPF Include Entry” of include:spf-na.exlibrisgroup.com as listed in the "Mail Relay Gateways" table on this Ex Libris Knowledge Article
E.g., let’s assume your previous SPF record looked like this:
“v=spf1 a:mail.institution.edu include:_spf.google.com mx ~all"
Then, afterward, it might look like this:
“v=spf1 a:mail.institution.edu include:_spf.google.com include:spf-na.exlibrisgroup.com mx ~all"
Note: CARLI recommends that your organization use “include:spf-na.exlibrisgroup.com” in the SPF record, instead of specific numerical IP address ranges.
However, if your organization is at or near the DNS lookup limit and cannot add the "include: spf-na.exlibrisgroup.com" directive to your SPF record, you can add the current Ex Libris mail-relay IP address ranges for North America as listed in the "Mail Relay Gateways" table: 216.147.212.20/30 and 64.74.237.230/31 . Entering these specific numerical IP address ranges may require you to manually update the SPF record in the future if/when Ex Libris updates or changes their mail-relay IP address ranges.
E.g., let's assume your previous SPF record looked like this:
“v=spf1 a:mail.institution.edu include:_spf.google.com mx ~all"
Then, afterward, it might look like this:
“v=spf1 a:mail.institution.edu include:_spf.google.com ip4:216.147.212.20/30 ip4:64.74.237.230/31 mx ~all"
- Set up a Mail Handling integration in Alma to solve the mis-alignment problem described above.
You will need the General System Administrator role in Alma to configure this. Consult with your campus/institutional IT staff to get the details about the mail relay server for this configuration.
- Go to Alma Configuration > General > External Systems > Integration Profiles
- On the “Integration Profile List” page, select Add Integration Profile. Alma allows you to define only one mail handling integration profile.
- Enter a unique Code and Name for the profile.
- In the Integration Type field, select Mail Handling.
- Click Next.
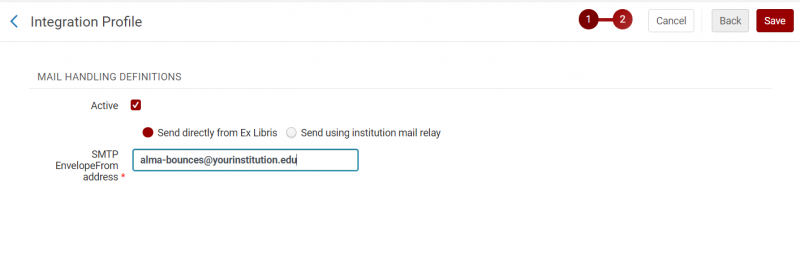
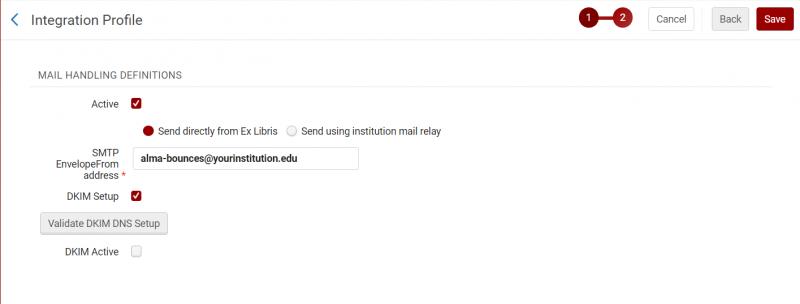
- The second page of the wizard appears. The Active checkbox is selected by default.
- Select Send directly from Ex Libris (the default).
- Enter a valid local email address for EnvelopeFrom that corresponds to the same domain as the fromAddress emails entered in Alma Letters configuration. (Note: this email address will receive bounced and/or rejected emails that fail to get delivered.) For example, the EnvelopeFrom email address might be alma-bounces@yourinstitution.edu, and the fromAddress in your Alma Letters might be circdesk@yourinstitution.edu.
- After entering the email address in the SMTP EnvelopeFrom address field, use your mouse to click on the page anywhere that is a white space outside of the text box (or you can use the <TAB> key). Two new DKIM controls will immediately appear: DKIM Setup and Validate DKIM DNS Setup.
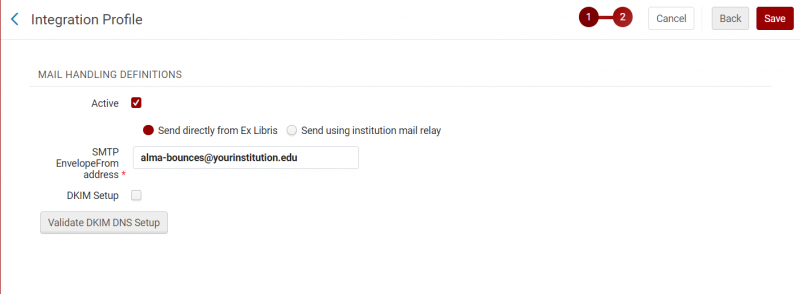
- Check the DKIM Setup box. The following DKIM Setup Guide popup window will appear. Copy and paste the 2 CNAME records and forward this information to your institution’s DNS Administrator and request that these 2 records be created.
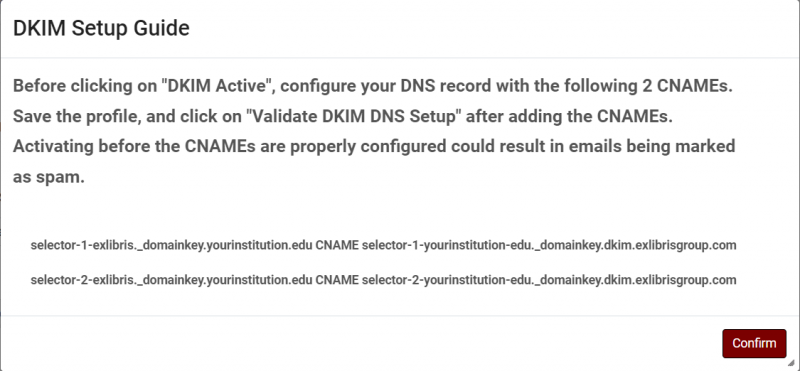
In the above example, these 2 CNAME records are the following (Note: your institution’s CNAME records will have your institution’s domain and/or sub-domain in place of the “yourinstitution.edu” and “yourinstitution-edu” portions that you see in these examples):selector-1-exlibris._domainkey.yourinstitution.edu CNAME selector-1-yourinstitution-edu._domainkey.dkim.exlibrisgroup.com
selector-2-exlibris._domainkey.yourinstitution.edu CNAME selector-2-yourinstitution-edu._domainkey.dkim.exlibrisgroup.com
- Click Confirm to close the popup. You will notice a new option, DKIM Active, appear. Do not check this box yet. However, please do verify that the DKIM Setup box is checked; having the DKIM Setup checkbox enabled is an important part of the DKIM configuration process.
- Verify that your Mail Handling Integration Profile has the same checkboxes and radio buttons enabled as seen in the previous screenshot. Then, click the Save button at the top right to save your Mail Handling integration profile; this will save the profile with all of your recent changes including the enabling of the DKIM Setup box. Wait for a response from your institution's DNS Administrator that they have created the 2 CNAME records.
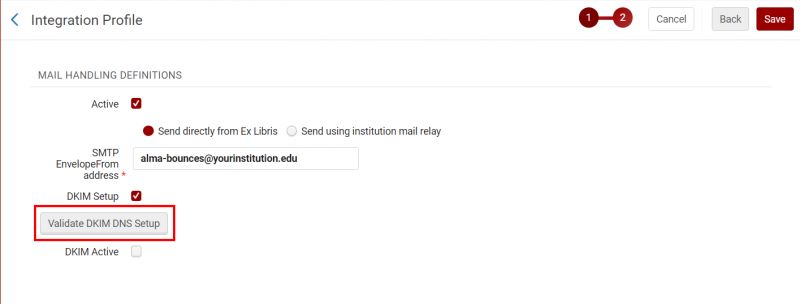
- Note: The Validate DKIM DNS Setup button is not utilized for testing until you hear back from your institution’s DNS administrator that they have created the 2 CNAME records. However, since you just saved the Mail Handling integration profile with that DKIM Setup checkbox enabled, it may take anywhere from 10 minutes to an hour before the Validate DKIM DNS Setup button would be able to return a valid response (the button physically works but it could return an invalid response). If you click the Validate DKIM DNS Setup button too soon after initially enabling DKIM Setup and saving the Mail Handling integration profile, the response back from the Validate DKIM DNS Setup button could be incorrect. In other words, if you are working through these previous steps and receive a fairly quick response back from your institution’s DNS administrator that the CNAME records are immediately available, before you use the Validate DKIM DNS Setup button for testing (in the next step below) please wait at least 10 minutes (but it is possible you may need to wait up to an hour) after you have initially enabled the DKIM Setup button and clicked Save to save the profile.
- Once you have received confirmation that your institution’s DNS Administrator has created the 2 CNAME records, open your saved Mail Handling integration profile, visually verify that the DKIM Setup button was previously enabled (the box was already checked), then click on the Validate DKIM DNS setup button to verify that the new DKIM DNS record is valid. If the DKIM Setup button was not previously enabled, then you will need to first check the box to enable DKIM Setup and then click Save to save the profile. (Note: You would need to wait at least 10 minutes, but it could be up to an hour, before utilizing the Validate DKIM DNS Setup button as it will take time for the new records to become available in DNS.)
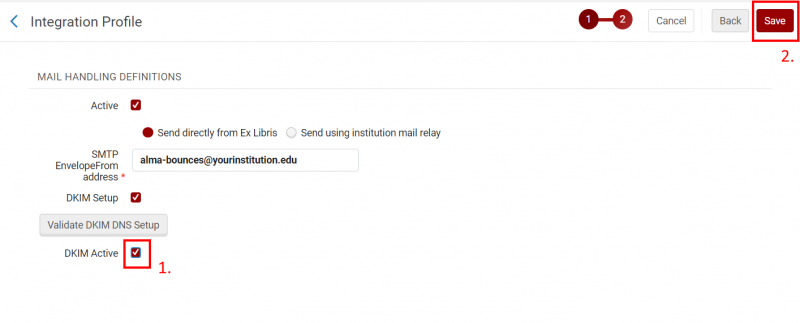
- Once you have verified that the previous test has succeeded, then you may check the DKIM Active box, then click the Save button to save your changes.
- Note: The Save and Test button found on the email integration profile window (as shown below) is not able to test all of the Alma email letters within your institution's Alma instance and is not able to fully indicate whether Alma email functionality is configured properly for your institution. For more assistance on testing of your institution's Alma email configuration, please contact CARLI support.

(Adapted from: Configuring Outgoing Email)
If you have any questions, please contact CARLI Support.