Primo VE Customizations: View Configuration Tabs
Revised: April 2, 2026
This page is meant to provide CARLI I-Share institutions with a list of Primo VE customization opportunities. I-Share institutions have a lot of autonomy in deciding how to configure their individual Primo VE discovery interface to best meet the needs of their users. For more information on getting started, please see Primo VE Customization: Getting Started.
Where applicable, CARLI Requirements and CARLI Recommendations are bolded and highlighted in color. Additional CARLI Requirements and CARLI Recommendations may be shared in the future when new configuration options become available.
Alma user role needed to configure Primo VE: Discovery Admin
Contents of this page:
- Configure Views General Information
- General Tab
- Define view
- General Primo VE attributes
- Discovery network settings section
- Links Menu Tab
- Default links
- Add custom links to banner - including the CARLI Required "All I-Share Libraries Search"
- Search Profile Slots Menu Tab
- Editing search profile slots
- Advanced Search Configuration Tab
- Brief Results Tab
- Facet configuration
- Sort options
- Dedup and FRBR settings
- Brief Record Display Tab
- Full Record Services Tab
- Manage Customization Package Tab
- Customizations you can make
- Working with the customization package
- Using Primo Studio for customizations
- Easily view Primo VE without your customizations
- Create Primo VE Search Boxes for Your Website
- How to create a search box for your website
- Example of code for a search box on your website
- Direct URLs to Primo VE pages (Full Display, Advanced Search, My Library Card, Login)
Configure Views
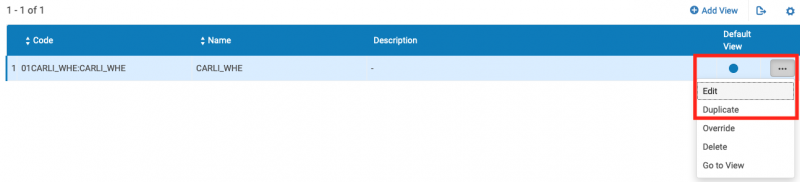
For all CARLI I-Share institutions, Alma and Primo VE are initially configured with a single View in Alma Configuration > Discovery > Configure views. The default View Code is 01CARLI_XXX:CARLI_XXX (where XXX is three-letter I-Share code in UPPERCASE). A single View will suffice for most institutions, though additional Views can be created in Alma if desired.
Alma user role needed: Discovery Admin
Access these options: To access these options in Alma, log into Alma and go to Alma Configuration > Discovery > Configure views. Then choose the "Edit" option under the ... menu for the View Code (reminder: default View Code is 01CARLI_XXX:CARLI_XXX (where XXX is three-letter I-Share code in UPPERCASE)
General Tab
define view

CARLI Recommends keeping the View Code and Name.
general attributes
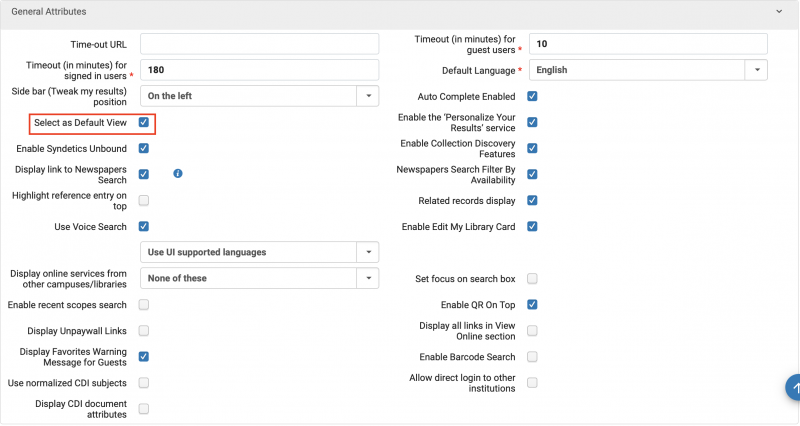
CARLI Recommends using View as Default View. Other options are Library Choice.
Discovery network settings section
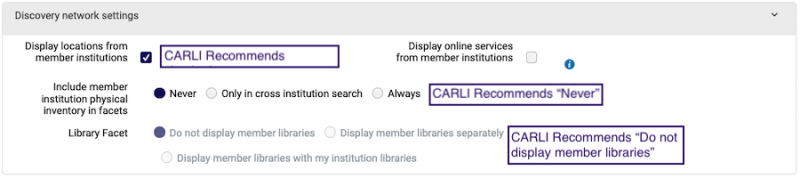
1. Display locations from member institutions – CARLI Recommends checked. Controls whether or not other institutions' holdings will display in the GETIT OTHER section (CARLI have a recommendation to rename this section in future) in the full record display of your Library Catalog search results.
2. Include member institution physical inventory in facets – CARLI Recommends "Never" be chosen. Controls behavior of the top level Availability facet "Held by library:"
- Never – CARLI Recommended. Show physical items in the IZ (my institution) only. This choice disables the Library Facet configuration option below it on this page.
- Only in cross institution search – When doing All I-Share Libraries search, show physical items in the IZ (my institution) and physical items in any institution across consortium.
- Always – Show any physical items in the entire network.
3. Library Facet. Controls behavior of the Library or Other Libraries facets on the search results page; this is disabled if you chose "Never" as the option above; available if you chose "Only in cross institution search" or "Always" options above.
- Do not display member libraries - CARLI Recommended. Will not display other institutions' libraries in the Library facet and Other Libraries facet. The Institution facet will still provide access to other institutions' holdings.
- Display member libraries separately - See the other members libraries listed in a separate facet called "Other Libraries." This setting is not recommended for I-Share because the names of other institutions' Alma Libraries are listed and may not include the institution name.
- Display member libraries with my institution libraries - See other member libraries blended in a single list with my own libraries in the "Library" facet. This setting is not recommended for I-Share because the names of other institutions' Alma Libraries are listed and may not include the institution name.
| Display member libraries separately: | Display member libraries with my institution libraries: |
|---|---|
 |
 |
Links Menu Tab

The Links across the top of the Primo VE banner are controlled here. If more links are enabled than can be displayed on the size of the screen, an ellipsis button will automatically appear.
See the Ex Libris documentation for detailed descriptions of each choice in the Links Menu tab
Default Links
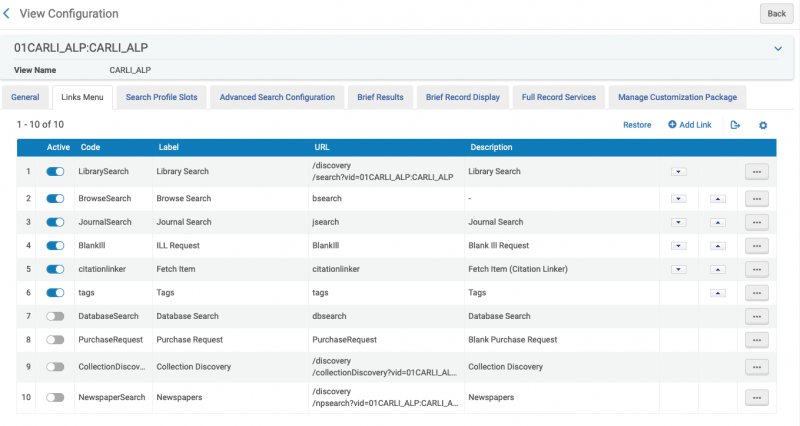
1. Library Search link – CARLI Recommended. This default link goes to your default Primo VE View page. You may rename the Label.
2. Browse Search link – CARLI Recommended. Browse an alphabetical list of headings or shelf listings depending on the type of browse selected.
3. Journal Search link – CARLI Recommended. Primo VE generates a full list of both electronic and physical journals held by the library and activated in Alma. Has auto-complete functionality for journal title searching. Users can limit to electronic or physical format with the Availability facet.
4. ILL Request link - This is a link to third-party service like ILLiad or WorldCat. In Fulfillment > Discovery Interface Display Logic > General Electronic Services you must define if a service is a Document Delivery/ILL service first.
5. Fetch Item link – Citation Linker. "Fetch Item does not search for records in the same way as a regular Primo search, which may return many results. Instead, it allows you to specify metadata (such as a title, ISBN, ISSN, and so forth) for a specific book, article, or journal to retrieve the item's available services (such as full text or ILL)."
6. Tags link – Tags are not currently supported in a consortial environment; CARLI Recommends that I-Share institutions disable Tags in Primo VE.
7. Database Search link – Deactivated by default. Search for databases that have been enabled in Alma; includes auto-complete title searching feature.
8. Purchase Request link – Deactivated by default. The Purchase Request form is one of a variety of request forms available in Alma so that user can provide additional information when needed. It can be added to the Main Menu Links so that the option always displays and/or configured to display as a service on the Full Record page when a particular title is not held by your institution.
9. Collection Discovery link – Deactivated by default. Browse for collections that have been defined in Alma. Note that there are no collections by default or created during migration.
10. Newspapers link – Deactivated by default. Newspaper Search provides a dedicated index and search of newspaper collections that have been activated in Alma.
Add Custom Links to Banner
I-Share institutions can also Add custom links to the Links Menu using the "Add Link" option. Some common additions might be:
- Your Library website
- Your Institution website
- Course Reserves
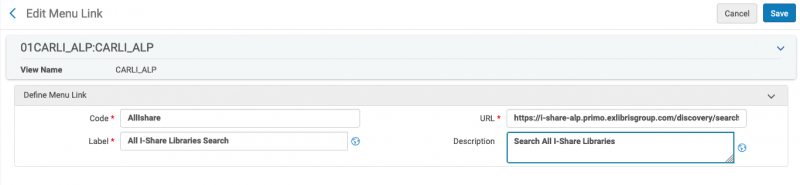
If you add a custom link in the banner to another Primo VE page that includes the View Code, you must change the colon (:) to %3A in the URL field or the link will not work properly. See examples below of the AllIShare link and the CourseReserves link.
To add an "All I-Share Libraries Search" Link - CARLI Required:
- All libraries must add a new link for the I-Share Catalog – clicking this link will pre-populate the search slot choice as "All I-Share Libraries" in the search box.
- Code: AllIShare
- URL: https://i-share-xxx.primo.exlibrisgroup.com/discovery/search?vid=01CARLI_XXX%3ACARLI_XXX&search_scope=NewDiscoveryNetwork
(where xxx is your institution's three-letter I-Share code in lowercase; and XXX is your three-letter I-Share code in UPPERCASE) - Label: All I-Share Libraries Search
- Description: Search All I-Share Libraries
- Ranking: This link must be one of the first six links so it is visible on the main Primo VE page on most standard monitors
To add a Course Reserves link:
- Clicking this link will pre-populate the search slot choice as "Course Reserves" (or whatever you choose to rename it)
- Code: CourseReserves
- URL: Use the following URL https://i-share-xxx.primo.exlibrisgroup.com/discovery/search?vid=01CARLI_XXX%3ACARLI_XXX&search_scope=CourseReserves
(where xxx is your institution's three-letter I-Share code in lowercase; and XXX is your three-letter I-Share code in UPPERCASE) - Label: Your choice (such as Course Reserves)
- Description: Your choice; this is the hover-over text users will see.
Search Profile Slots Tab

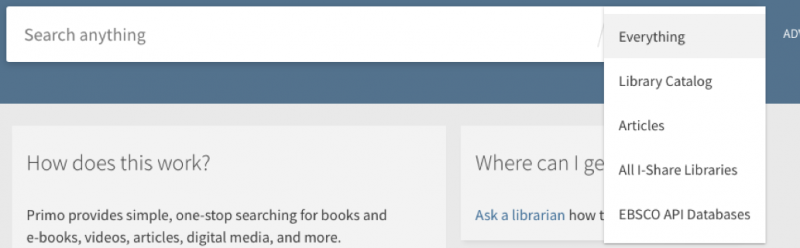
Search Profile Slots are the options that appear in the dropdown menu at the end of the search box.
Editing Search Profile Slots
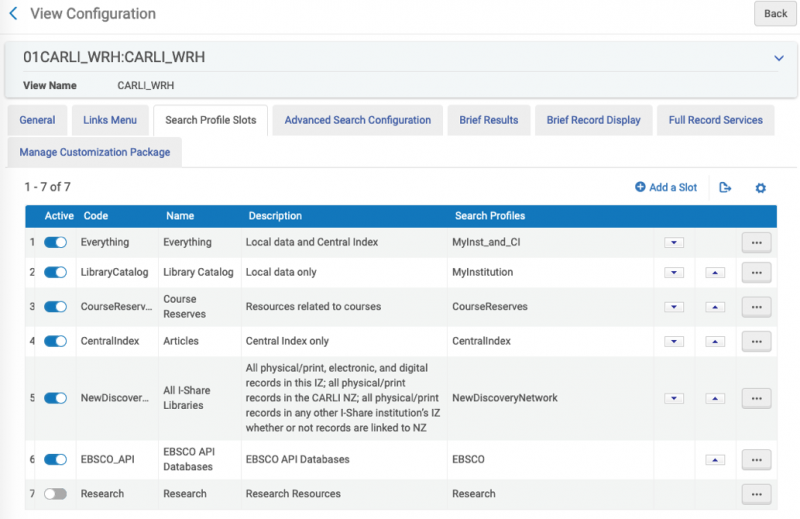
All I-Share institutions have been configured with the following Search Profile Slots (Names listed here):
- Everything – Blended search of all records belonging to your institution and your institution's Central Index Profile; can be renamed. However, the out-of-the-box "Everything" searches only records within your Institution Zone (IZ) and your Central Index profile. It does not include results from other I-Share institutions or CARLI-activated resources in the NZ! To edit the "Everything" search profile slot to truly search EVERYTHING, see the directions on the following page: Add I-Share Results to "Everything" Search in Primo VE
- Articles – Searches all records belonging to your institution's Central Index profile; can be renamed.
- Library Catalog – CARLI Recommended, but you may rename it. Searches all physical/print, electronic, and digital records in your Institution Zone (IZ).
- All I-Share Libraries – CARLI Required; do not rename or alter its configuration. Searches all physical/print, electronic, and digital records in this IZ; all physical/print records in the CARLI Network Zone (NZ); and all physical/print records in any other I-Share institution’s IZ whether or not records are linked to the NZ.
Some I-Share institutions have been configured with one or more of the following Search Profile Slots (Names listed here):
- Course Reserves
- EBSCO API Databases
- WorldCat API – Defined if credentials were provided on the Alma Configuration Form. Optional and may be renamed. This can be added later if desired.
CARLI Recommendations for Search Profile Slots
- I-Share institutions should test the Everything and Articles slots to determine if they want to present these options.
- If you wish the Everything slot to search the entire Discovery Network (everything in your IZ and the NZ and all other institutions' IZs), a new Search Profile will need to be created. If needed, contact CARLI for further information.
- I-Share institutions should test the EBSCO API Databases slot to see if your institution wants to present it to your users as a search slot or as part of a blended search. Review the known limitations of the EBSCO API search in Primo VE.
- Any Search Profile Slot other than one for your Library Catalog and the All I-Share Libraries slot may be disabled if your institution does not wish to use them.
- New Search Profiles Slots may be defined by your institution if desired.
Advanced Search Configuration Tab

More information about the Advanced Search Configuration tab
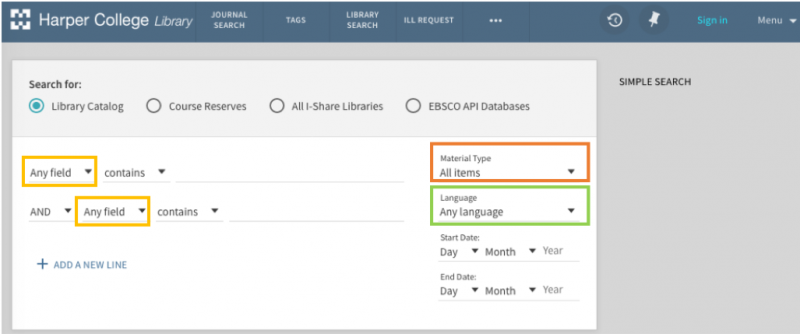
All I-Share institutions received default Alma configurations of Indexes, Resource Type, and Languages that can be used in the Advanced Search feature. These can be toggled on/off and new entries can be added.
- List of Indexes – The fields that appear in the Search Field drop-down list for advances searches (shown above with the default "Any field").
- List of Resource types – The resource types that appear in the Material Type drop-down list for advances searches (shown above with the default "All items").
- List of Languages – The languages that appear in the Language drop-down list for advances searches (shown above with the default "Any language").
Narrowing Search Results by Type
If you would like to have pre-defined filters for narrowing search results appear under the Simple Search box in Primo VE, you have two options: "Pre-filters" OR the Resource Type filter ribbon. You may not use both.
Pre-filters
Pre-filters for Resource Type and/or Search Type Field options are shown below and can be configured to be displayed beneath the Simple Search box by checking the appropriate "Enable for Basic Search" boxes on the Advanced Search Configuration Tab.
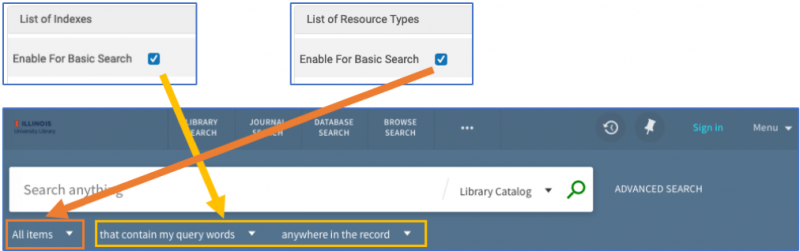
For more information on the "pre-filters".
Resource Type Filter Ribbon
The Resource Type Filter ribbon also allows users to filter their results by clicking on a resource type option. For each search profile slot, only enabled resources appear for basic searches, and their appearance is not dependent on whether the search results contain items matching that resource type. See the example of the Resource Type Filter ribbon below. This option may be configured under the Brief Results Tab in View Configuration.

Brief Results Tab
Brief Results are what users see after a successful search. This tab provides configuration options for faceting results, sorting results, and Dedup/FRBR settings of the results.
Facet configuration
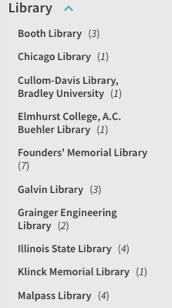
CARLI Recommends enabling the Institution facet (it is ON by default) to facilitate user access to materials at other I-Share libraries when doing an All I-Share Libraries search.
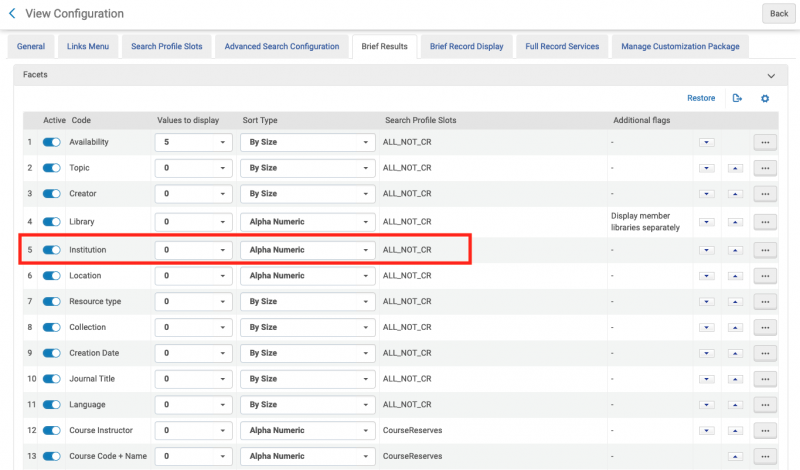
- The number of values to display in a facet heading by default; 0 means the facet is closed until clicked open by user.
- The order in which the facets appear in the column.
- The search profile slots results you want each type of facet to appear in.
sort options
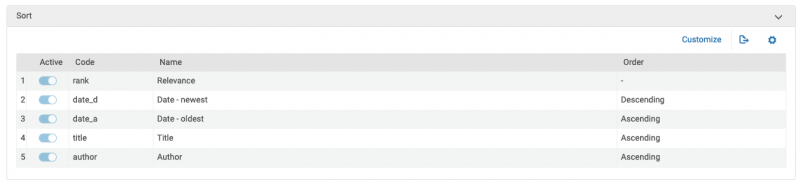
There are five options for the "Sort by" dropdown on the search results on Brief Results page.
Dedup and FRBR settings
CARLI Recommendations for these settings may be found on the following page: Primo VE Dedup and FRBR.

For more information, see the Ex Libris documentation on Dedup and FRBR settings.
Brief Record Display Tab
The Brief Record Display tab configures the information that displays for each record on the record's brief and full display pages.
This tab controls display of two things in the brief results list (search results page) and the top of the full record display page:
- The bibliographic record data displayed
- Default record data displayed are:
- Vernacular Title ; Title
- Creator ; Contributor
- Creation date
- Is Part Of
- Additional data can be included in the display if desired.
- Default record data displayed are:
- The record actions available to users
- Record Actions may have been chosen on the Alma Configuration Form but can be toggled on/off or reordered at any time.
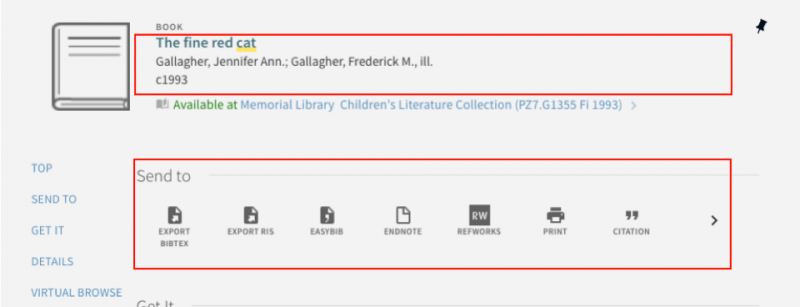
- Only three actions can be displayed on the brief results list (search results page); these are called "up-front actions." The "e-shelf--Add/Remove record to Favorites" option is on by default for the brief results list record actions and cannot be removed. You may choose two other options to appear for each record on the brief results list.
- Note: The actions are listed RIGHT TO LEFT based on the ranking of the enabled actions (i.e. the action ranked in position one will appear on the far RIGHT of the list).
Brief result list

Top of full record display page
Full Record Services Tab
This tab controls what is presented on the full record page — known as the Full Display Page — with the exception of the Brief Display and Record Actions ("Send to") sections, which are configured on the Brief Results Tab. The sections configurable on this tab are called Services.
There are 10 default Services (codes and descriptions shown below). Some of them can be further configured on this tab, but others must be configured elsewhere. Here you can adjust the order in which they appear on the Full Display Page.
1. searchWithinJournal - Configuring searching for articles within a journal.
2. quickAccess - Used with the Alma D Viewer. CARLI does not utilize Alma D, so this functionality will not be visible in Primo VE by default.
3. getit_link1 - View It/Get It/How to get it. Adding a General Electronic Service and Primo VE Delivery Services
4. details - Record details controls which bibliographic fields and other information will display. Configuring the Details Service and the list of Primo VE Default Display Fields
5. recommendations – Configuring Resource Recommender for Primo VE.
6. tags – Tags are currently not supported in consortial instance of Alma/Primo VE.
7. browseshelf - Virtual bookshelf carousel near the bottom of the Full Display Page.Configuring the Browse Shelf Service.
8. links – Additional links at the bottom of the Full Display Page. Toggle on/off link for displaying the MARC record in a new tab (Display Source Record) here. CARLI Recommends this be CHECKED/ON to start so library staff can easily see the underlying MARC record in Primo VE.
9. citationTrailAndTimesCited - Citation Trail and Times Cited.
10. moreFromTheSame - More From The Same Course/Collection. Configuring Course Reserves for Primo VE and Configuring Collection Discovery for Primo VE
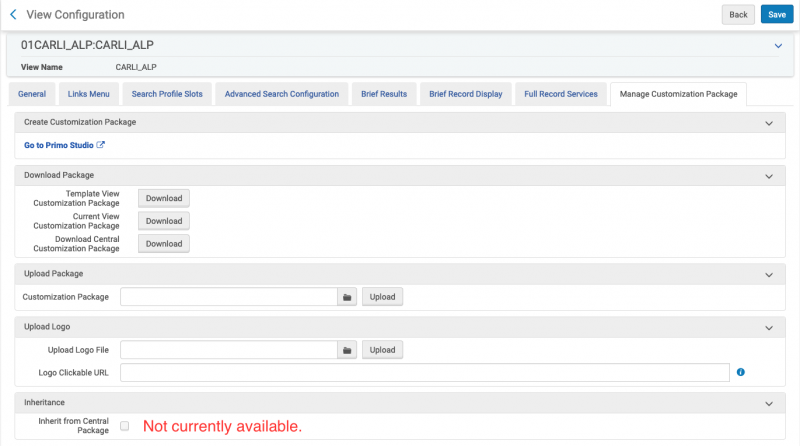
Manage Customization Package Tab
The Customization Package allows for both simple customizations like logo and colors, and advanced customizations like custom css and JavaScript.
Customizations you can make
Basic Customizations
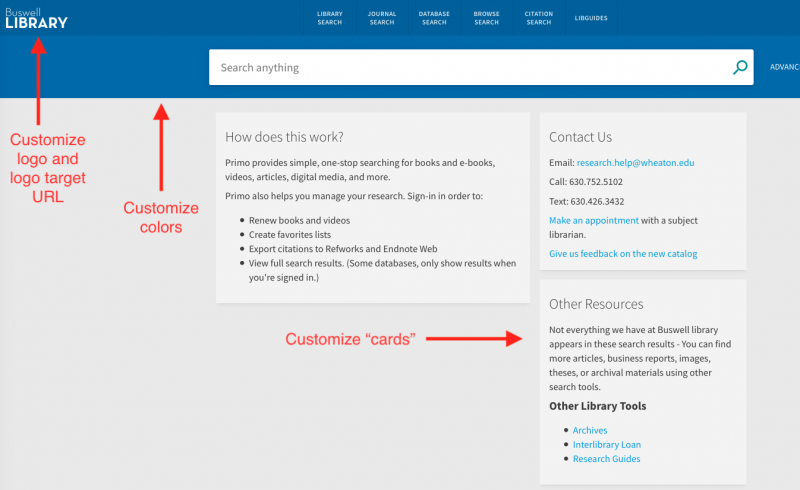
You can accomplish the following basic customizations by creating and uploading a new Customization Package in this Tab:
- Changing the colors of the site
- Changing the logo
- Editing the homepage cards found below the search box (edit the /html/homepage_en.html file)
- Changing the target URL of the clickable logo.
- Adding a custom favicon.ico.
- Adding a custom Help Page.
Advanced Customizations
Some more advanced customizations you can accomplish by creating and uploading a new Customization Package:
- Custom CSS
- Custom HTML
- Custom images and icons
- Custom JavaScript
- Add-ons developed and maintained by the Primo VE community (in Primo Studio only; see below)
- Primo VE Email Template (in Primo Studio only; see below)
CARLI Recommends watching the "Primo VE - Configuring the User Interface" video series (6 videos, 23 minutes total) before making customizations
Working with the customization package
Basic overview of how to work with a Customization Package:
- Download the Current View Customization Package .zip file from the Manage Customization Package Tab. The file will download as something like 01CARLI_EIU-CARLI_EIU.zip.
- If you are working with the customization package for the very first time, download the "Template View Customization Package" and rename the folder within the .zip file to the appropriate view name. If you are keeping the name as the current view (i.e. editing the default view rather than creating a new one), the name would be: 01CARLI_XXX-CARLI_XXX (where XXX is your three-letter I-Share code in UPPERCASE). Once you edit the template and upload a customization package, the download button for "Current View Customization Package" will then be available.
- Unzip the .zip file to your PC. For example, the .zip file in step 1 above would unzip to a folder named 01CARLI_EIU-CARLI_EIU.
- Make changes to its contents, either manually or through Primo Studio, and save the changes to the file of the Customization Package on your PC.
- Zip the folder back up into a single .zip file (For Windows users, it is recommended that you use a compression tool such as 7zip or Winrar instead of Windows Send to > Compress folder to avoid upload errors). Make sure that the .zip file name is the same as the View.
- Upload the edited Customization Package .zip file to the Manage Customization Package Tab.
- Changes take effect immediately.
- Users on Mac computers may have issues with hidden .DS_store files being added to their customization packages. This will prevent the customization package from being successfully uploaded in Alma. To zip the package and remove the .DS_store files from a customization package on a Mac:
- Open the Terminal application under Applications > Utilities.
- Move to the parent directory of the folder that you want to compress. For example:
cd /Users/<user name>/<parent folder> - Enter the following command to compress the file:
zip –r <target file>.zip <My_View> -x "*.DS_Store"
using primo studio for customizations
You may use Primo Studio to customize some of these options in a WYSIWYG (What You See Is What You Get) editor and save changes to an existing Customization Package.
Easily View Primo VE Without Your Customizations
If you would like to view your Primo VE instance without all customizations you loaded using the Customization Package, add &noCustomization=true to your Primo VE URL. This can be useful when troubleshooting issues with customizations you have made. This has no effect on the customizations as they're seen by other users and applies only to the current browser session.
An example of the URL differences:
- Southern Illinois University at Carbondale's current Primo VE instance: https://i-share-sic.primo.exlibrisgroup.com/discovery/search?vid=01CARLI_SIC:CARLI_SIC
- Using the code, Southern Illinois University at Carbondale's non-customized Primo VE instance: https://i-share-sic.primo.exlibrisgroup.com/discovery/search?vid=01CARLI_SIC:CARLI_SIC&noCustomization=true
The non-customized page will remain throughout your session, including on brief and full results pages, and when using advanced search and various search scopes and menu links. (Original source: Ex Libris Knowledge Article.)
Inheritance
CARLI does not currently have a shared Central Package to distribute from the Network Zone.
Create Primo VE Search Boxes for your Website
This is not a customization you can make to Primo VE in Alma. Rather, this is information on how to add specific code to your own library website to create a basic search box for Primo VE.
Create a search box for your website
Ex Libris documentation describes how to create a search box on your own library website that searches Primo VE. There is an example of the code used for creating the search box at the bottom of this section. The following chart provides the details I-Share institutions will need:
| Parameter | Example or Description |
| host_name |
i-share-xxx.primo.exlibrisgroup.com (where xxx is your institution’s three-letter I-Share code in lowercase) |
| inst_code:view_code |
01CARLI_XXX:CARLI_XXX By default, the view_code is 01CARLI_XXX:CARLI_XXX (where XXX is your three-letter I-Share code in UPPPERCASE). The inst_code will always be 01CARLI_XXX Note: If you have created other Views that you'd like to use instead, the view_code will be different. Look for the code information in: Alma > Discovery > Configure Views > Code |
| tab_code |
Defaults created by Ex Libris are: Everything (for your local catalog + CDI) If you created a custom Search Profile Slot that you'd like to use instead, look for the code information in: Alma > Discovery > Configure Views > Search Profile Slots > Code |
| scope_name |
Defaults created by Ex Libris are: MyInst_and_CI (for your local catalog + CDI) If you created a custom Search Profile that you'd like to use instead, look for the code to use as the scope_name in: Alma > Discovery > Search Profiles > Code |
Example of search box code
This example has been adapted from the Ex Libris-provided documentation to highlight where to adjust I-Share institution-specific parameters.
In the example code below, EIU parameters are shown highlighted in bright yellow for a search using the default Library Catalog search scope. Make adjustments for your institution as described in the above table. You may further adjust the characteristics of the search button, if desired, by editing values in the Search Button section (color, button size, text), or you may adjust the entire box using other HTML (not demonstrated here). Consult with local web development staff at your institution as needed.
You will need to paste both of these two sections of code into your webpage to create a basic Primo VE search box. Some Content Management Systems may have a particular place or way that you will need to insert JavaScript code (the code within the <script> tags). The search box and button (the code within the <form> tags) should be placed typically in the body of the page where you want the box to appear.
Note: Be sure to consult the Ex Libris-provided documentation "Creating a Search Box with Deep Links to Primo VE" if you will have more than one search box of any kind on a single HTML page. You must define separate functions and forms for each search box. The details that you must make unique in your code are highlighted in red text on the Ex Libris page.
Replace the yellow-highlighted sections with your own I-Share institution-specific parameters:
<!-- Script that converts the query string into valid parameter -->
<script type="text/javascript">
function searchPrimo() {
document.getElementById("primoQuery").value = "any,contains," + document.getElementById("primoQueryTemp").value.replace(/[,]/g, " ");
document.forms["searchForm"].submit();
}
</script>
<form id="simple" name="searchForm" method="get" target="_self" action="https://i-share-eiu.primo.exlibrisgroup.com/discovery/search" enctype="application/x-www-form-urlencoded; charset=utf-8" onsubmit="searchPrimo()">
<!-- Customizable Parameters -->
<input type="hidden" name="vid" value="01CARLI_EIU:CARLI_EIU">
<input type="hidden" name="tab" value="LibraryCatalog">
<input type="hidden" name="search_scope" value="MyInstitution">
<input type="hidden" name="mode" value="basic">
<!-- Fixed parameters -->
<input type="hidden" name="displayMode" value="full">
<input type="hidden" name="bulkSize" value="10">
<input type="hidden" name="highlight" value="true">
<input type="hidden" name="dum" value="true">
<input type="hidden" name="query" id="primoQuery">
<input type="hidden" name="displayField" value="all">
<!-- Enable this if "Expand My Results" is enabled by default in Views Wizard -->
<input type="hidden" name="pcAvailabiltyMode" value="true">
<input type="text" id="primoQueryTemp" value="" size="35">
<!-- Search Button -->
<input id="go" title="Search" onclick="searchPrimo()" type="button" value="Search" alt="Search" style="height: 22px; font-size: 12px; font-weight: bold; background: #DE6E17; color: #ffffff; border: 1px solid;">
</form>
Resulting search box for EIU's Library Catalog search scope:
Create Links to Primo VE for Your Website (Links to Login page, Direct Search, etc.)
These are not customizations you can make to Primo VE in Alma. This is information on how to add specific code to your own library website to create various links into Primo VE, such as a basic search link, a link to log into Primo VE, or a link to an item's full display page within Primo VE.
Direct URLs to primo ve pages (My Library Card, Login page, Full Display)
Direct URL links to specific Primo VE pages can also be added to your library website. The following information provides different options (taken from Ex Libris developer's network page Deep Links - New UI).
The following chart provides the details I-Share institutions will need:
| Parameter | Example or Description |
| host_name |
i-share-xxx.primo.exlibrisgroup.com (where xxx is your institution’s three-letter I-Share code in lowercase) |
| inst_code:view_code |
01CARLI_XXX:CARLI_XXX By default, the view_code is 01CARLI_XXX:CARLI_XXX (where XXX is your three-letter I-Share code in UPPPERCASE). The inst_code will always be 01CARLI_XXX Note: If you have created other Views that you'd like to use instead, the view_code will be different. Look for the code information in: Alma > Discovery > Configure Views > Code |
| search_slot_code |
Defaults created by Ex Libris are: Everything (for your local catalog + CDI) If you created a custom Search Profile Slot that you'd like to use instead, look for the code information in: Alma > Discovery > Configure Views > Search Profile Slots > Code |
| search_profile_code |
Defaults created by Ex Libris are: MyInst_and_CI (for your local catalog + CDI) If you created a custom Search Profile that you'd like to use instead, look for the code to use as the scope_name in: Alma > Discovery > Search Profiles > Code |
My Library Card
To create a link to the Primo VE "My Library Card", use the following codes, where you need to insert your institution's host name and view code.
URL template:
https://i-share-xxx.primo.exlibrisgroup.com/discovery/account?vid=institution_code:view_code
Example URL customized to go to My Library Card for ADL:
https://i-share-adl.primo.exlibrisgroup.com/discovery/account?vid=01CARLI_ADL:CARLI_ADL
Primo VE Login
To create a link to the Primo VE "Login" link, use the following codes, where you need to insert your institution's host name and view code.
URL template:
https://i-share-xxx.primo.exlibrisgroup.com/discovery/login?vid=institution_code:view_code
Example URL customized to go to the Primo VE login page for NPU:
https://i-share-npu.primo.exlibrisgroup.com/discovery/login?vid=01CARLI_NPU:CARLI_NPU
Full Display of Item Record
To create a link to the full record of an item, you'll need the home name, view code, and also additional information, including the doc_id for the item, the code of the search profile, and the code for the search slot.
URL template:
https://i-share-xxx.primo.exlibrisgroup.com/discovery/fulldisplay?docid=doc_id&context=L&vid=institution_code:view_code&lang=en&search_scope=search_profile_code&tab=search_slot_code
Example URL customized to go to the Full Display of Alma record with MMS ID 991025503405851 for JUD:
https://i-share-jud.primo.exlibrisgroup.com/discovery/fulldisplay?docid=alma991025503405851&context=L&vid=01CARLI_JUD:CARLI_JUD&lang=en&search_scope=MyInst_and_CI&tab=Everything
Note: The "doc_id" is typically the Alma MMS ID prefixed by "alma". It can be found on the record in Alma, or at the end of the permalink for the item in Primo VE.
Journal Search
To create a link to the Journal Search page, you'll need the home name, view code, and also additional information, including the doc_id for the item, the code of the search profile, and the code for the search slot.
URL template:
https://i-share-xxx.primo.exlibrisgroup.com/discovery/jsearch?&vid=institution_code:view_code
Example URL customized to go to the Journal Search page for WHE:
https://i-share-whe.primo.exlibrisgroup.com/discovery/jsearch?&vid=01CARLI_WHE:CARLI_WHE
Link directly into Primo VE with a search scope pre-selected
You can also create a link directly into Primo VE with one of the search scopes pre-selected, such as Course Reserves or the local library catalog.
URL template:
https://i-share-xxx.primo.exlibrisgroup.com/discovery/search?vid=institution_code:view_code&search_scope=search_profile_code&tab=search_slot_code
Below are examples using the four default search scope provided by Ex Libris. If you have created custom search scopes, see the chart above for information on where to find the codes.
Everything:
https://i-share-xxx.primo.exlibrisgroup.com/discovery/search?vid=01CARLI_XXX:CARLI_XXX&search_scope=MyInst_and_CI&tab=Everything
Library Catalog:
https://i-share-xxx.primo.exlibrisgroup.com/discovery/search?vid=01CARLI_XXX:CARLI_XXX&search_scope=MyInstitution&tab=LibraryCatalog
All I-Share Catalog:
https://i-share-xxx.primo.exlibrisgroup.com/discovery/search?vid=01CARLI_XXX:CARLI_XXX&search_scope=NewDiscoveryNetwork&tab=NewDiscoveryNetwork
Course Reserves:
https://i-share-xxx.primo.exlibrisgroup.com/discovery/search?vid=01CARLI_XXX:CARLI_XXX&search_scope=CourseReserves&tab=CourseReserves
URLs for Pre-Defined Basic OR Advanced Searches
To create a URL to pre-defined search results--either basic results or advanced search results--you will need to know the search parameters. First, perform either a basic or advanced search within Primo VE and check to make sure the results are what you are expecting. Then, use the search parameters from the resulting URL of the search results to construct the links as described below.
Basic Search
URL template:
https://i-share-xxx.primo.exlibrisgroup.com/discovery/search?query=any,contains,search_term&tab=search_slot_code&search_scope=search_profile_code&vid=institution_code:view_code
Example URL customized for TIU that performs a Basic search for the word "cat" in the "Everything" search scope:
https://i-share-tiu.primo.exlibrisgroup.com/discovery/search?query=any,contains,cat&tab=Everything&search_scope=MyInst_and_CI&vid=01CARLI_TIU:CARLI_TIU
Advanced Search
URL template:
https://i-share-xxx.primo.exlibrisgroup.com/discovery/search?query=any,contains,history,AND&query=creator,contains,David,AND&pfilter=lang,exact,eng,AND&tab=search_slot_code&search_scope=search_profile_code&vid=institution_code:view_code&mode=advanced
Example URL customized for AUG that performs an Advanced search in any field for the word "space" and the author/creator field for "clarke" with material type = books:
https://i-share-aug.primo.exlibrisgroup.com/discovery/search?query=any,contains,space,AND&query=creator,contains,clarke,AND&pfilter=rtype,exact,books,AND&tab=Everything&search_scope=MyInst_and_CI&vid=01CARLI_AUG:CARLI_AUG&mode=advanced