How to: Using Work Orders in Alma
Last Updated 10/23/2023
A work order is an internal library request, which routes physical materials to a specific library department for internal processing by library staff. When an item is sent to a department by a work order, Alma marks the item as not available on the shelf. Staff can then also track the material using staff-assigned statuses.
Examples of Work Orders
It can help to think of work orders as “areas” or “carts” that would have existed in your library’s physical space, where historically it’s been a little difficult to track when an item is in that location. Often, in Voyager, you would have checked the material out to a “pseudo-patron” to keep track of it, and make it appear not available to patrons.
Example work orders courtesy of Oakton Community College:
- Acquisitions work order that first has the status of Copy Cataloging and then a status of Physical Processing as an item is prepared to be shelf-ready.
- Review work order that has the statuses: Sent to Bindery, On Hold, Order Replacement, Reviewing, and Save Bib Record.
Setting up Work Orders: Work Order Structures
There are two primary structures for setting up work orders in Alma, and four possible component parts to the set up. Your institution can use a combination of these structures as needed at your institution.
For example, perhaps you want your Circulation Review work order to be processed at your circulation desk, but your Mending work orders to be processed through a standalone Mending department.
Structure 1: Processing work order materials at a standalone department.
Use this structure if you need to transit books to a separate department for processing.
Structure 1 uses ONLY these components:
- Work Order Type
- Work Order Department
- Work Order Statuses
Structure 2: Processing work order materials at an already-existing library circulation desk.
Follow this scenario if you are primarily using the status to remove the item from circulation but don’t need to transit it to another department.
Structure 2 uses ONLY these components:
- Work Order Type
- Work Order Statuses
- Associate Work Order with Circulation Desk
- Note: You will need to delete an auto-created-by-Alma Work Order Department as part of the set-up steps; details will be included in the set-up steps.
After determining the structure of your work order department, the direction for setting up the necessary components are detailed below.
Setting up Work Orders: Components
Work Order Type
A work order type indicates the type of library process to be carried out on a physical resource, such as binding, mending, cataloging, interlibrary loan lending (outside I-Share), or digitization.
Set the case of the new code to match that of the other codes already in use by your other work order types already in use- for example, all caps, all lowercase, or title
- In Alma Configuration at the institutional level, under General> Work Orders and Departments select Work Order Types.
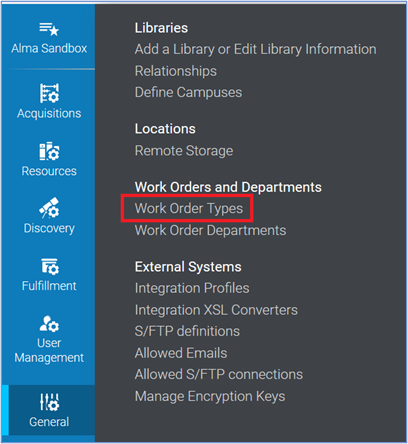
- This will open the list of work order types at your institution. Select the option to Add Work Order Type.
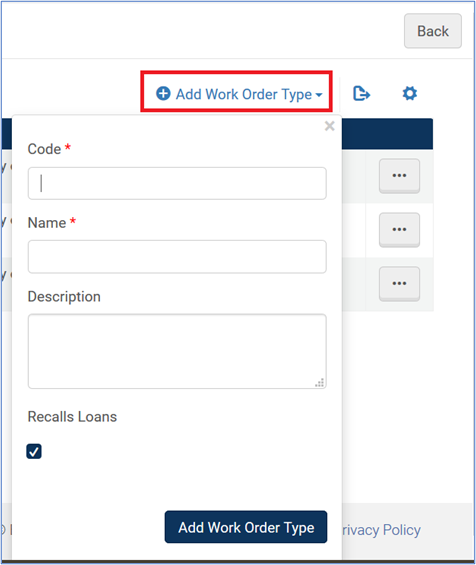
- This will open a form to create the new work order type; enter the work order type information as follows:
- Code: Enter a code to represent the work order type.
- Name: Enter a name for the work order type.
This name may occasionally display to patrons.
If you envision using this work order type for tasks in addition to recalls, you will want to choose a more-encompassing/broader name.
Example names for work order types include: Acquisitions, Circulation Review, Cataloging Review, Library Use, Material Recall, etc.
- Description: Enter a brief description for the work order type.
- Recalls Loans: Check the check box if you are using the work order to recall an item. See How to Place Recalls for more information.
- Select the Add Work Order Type button and note that your work order type is added to the list.
Work Order Departments
A department is an area of a library that handles a work order, such as receiving purchased material, binding, fixing worn items, or managing recalled material.
If you are planning to use an existing circulation desk as the work order department, you will need to delete the auto-added-by-Alma default work order department after you complete your setup. The steps to do so will be repeated for you in the appropriate section.
- Select the ellipsis for your new work order type, and then choose Manage Departments.

- This will open the Department List. Select the option to Add Department.
- This will open the four-part Department Details wizard to create the new work order department.
On page one of the wizard, enter the work order department information as follows:
- Code: Enter a code for the work order department.
-
Name: Enter the name for the work order department.
This name is what library staff will select when switching their location in Alma to the work order department to process materials for the associated workflows.
This is also the name that will display when assigning material to a work order.
This name may occasionally display to patrons.
If you envision using this work order department for tasks in addition to recalls, you will want to choose a more-encompassing/broader name.
Example work order department names for the recall process include: Circulation Review, Fulfillment Processing, Library Staff Review, Technical Processing, etc.
- Description: Enter a brief description of the work order department.
- Work Time (days): The number of days used to calculate the expiration date that appears on the Resource Request Monitoring page for the item being processed.
If the field is left blank or set to 0, Alma will use a default of 7 days.
- Default Printer: If you want routing slips to print, select a printer.
The printer must be configured at the institution level.
Note: Routing slips are not consistently printing for work orders.
-
After filling in the values on the first page of the setup wizard, select the Next button.
-
Page 2 of the wizard is for the Served Libraries. If all of the libraries at your institution can use the work order department, verify that your institution name is listed, and select the Next button. You can also attach the department to a particular library.

-
Page 3 of the wizard is the department’s Contact Information. Enter the address, phone number, and email address that should be used for the department and select the Next button.
-
Page 4 of the wizard is where you can add the library staff members who can process materials in this work order department. Select the option to Add operators for the department.
The operators you add to the list receive the Work Order Operator role for the department.
Note: if you are one of the operators, you must log out of Alma and log back in before using the department.
-
Select the Save button to complete the wizard and note that your work order department is added to the list.
Work Order Statuses
A work order status represents a specific task that makes up the work order type, as managed by the work order department. Each status represents a step in the process performed by library staff, to help track the item’s whereabouts while being worked on in the department. For example, a Mending work order type could include the Work order statuses of gluing, sewing, rebinding, photocopy page request, erasing, etc.
-
Under General> Work Orders and Departments> select Work Order Types.
- For your new work order type, select the ellipsis> Manage Statuses.
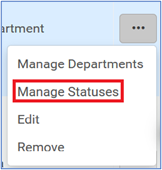
- This will open the Work Order Type Statuses List. Select the option to Add Status.
- This will open a form to create the new work order status; enter the work order status information as follows:
Example work order status names include: Copy cataloging, Binding, Mending, Recalled from patron, etc.

- Code: Enter a code to represent the status.
- Name: Enter a name for the status.
-
Select the Add Status button and note that your work order status is added to the list.
Associating a Work Order with a Circulation Desk
After you have created a work order type and work order statuses, you can associate them with your circulation desk as the work order department. Do not follow these steps if you have created a separate work order department.
- At the top of the Alma Configuration screen, switch to configuring the library where the work order department should be associated.
- Select Fulfillment> Library Management> Circulation Desks.
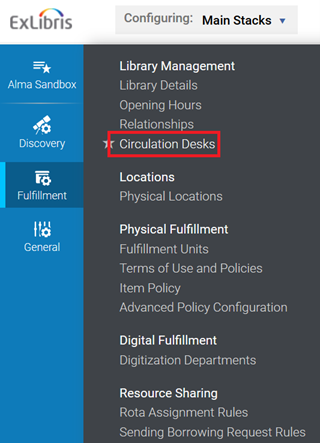
This will open the Circulation Desks List.
- Locate the circulation desk you would like to associate with the work order in the list.
- For that desk, select the ellipsis> Edit.
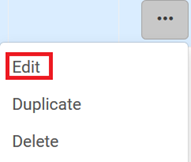
This will open the Circulation Desk information tabs.
- Select the Work Order Types tab.

- Select Add work order.
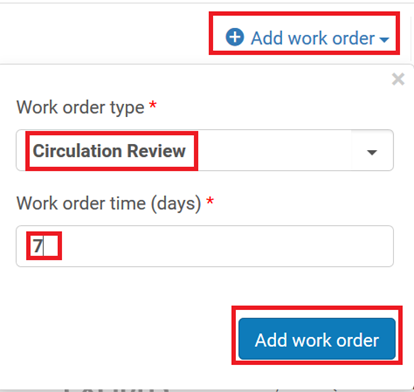
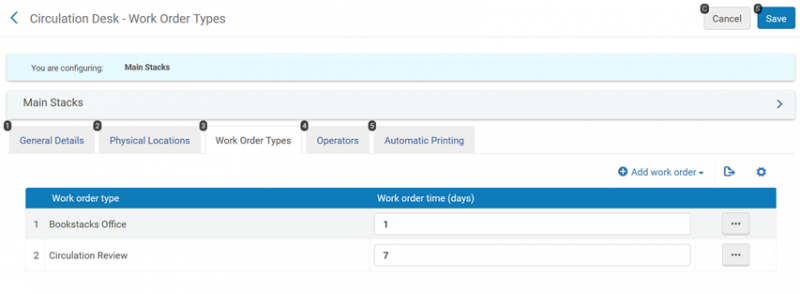
- Enter the work order type as follows:
- Work order type: Select the work order type from the list.
- Work order time (days): Enter the amount of time in days that you expect the processing to take.
- Select the Add work order button.
- Save the Circulation Desk’s settings.
- Alma may automatically create a default Work Order department that you do not need, since you want to process the Work Order workflows through your circulation desk.
Here are the steps to delete the auto-created Work Order department:- In Configuration at the Institutional Level> General> Work Orders and Departments> open Work Order Departments.
- Notice that there may be a new Work Order Department named after the circulation-desk associated "Work Order Type" that you created in the earlier steps. This auto-created Work Order Department will include the word "Default" in the name.
- Use the ellipsis button to Delete the auto-created Work Order Department.
Using Work Orders
After you have work orders set up in Alma, you can use them to assign statuses to items. Once an item has a work order status applied, you can scan it into the work order department and scan it when you are done processing it.
Assigning Work Order Statuses to Physical Items
To assign a work order status to a physical item, you must have a Physical Inventory Operator or Physical Inventory Operator – Extended role.
To assign a work order status to an item:
- Do a Physical Items search for the item for which you need assign a status.
- Locate the item in the search results and select the ellipsis> Work Order
- If you do not have the Work Order button, double-check that you have the Work Order Operator role, scoped to the appropriate work order department.
- If you still do not have the Work Order button, double-check that your search was a Physical Items search.
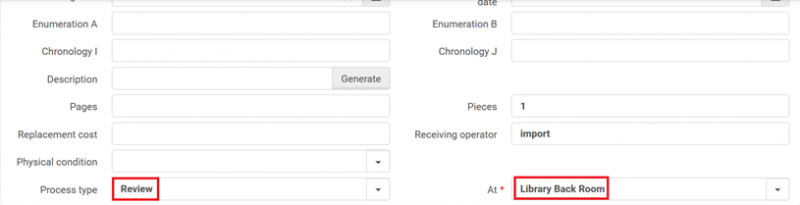
- This will open the Place Item in Process page.
- Select the appropriate Process Type (aka Work Order Type) and Managing Department (aka Work Order Department).
- Check the checkbox for Do not pick from shelf if appropriate.
- You may add a note if desired; this note might display to patrons.
- Select the Submit button.
Alma then assigns the work order status to the item.
If the work order department is set up to place a recall on that item, that recall will now be placed and Alma will send the user the “Loan Status Notice” letter, if enabled at your institution.
Alma does NOT modify/shorten the user’s due date for the recalled item. However, you can change the date manually.
Specifying a Work Order Type When You Edit an Item
When you edit an item, you can choose a work order type and department for the item as part of the item record.
- Perform a physical item search for the item.
- Select the ellipsis> Edit Item.
- In the Process type field, select the work order type.
- Adjust the work order department in the At field as needed.
Adding Items to the Work Order Type in Batch
You can add items to the work order type via running a job. First create the set:
- Select Admin> Manage Sets.
- Select Create Itemized Set.

- Enter the information about the set:
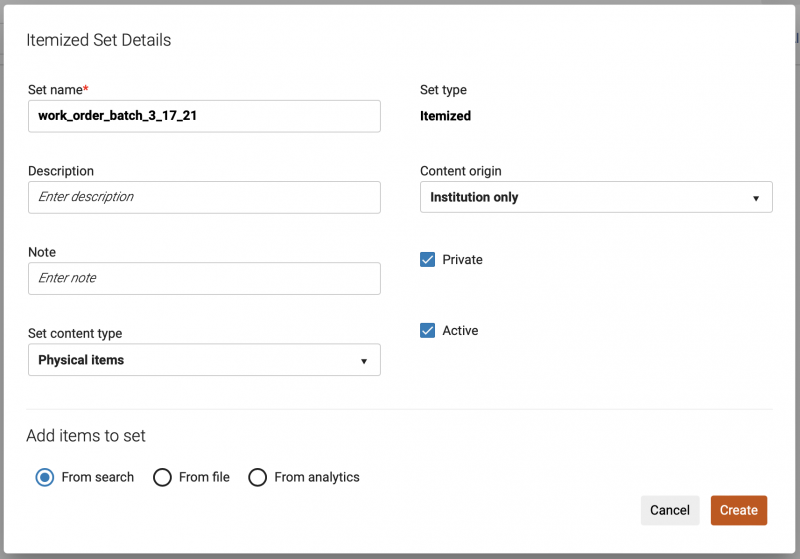
- Set name: Enter the name of the set.
- Set content type: Choose Physical Items.
- Under Add Members to Set, select From search.
- Click Create. The Repository Search screen with appear.
- Perform a Physical Items search for the item.
- Select the item and select Add Selected.

- Repeat steps 6 and 7 until all items in the set are selected.
- Select Done.
Then run the job:
- Select Admin> Run a Job.
- Search in the Name field for work order.
- Select Create physical items work orders.

- Select Next.
- Select the set.
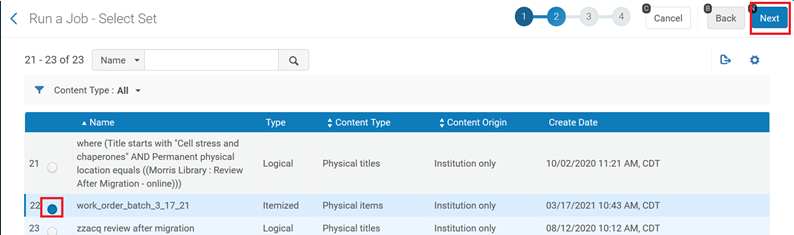
- Select Next.
- Enter the job parameters:

- Work Order Type: Select the work order type.
- Department: Select the department in which the work order is performed.
- Do not pick from shelf: Select this box if you have the item in hand.
- Select Next.
- Confirm the job details and select Submit.
The job starts to run. Select Refresh to view its current status.
- Select the History tab and select the ellipse> Report to view the job report.
The items are now added to the work order type.
Scanning Items into the Stand-Alone Work Order Department
To scan items into the work order department, you need to select the work order department as your location. To do so, you must be authorized as an operator for that department in the Work Order Department definition.
To scan items into the work order department:
- Select the work order department by selecting it from the list that displays when you select the location icon in the upper-right-hand side of the main Alma page.

- Select Fulfillment> Scan In Items.
- Fill out the Scan In Items page:
- Automatically print slip: This setting works only when you select Done.
- Set Status To: Select the appropriate status from the list.
- Done: Leave it set to No.
- Scan item barcode: Scan in the item’s barcode.
- OK: Select the OK button after the Scan item barcode field.
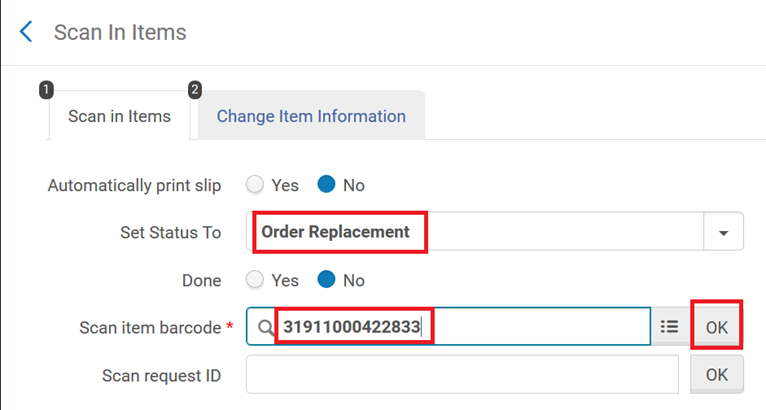
Changing the Work Order Status on an Item in a Stand-Alone Work Order Department
To change the work order status:
- Select the work order department by selecting it from the list that displays when you select the location icon in the upper-right-hand side of the main Alma page.
- Select Fulfillment> Scan In Items.
- Fill out the Scan In Items page:
- Automatically print slip: This setting works only when you select Done.
- Set Status To: Select the appropriate status from the list.
- Done: Leave it set to No.
- Scan item barcode: Scan in the item’s barcode.
- OK: Select the OK button after the Scan item barcode field.
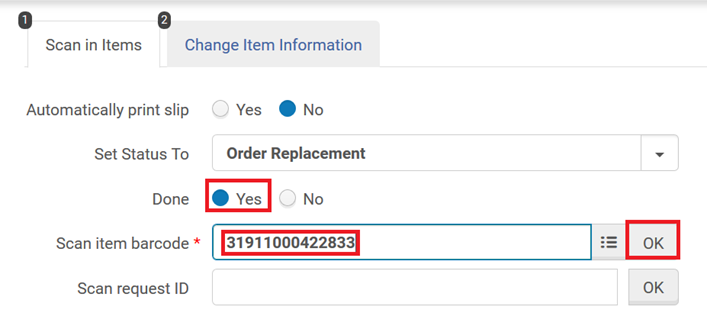
Scanning Items Out of the Stand-Alone Work Order Department
To scan items out of the work order department, you need to select the work order department as your location. To do so, you must be authorized as an operator for that department in the Work Order Department definition.
To scan items out of the work order department:
- Select the work order department by selecting it from the list that displays when you select the location icon in the upper-right-hand side of the main Alma page.
-
Select Fulfillment> Scan In Items.
- Fill out the Scan In Items page:
- Automatically print slip: This setting works only when you select Done.
- Set Status To: Select the appropriate status from the list.
- Done: Set to Yes.
- Scan item barcode: Scan in the item’s barcode.
- OK: Select the OK button after the Scan item barcode field.
- The item’s Request/Process Type changes to Transit for Reshelving.
To mark an item as done:
- Select Fulfillment> Manage in Process Items.
- Select an item and select Done.
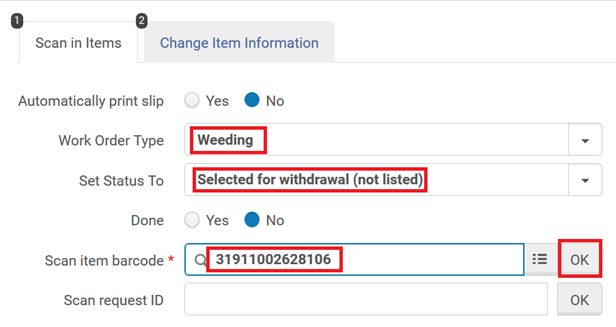
Scanning Items into a Circulation-Desk Managed Work Order Department
When you scan work-order items into a circulation desk, you don’t need to log into a separate department.
- Verify that your location in Alma is the circulation desk to which you added the work order.
- Select Fulfillment> Scan In Items.
- Fill out the Scan In Items form:
- Automatically print slip: This setting works only when you select Done as Yes.
- Work Order Type: Select the appropriate work order type.
- Set Status To: Select the appropriate status from the list.
- Done: Set this as No.
- Scan item barcode: Scan in the item’s barcode.
- OK: Select the OK button after the Scan item barcode field.
Changing the Work Order Status on an Item in a Circulation-Desk Managed Work Order Department
To change the item status:
- Verify that your location in Alma is the circulation desk to which you added the work order.
- Select Fulfillment> Scan In Items.
- Fill out the Scan In Items form:
- Automatically print slip: This setting works only when you select Done as Yes.
- Work Order Type: Select the appropriate work order type.
- Set Status To: Select the appropriate status from the list.
- Done: Set this as No.
- Scan item barcode: Scan in the item’s barcode.
- OK: Select the OK button after the Scan item barcode field.
Scanning Items out of a Circulation-Desk Managed Work Order Department
When you have finished processing the item, you then can scan the item out of the work order department.
- Verify that your location in Alma is the circulation desk to which you added the work order.
- Select Fulfillment> Scan In Items.
- Fill out the Scan In Items form:
- Automatically print slip: Select this setting to print a routing slip. This setting works only when you select Done as Yes.
- Work Order Type: Select the appropriate work order type.
- Set Status To: Select the appropriate status from the list.
- Done: Set this as Yes.
- Scan item barcode: Scan in the item’s barcode.
- OK: Select the OK button after the Scan item barcode field.
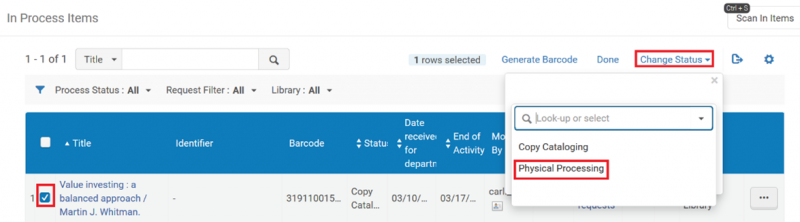
Managing Statuses Within the In Process Items Area
You can also assign or change statuses within the In Process Items area. You must have the Work Order Operator role assigned to you. You can access the In Process Items area from within a work order department or from a circulation desk with work orders specified.
To change a status:
- Select Fulfillment> Manage in Process Items.
- Select an item and select Change Status.